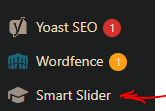
In the admin panel, on the left side there is now an option called “smart slider”.
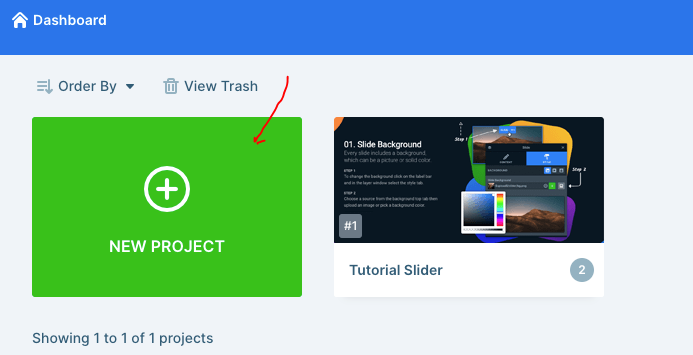
When going into there you can select – “dashboard” from the side-menu that appears and then select to create a “new project”.
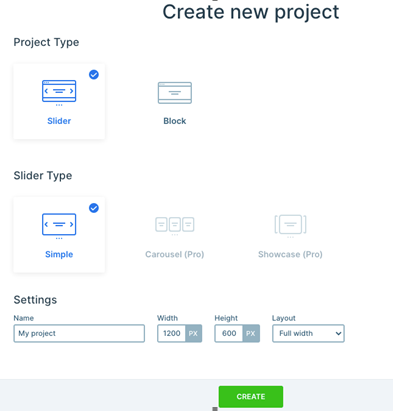
When creating a new project you can give that slider a specific name etc if you want to
The project type you’d likely want to use is slider and slider type simple, you’d probably want the name to be a reference to the post it is for.
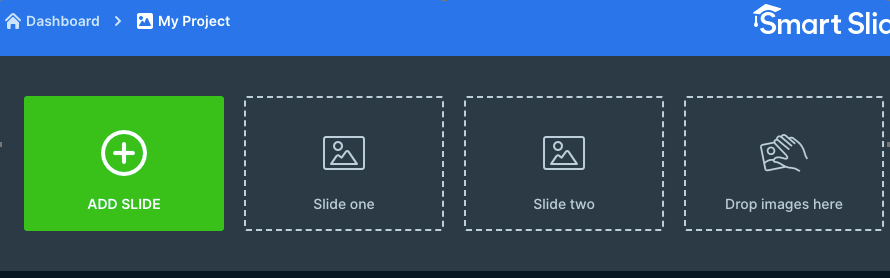
When you add a slide, you can select image which will give you a prompt to add an image from the media library.
Once it’s been set up you need to add the shortcode in the blog editor section and it should populate itself on the frontend, this slider in the example was given an ID of 2, so you’d add [smartslider3 slider=”2”]
The idea of technical SEO is to minimise the work of bots when they come to your website to index it on Google and Bing. Look at the build, the crawl and the rendering of the site.
To get started:
Crawl with Screaming Frog with “Text” Rendering – check all the structured data options so you can check schema (under Configuration – Spider – Extraction)
Crawl site with Screaming Frog with “JavaScript” rendering also in a separate or second crawl
Don’t crawl the sitemap.xml
This allows you to compare the JS and HTML crawls to see if JS rendering is required to generate links, copy etc.
Download the sitemap.xml – import into Excel – you can then check sitemap URLs vs crawl URLs.
Check “Issues” report under Bulk Export menu for both crawls
Also download or copy and paste sitemap URLs into Screaming Frog in list mode – check they all result in 200 status
*Great for tailoring copy and pages. Just turn it on and add query parameter
Summary:
– Perform a crawl with Screaming Frog – In Configuration – Crawl – Rendering – Crawl once with Text only and once with JavaScript
Check indexation with site: searches including:
site:example.com -inurl:www
site:*.example.com -inurl:www
site:example.com -inurl:https
– Search screaming frog crawl – for “http:” on the “internal” tab – to find any unsecure URLs
*Use a chrome plug in to disable JS and CSS*
Check pages with JS and CSS disabled – Are all the page elements visible? Do Links work?
Configuration Checks
Check all the prefixes – http, https and www redirect (301) to protocol your using – e.g. https://www.
Does trailing slash added to URL redirect back to original URL structure?
Is there a 404 page?
Robots & Sitemap
Is Robots.txt present?
Is sitemap.xml present? (and in the sitemap)
Is Sitemap Submitted in S.C.?
X-robots present?
Are all the sitemaps naming conventions in lower case?
Are the URLs correct in the sitemap – correct domain and correct URL structure?
Do sitemap URLs all 200? (including images) List Mode in Screaming Frog – “Upload” – Download sitemap – “ok”
For site migrations check – Old sitemap and Crawl Vs New – For example, Magento 1 website sitemap vs Magento 2 – anything missing or added – what are status codes?
– Status Codes – any 404s or redirects in SCreaming Frog crawl?
Rendering Check – Screaming Frog – also check pages with JS and CSS disable. Check links are present and work
Are HTML Links and H1s in the rendered HTML – check URL Inspection in Search Console or Mobile Friendly text?
Do pages work with JS disabled – links and images visible etc?
What hreflang links are present on the site?
Schema – Check all schema reports in Screaming Frog for errors
Sitemap Checks Are crawl URLs missing from the sitemap? (check sitemap Vs crawl URLs that 200 and are “indexable”
Site: scrape How many pages are indexed?
Do all the scraped URLs result in a 200 status code?
H1s Are any duplicate H1s? Are any pages missing H1s? Any multiple H1s?
Images Are any images missing alt text? Are any images too big in terms of KB?
Canonicals Are there any non-indexable canonical URLs?
Are any canonicals canonicalised? e.g. pages with different canonicals that arent simples/config products
URL structure Errors
Meta Descriptions Are any meta descriptions too short? Are anymeta descriptions too long? Are any meta descriptions duplicated?
Meta Titles Are any meta titles too short? Are anymeta titles too long? Are any meta titles duplicated?
Robots tags blocking any important pages?
Menu Is the menu functioning properly?
Pagination Functioning fine for UX? Canonical to root page?
Check all the issues in the issues report in Screaming Frog
PageSpeed Checks Lighthouse – check homepage plus 2 other pages
GTMetrix
pingdom
Manually check homepage, listing page, product page for speed
Dev Tools Checks (advanced) Inspect main elements – are they visible in the inspect window? e.g. right click and inspect the Headings – check has meta title and desc Check on mobile devices Check all the elements result in a 200 – view the Network tab
Console tab – refresh page – what issues are flagged? Unused JS in the elements tab – coverage
other Checks
Has redirect file been put in place? Have hreflang tags for live sites been added? Any meta-refresh redirects!?
Tech SEO 1 – The Website Build & Setup
The website setup – a neglected element of many SEO tech audits.
Storage Do you have enough storage for your website now and in the near future? you can work this out by taking your average page size (times 1.5 to be safe), multiplied by the number of pages and posts, multiplied by 1+growth rate/100
for example, a site with an average page size of 1mb with 500 pages and an annual growth rate of 150%
1mb X 1.5 X 500 X 1.5 = 1125mb of storage required for the year.
You don’t want to be held to ransom by a webhost, because you have gone over your storage limit.
How is your site Logging Data? Before we think about web analytics, think about how your site is storing data. As a minimum, your site should be logging the date, the request, the referrer, the response and the User Agent – this is inline with the W3 Extended Format.
When, what it was, where it came from, how the server responded and whether it was a browser or a bot that came to your site.
Blog Post Publishing Can authors and copywriters add meta titles, descriptions and schema easily? Some websites require a ‘code release’ to allow authors to add a meta description.
Site Maintenance & Updates – Accessibility & Permissions Along with the meta stuff – how much access does each user have to the code and backend of a website? How are permissions built in? This could and probably should be tailored to each team and their skillset.
For example, can an author of a blog post easily compress an image? Can the same author update a menu (often not a good idea) Who can access the server to tune server performance?
Tech SEO 2 – The Crawl
Google Index
Carry out a site: search and check the number of pages compared to a crawl with Screaming Frog.
With a site: search (for example, search in Google for site:businessdaduk.com) – don’t trust the number of pages that Google tells you it has found, scrape the SERPs using Python on Link Clump:
How to scrape Google SERPs in one click – Don’t use LinkClump, use the instructions on my blog post here to make your own SERP extractor
Too many or too few URLs being indexed – both suggest there is a problem.
Correct Files in Place – e.g. Robots.txt Check these files carefully. Google says spaces are not an issue in Robots.txt files, but many coders and SEOers suggest this isn’t the case.
XML sitemaps also need to be correct and in place and submitted to search console. Be careful with the <lastmod> directive, lots of websites have lastmod but don’t update it when they update a page or post.
Response Codes Checking response codes with a browser plugin or Screaming Frog works 99% of the time, but to go next level, try using curl and command line. Curl avoids JS and gives you the response header.
You need to download cURL which can be a ball ache if you need IT’s permission etc.
Anyway, if you do download it and run curl, your response should look like this:
Next enter an incorrect URL and make sure it results in a 404.
Canonical URLs Each ‘resource’ should have a single canonical address.
common causes of canonical issues include – sharing URLs/shortened URLs, tracking URLs and product option parameters.
The best way to check for any canonical issues is to check crawling behaviour and do this by checking log files.
You can check log files and analyse them, with Screaming Frog – the first 1,000 log files can be analysed with the free version (at time of writing).
Most of the time, your host will have your logfiles in the cPanel section, named something like “Raw Access”. The files are normally zipped with gzip, so you might need a piece of software to unzip them or just allow you to open them – although often you can still just drag and drop the files into Screaming Frog.
Lighthouse Use lighthouse, but use in with command line or use it in a browser with no browser add-ons.If you are not into Linux, use pingdom, GTMetrix and Lighthouse, ideally in a browser with no add-ons.
Look out for too much code, but also invalid code. This might include things such as image alt tags, which aren’t marked up properly – some plugins will display the code just as ‘alt’ rather than alt=”blah”
Javascript Despite what Google says, all the SEO professionals that I follow the work of, state that client-side JS is still a site speed problem and potential ranking factor. Only use JS if you need it and use server-side JS.
Use a browser add-on that lets you turn off JS and then check that your site is still full functional.
Schema
Finally, possibly in the wrong place down here – but use Screaming Frog or Deepcrawl to check your schema markup is correct.
You can add schema using the Yoast or Rank Math SEO plugins
The Actual Tech SEO Checklist (Without Waffle)
Basic Setup
Google Analytics, Search Console and Tag Manager all set up
Site Indexation
Sitemap & Robots.txt set up
Check appropriate use of robots tags and x-robots
Check site: search URLs vs crawl
Check internal links pointing to important pages
Check important pages are only 1 or 2 clicks from homepage
For render blocking JS and stuff, there are WordPress plugins like Autoptimize and the W3 Total Cache.
Make sure there are no unnecessary redirects, broken links or other shenanigans going on with status codes. Use Search Console and Screaming Frog to check.
Site UX
Mobile Friendly Test, Site Speed, time to interactive, consistent UX across devices and browsers
Consider adding breadcrumbs with schema markup.
Clean URLs
Image from Blogspot.com
Make sure URLs – Include a keyword, are short – use a dash/hyphen –
Secure Server HTTPS
Use a secure server, and make sure the unsecure version redirects to it
Allow Google to Crawl Resources
Google wants to crawl your external CSS and JS files. Use “Fetch as Google” in Search Console to check what Googlebot sees.
Hreflang Attribute
Check that you are using and implementing hreflang properly.
Tracking – Make Sure Tag Manager & Analytics are Working
Check tracking is working properly. You can check tracking coed is on each webpage with Screaming Frog.
Internal Linking
Make sure your ‘money pages’ or most profitable pages, get the most internal links
Content Audit
Redirect or unpublish thin content that gets zero traffic and has no links. **note on this, I had decent content that had no visits, I updated the H1 with a celebrity’s name and now it’s one of my best performing pages – so it’s not always a good idea to delete zero traffic pages**
Consider combining thin content into an in depth guide or article.
Use search console to see what keywords your content ranks for, what new content you could create (based on those keywords) and where you should point internal links.
Use Google Analytics data regarding internal site searches for keyword and content ideas 💡
Update old content
Fix meta titles and meta description issues – including low CTR
Find & Fix KW cannibalization
Optimize images – compress, alt text, file name
Check proper use of H1 and H2
See what questions etc. are pulled through into the rich snipetts and answer these within content
Well, I am cheating a bit here as it is still 2020, but it’s December 22nd so please forgive me.
I don’t have any plugins on this site, but I do on my ecommerce site – NiceMMA.com
I’ve also been asked to look into plugins and basically update myself with WordPress ready for 2021 and a slightly new job role, so a thought a blog post might make a good place to record my findings.
Rank Math SEO – WordPress Plugin
This is similar to Yoast but you get more in the free version. I’m not sure I’ll be using it in my day job though, as it asks for permission to analytics and search console.
You can update URLs, redirects and a bunch of other great things with the free version and it also gives a quick SEO audit, which is nice.
Rank Math SEO allows you to look at ‘focus keywords’ and makes it easy to update the meta details.
Duplicate Page – WordPress Plugin
If you make a specific blog layout or a contact page or anything and you don’t want to remake it from scratch, this plugin with duplicate the page or post for you and keep it as a draft so you can go in and edit it before publishing.
Manage WP – WordPress Plugin
Good for web developers, you can update all the plugins all in one go and do other stuff really easy
Empty Spam Bee
If you have a contact form or email address on your site – this should keep out most of the spam.
iThemes Security
Great security plugin. Turn off some of the notifications in the notifications center or you will get loads of emails. Check – secure the site and activate Network Group Brute Force Protection
Elementor Custom Skin
great for creating custom designs if you build WordPress sites using Elementor
This plugin works great with Custom Post Type UI
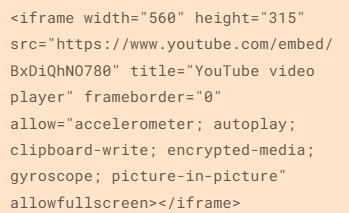
To Learn more about Elementor, subscribe to this guy’s Youtube channel –
Live Chat for WordPress
If you are looking for an ai chatbot for free, look at this plugin
Live chat can be an important tool for customer service. It can provide 24 hour instant customer support. Email and telephone contact details are great on a website, but a user is typically in a hurry and wants instant answers, and doesn’t want to wait 24 hours for a reply via email.
Click “Pages” (near the bottom-third of the page on the left)
Click on a high-performing post in terms of Impressions and Clicks in google
With the specific page/post selected, click on queries
Make a note of all relevant queries in the top 100
See if these queries can be added to the ranking post
Find any queries that are not directly related to your post
Create a new post specifically about this/these queries (if you rank for it without a specific post – you’ll rank better with a specific post for that query)
In the original post – put an internal link to the new post
The Chrome Inspect Element function is instrimental in making these changes to your WordPress theme.
Let’s say for example, that you want to change the main header on the homepage of your WordPress theme – then right click and choose “Inspect Element”.
Then click on the arrow icon on the top left of the window that opens, and your arrow should automatically select whatever you hover over.
Use a Text Document To Track Changes
Copy and paste code that you want to make changes to.
Make your changes in your notepad document and add a comment so that you can easily identify what you have changed.
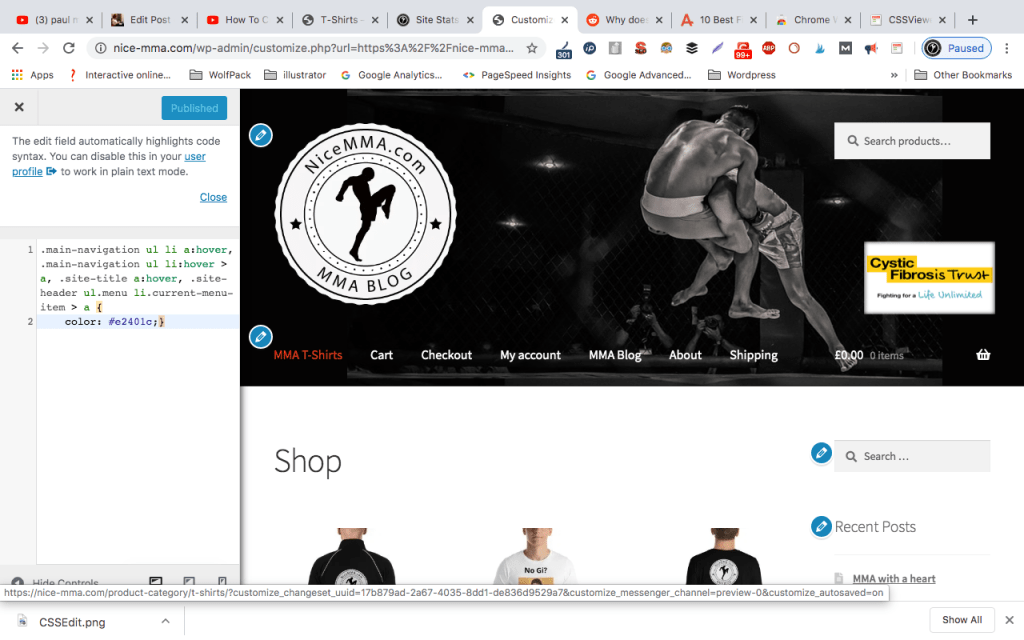
Paste Changes into the Appearance>Customize>Additional CSS window
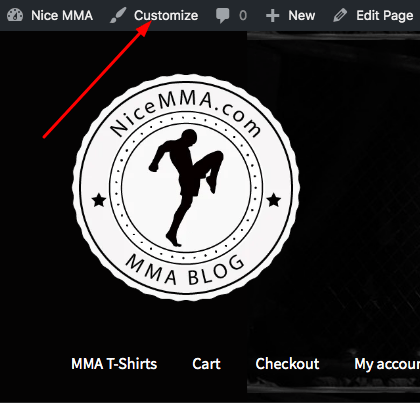
Once you have selected your code from the text/notepad document, you can go to the WordPress admin section /wp-admin and the Appearance menu and then “Customize”, then near the bottom, you should be able to paste in your new CSS.
To Preview CSS Changes
In inspect element, click the “+” icon on the top right.
You can then add styles to different elements.
Be aware that you may need to edit the parent element, to see any changes (rather than the specific element)
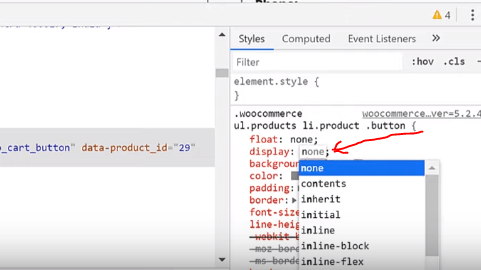
To Remove Elements on a Webpage
In CSS, if you change the “Display:” value to “none”, from inline-block etc.
display: none;
You’ll need to copy & paste the whole block of code from inspect element’s CSS window, into the Custom CSS menu’s window in WordPress’s (Appearance>Customize>Custom CSS)
The video below has more details on how to do this:
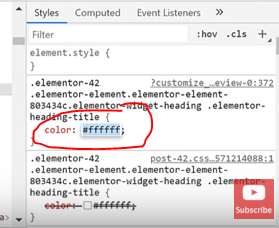
To Change the Colour of Elements
Use the same method as above – i.e. select the element with the inspect element tool.
Select the item that you want to choose using the arrow in the Inspect Element window (arrow is on top left)
Then change the colour using the panel on the right:
Finally, paste the new code for that element, into the Custom CSS window in WordPress (go to Appearance>Customize – wait for the Customize menu to load and then click either “Customize CSS” or “Additional CSS” which is normally located near the bottom left
Change the Colour of Font-Awesome Icons
This is easily done, the same way as shown above.
Select the icon, then change the colour in the CSS panel of inspect element on the right.
Select all the CSS in that window and then paste it into the Custom CSS/Additional CSS window on the left:
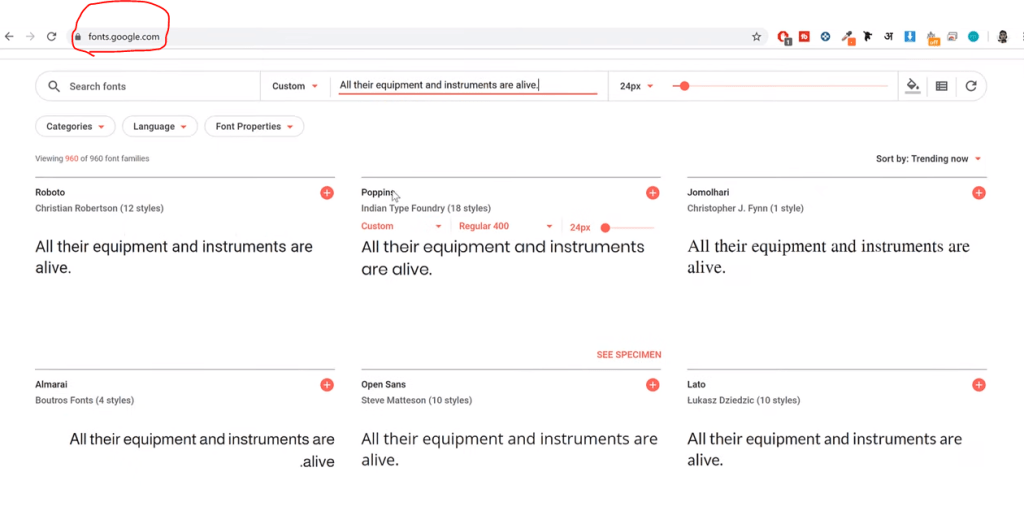
Changing the Fonts on Your WordPress Theme
Go to fonts.Google.com to see all the available fonts (well, most of them)
Open Inspect-Element – click the arrow on the top left of the window
Then, again just select the text that you want to change and this time change the font-family value to the one you want
Remember to add all the code/CSS from the window precise window that you edit on the right, to the Customize/Additional CSS panel on the left.
Using this method you can also change:
Padding & Margins Containers Background Image, Position etc. Sidebar
!Important
By adding !important to your CSS, you can ovveride all other rules relating to that element. Use this sparingly though as it will get confusing.
To follow along with this tutorial, please install and open Google Chrome, and then add the following extension (at your own risk etc. but I’m sure they’re fine):
Firebug for Chrome (or you can just use Developer tools by right-clicking on parts of your webpage and selecting “Inspect” or “Inspect Element” from the menu that appears – Firebug works well on Chrome on my desktop – but not on my Macbook)
To get used to using Firebug – open your website – or just go to a website of your choice.
Click the Firebug extension on the top right of your Google Chrome browser
Update – Using Dev Tools Inspect Element in Chrome is just as good. Just remember to click the arrow icon on the top left of the window that appears, so that you can easily select individual elements.
Adding CSS to WordPress – Additional CSS
Most WordPress themes, have a “Customize” option, that contains a menu item called “Additional CSS”
Login – on the ‘header menu’ click Customize – then Click “additional CSS”
You can then paste your CSS directly into the box provided:
Note that if you add CSS to the box on one page – but it refers to an element that is on other pages – e.g. the main-menu – then this will be applied to all pages.
If you wanted to make a change to one page only – to a ‘global-element’ such as the main-menu – you would need to add a new class or id – by editing the HTML in the Theme Editor in the dashboard/wordpress.
Try Out Your New CSS in Inspect Element or Firebug
Once you right click and “Inspect” the CSS – you can edit it.
When you have made a change to the CSS in the Inspect-Window, copy it by highlighting it and holding CTRL + V
Open the “Additional CSS” menu item, then paste in the edited snippet of code
Paste CSS into the Additional CSS Box
Now that the above code has been added, and published, the Menu Items turn red when the mouse-cursor hovers over them:
Basics of CSS
The basic concept and idea of CSS is that you can style multiple items, with one piece of code.
So for example, rather than adding a colour to every header on your website – you could ‘tell your CSS stylesheet – to make every H1 a specific colour.
Although you can use “inline CSS” by adding it directly to the HTML – best practice is to add all of your CSS to a stylesheet, which is then linked to the HTML. This is done for you already in WordPress, via the “Additional CSS” box in the Customize menu and the Appearance menu in WP-admin, under Theme Editor.
CSS Selectors
Understanding how CSS works is directly linked to understanding the concept of ‘selectors’.
CSS selects a certain HTML tag, a class or an ID and then ‘tells the browser/HTML’ what style to apply.
HTML Tags are already predifined, examples include – p (paragraphs) – H1 (main headers) – a (anchor text)
Classes and IDs are not predefined by any internet-standards such as W3. You can give a HTML tag a class or an ID – so that specific paragraphs or headers etc. can be styled and not others.
A stylesheet must ‘select’ an element, ID or class, to change the style.
To select an ID
e.g.
<div id = “main-nav“>
The ID selector is preceded by a hash character (“#”) in the stylesheet:
#main-nav {
    background-color: #ccc;
    padding: 20px
}
Selecting Classes
In the CSS, a class selector is a name preceded by a full stop
.intro {
    color: red;
    font-weight: bold;
}
Universal Selectors
The asterix * is the “universal selector”
The below CSS would select all items and make their background colour yellow:
* {
    background-color: yellow;
}
A Few Examples of CSS
Make the text within the main headers (h1s) – coral:
h1 {
    color: coral;
}
Make the text within the class called “main” centred
.main {
                text-align:center;
            }
CSS Animation
Animation in CSS, usually incorporates Keyframes.
The keyframes must then select an element, for example, this keyframe selector would determine the styles and/or rules for the element called “slidein”:
Step 1 – Configure the Animation
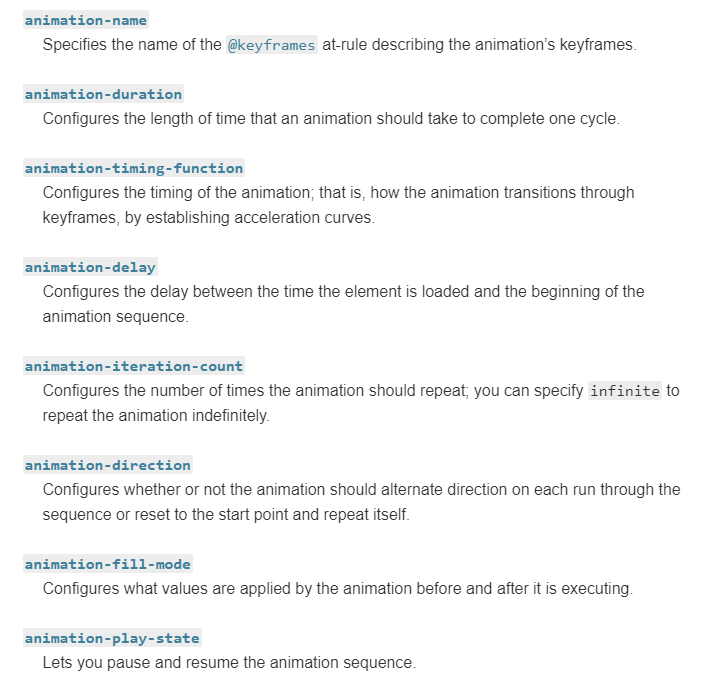
Style the element – a paragraph (p) in the example above. You would style the paragraph, or H1 or whatever element you want to animate, with the animation properties.
The animation properties are:
animation-name This must sync-up with the name with the@keyframes at-rule
animation-duration
animation-timing-function Configures the timing of the animation, relating to how the animation transitions through keyframes.
animation-delay How long between the element loading and the animation starting?
animation-iteration-count Defines the number of times the animation should loop
To see a good example of CSS animation, please see this one on impressivewebs.com (this free version of wordpress won’t allow me to embed code etc.)
To be fair, it’s probably a bit easier to animate with JQuery – but still very handy to know CSS animations, especially when you’re trying to work out what’s going on a give webpage in terms of SEO etc.
CSS Transitions
Properties are animated from “initial to “final states” using CSS Transitions.
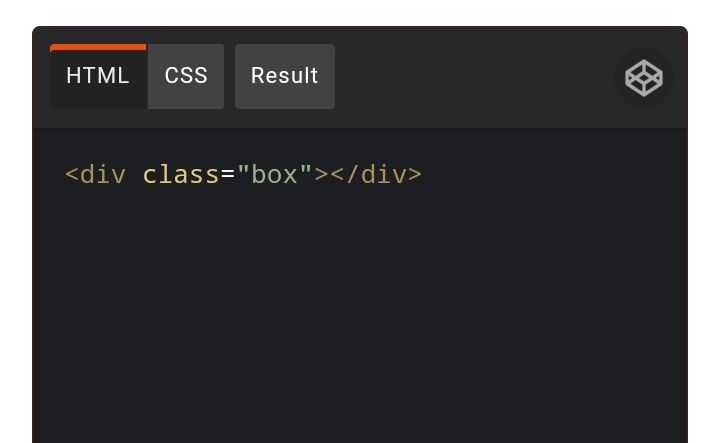
In the example above:
a div class is created in HTML and named “box”
The box is then styled in CSS to be red and specific dimensions
Transition is added to animate the box
Transition used on itself is shorthand, instead of declaring what to transition, for how long etc.
In the example above, we transition the background colour, over 2 seconds and tell it to “ease out”
The background colour to change to on-hover is declared as green
moz-transition, webkit transition etc are included for other browsers – usually older ones
By using keyframes and changing the opacity of the ‘nth-child’ and altering the animation delay, you get the rotating word effect:
What is SaSS?
SaSS stands for “Syntactically Awesome Style Sheets”
SaSS look a bit different to standard CSS, as you don’t need the semi-colons or curly braces.
Variables
With SaSS, you can use the dollar symbol – $ to store variables.
You can, for example, create your own text variable, giving the text several styles such as size, font family, font style and a font weight – and store this information in a font variable called $my-font.
You can then call this variable to style various parts of a webpage
body {
  font: 100% $my-font;
}
or you could, create a colour variable, to save having to write out the hex code each time, e.g.
Add specific fields, to the new post-types using the Advanced Custom Fields plugin
Give new fields an id – so that you can then edit the styling with CSS
See our WordPress for CSS blog post for more information on customising CSS – this will be the next post to be published
Custom fields is probably the easiest way to implement significant layout changes to a WordPress theme.
It is also a great way to provide a client with specific pages, that they can populate and publish themselves.
It obvisouly helps, a lot, to know HTML and CSS, and ideally PHP and Javascript, but you should be able to effectively customise designs to your own, and to your clients’ needs by using plugins instead (along with the Customize features now available on WordPress sites.
If a client is very specific about a design, it can a be a bit of a nightmare if you are not savvy with editing WordPress CSS, HTML and JS – Advanced Custom Fields makes it easy – and easier for both you and your clients to update when required – by changing the visual editor in wp-admin to make it as simple as possible.
In fact, I first came across Advanced Custom Fields, when I worked for a UK Tourism company, and the Web Agency amended pages using the plugin.
Step by Step
Sort your hosting and domain out. Hostgator is decent (not an affiliate link)
Backup your website (you should do this before installing new plugins – ironically, you made need a plugin to do this!)
Click the “Add New” button next to “Field Groups” at the top of the page on the Custom Fields tab/menu item
Give the Field a Name e.g. “Product Description 2”
Now click the blue “+Add Field” button (near the top, to the right)
Now fill in the items required: – Field Name – give it a descriptive name – e.g. Product Description 2 – Field Type – for text entry/a text box – choose Text
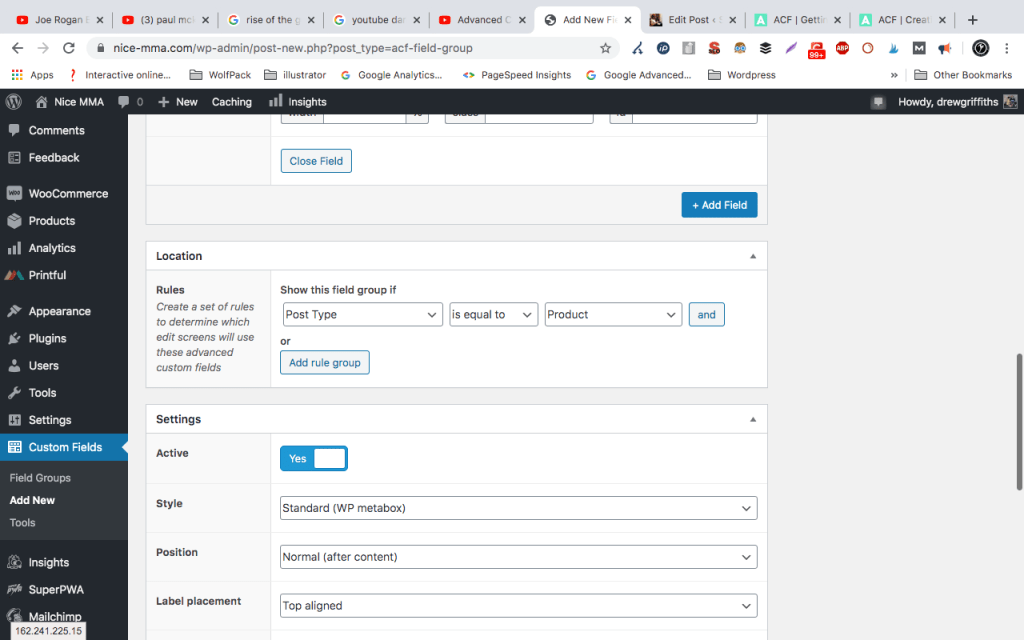
Most items are quite straight forward – the Location part is very important thought – as this dictates on which pages or posts, this field will appear. For my wooCommerce store, I have chosen: Post Type – is equal to – product so that I get the text field on all my product posts.
when you are happy – click the “Publish” button on the right hand side.
Now when I create a new Product Post/Page – I have the option to add a second description via a text box:
“Product Description 2” is now shown at the bottom of the page
Other Text Fields that might be appropriate for a Product could be things like:
Manufacturer
Year
Price
Condition
You could also set the fields to “Required” – so that a product could not be posted to the website without all of the above details. This is particularly helpful if you have multiple people working on the same site.
Remember that Year and Price would be a “number” and not a text field.
Add A Rating Box Using Advanced Custom Fields
Click “Add Field” button
Give the Field a name in Field Label & an actual Field Name
Add Instructions for the admin-user
Add a min and max value, e.g. 0 and 10
Step size – 1 (means can’t give 1.5 etc. has to be a whole number)
Combining Advanced Custom Fields with Custom Post Type Plugin
Install CPT UI plugin and activate it
Add a new post type by clicking on the relevant part of the side menu to bring up the CPT UI options
Fill in the basic settings: Slug – what will appear in the URL of these posts Singular – e.g. “Offer” Plural – e.g. “Offers”
Add Post Type – it should appear on the left hand menu/nav
Go Back to CPT UI – this time click on !Edit Post Types”
Minimize or just skip over the “Additional Labels” section
Under “Settings” – Has Archive – change to “True” – Menu Position – Change to “6” so it appears below normal posts – Menu Icon – Change this to a relevant icon – 50 x 20 pxls
Now – when you go back to the Advanced Custom Fields section of the menu/backend – you can add specific fields to the “Offer” post type:
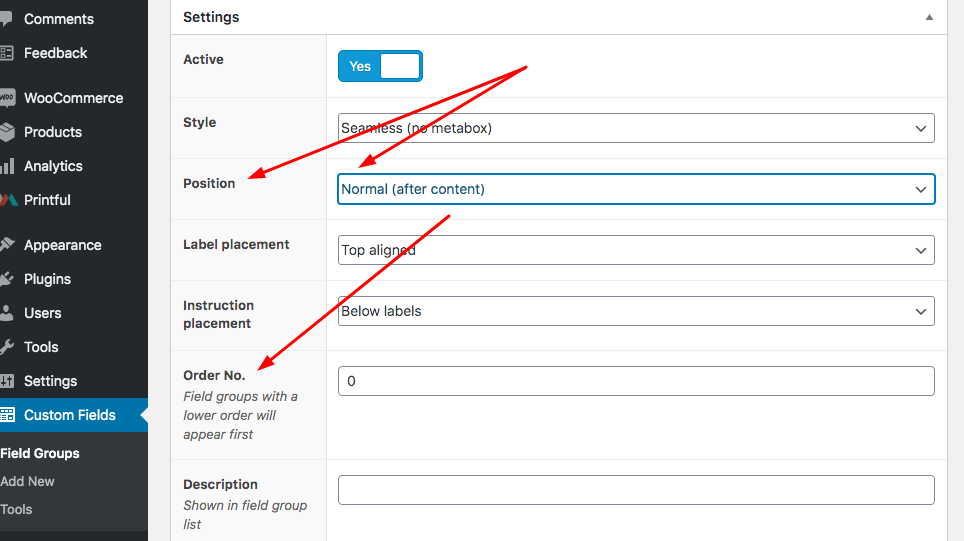
Positioning Fields on the Page
Simply use the options (in Settings) that custom fields gives you for positioning the field:
You can also add a class and id, so that you can edit the fields using CSS (see our next post about WordPress and CSS!)