How to Make AI Posters for Business & Events – that aren’t obvs AI Posters

TL;DR

  • Adverts look “AI” when the AI makes every decision. Let it make the picture; you make the choices.
  • Brief first: who it’s for, the one message, where it’ll be seen, how it should feel.
  • Prompt like a photographer: real setting, light, lens, film stock and empty space. Drop “stunning 8k masterpiece”.
  • Fix the tells: hands, gibberish text, waxy skin, glow, melting edges, dead-centre framing.
  • Never let AI write your words. Set the type yourself, two typefaces maximum.
  • Keep the real product in shot, crop off-centre, tone the colour down, add grain, then squint-test it at phone size.
  • Event posters: the date and details are the design, make 4:5 and 9:16 versions, use one real idea instead of a silhouette crowd, and build a reusable template.
  • Short on time? Jump to the hack near the end for copy-and-paste prompts.

AI can produce a poster in seconds, but most people can spot one just as fast. The glossy skin, the orange-and-teal glow, the gibberish lettering and the perfectly centred everything give it away before anyone reads a word.

The fix isn’t a magic prompt. It’s treating the AI as one tool in a normal design process: you brief it, you direct it, then you finish the work by hand. Follow the seven steps below and your posters and adverts will read as designed, not generated. There’s a finished example poster at the end.

Step 1: Start with a brief, not a prompt

The biggest giveaway of an AI advert is that it isn’t about anything. Someone typed “cool poster for a bakery” and accepted the first result, so the image is a generic average of every bakery picture ever made.

Before you open any image tool, answer four questions in plain words: who it’s for, the single message, where it will be seen, and how it should feel. Collect two or three real photos or adverts you admire as references.
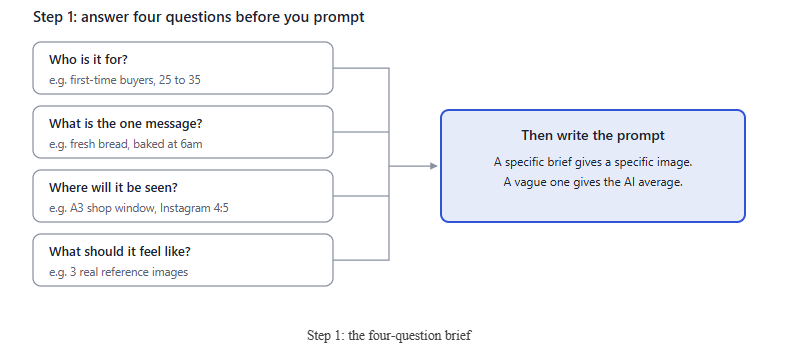
Step 1: answer four questions before you promptWho is it for?e.g. first-time buyers, 25 to 35What is the one message?e.g. fresh bread, baked at 6amWhere will it be seen?e.g. A3 shop window, Instagram 4:5What should it feel like?e.g. 3 real reference imagesThen write the promptA specific brief gives a specific image.A vague one gives the AI average.
Step 1: the four-question brief

The format question matters more than people think. A shop-window A3 poster, a 4:5 Instagram post and a 16:9 web banner need different compositions, so decide the shape first and generate at that ratio.

Step 2: Prompt like a photographer, not a fan

Words like “stunning”, “8k”, “hyper-realistic” and “masterpiece” are the fastest route to the AI look. They push the model towards over-sharpened, over-lit, over-saturated images.

Describe the shot the way a photographer or art director would brief a crew: the subject in a real setting, the light, the lens, the film stock and where the empty space should go.
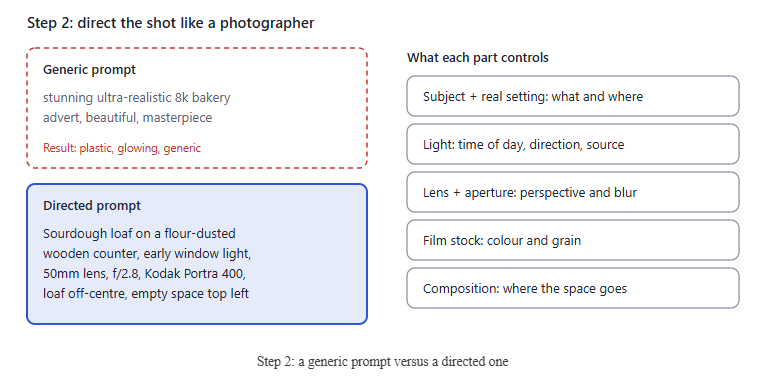
Ask for empty space on purpose. Real adverts leave room for a headline and a logo, and AI images tend to fill every corner. Generate several variations and pick the one that looks least “perfect”, not the most impressive.

Step 3: Hunt down the AI tells

Viewers don’t consciously analyse an image; they notice that something feels off. Almost always it’s one of six details, so check each one before you go any further.
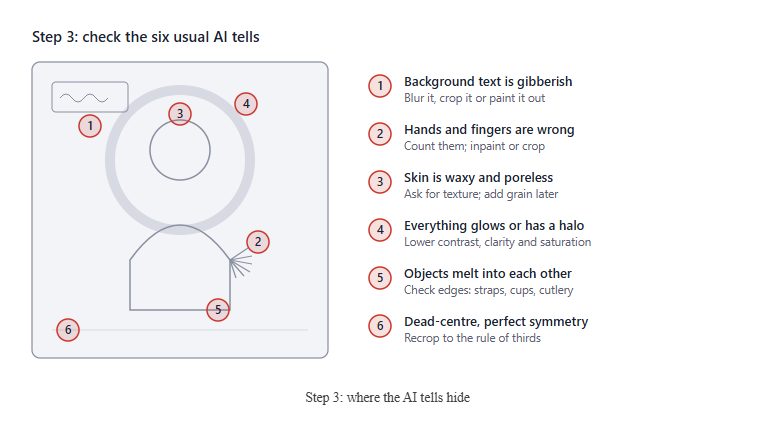
Most modern tools let you select a small area and regenerate just that part (often called inpainting or generative fill). Use it for hands, edges and background signs. If a detail still won’t come right, crop it out; a tighter crop usually looks more intentional anyway.

Step 4: Never let the AI do your typography

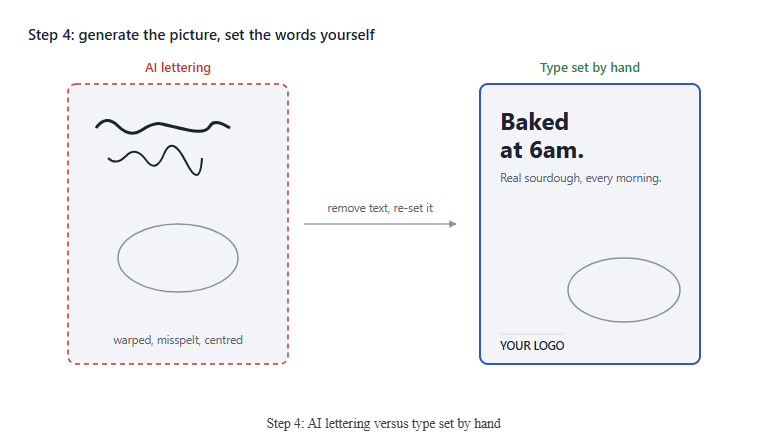
Even the best image models still wobble on letters, and they love a big centred headline. That one habit gives away more AI adverts than anything else.

Generate the image with no text at all (add “no text, no lettering, no logos” to your prompt), then set the words yourself in Canva, Figma, Affinity, Photoshop or whatever you use.

Step 4: generate the picture, set the words yourselfAI letteringwarped, misspelt, centredremove text, re-set itType set by handBakedat 6am.Real sourdough, every morning.YOUR LOGO
Step 4: AI lettering versus type set by hand

Use no more than two typefaces, align text to an edge rather than the centre, and keep the headline short. Your real logo, a price and a web address in a sensible corner do a lot to make a poster feel like it came from an actual business.

Step 5: Composite, crop and edit by hand

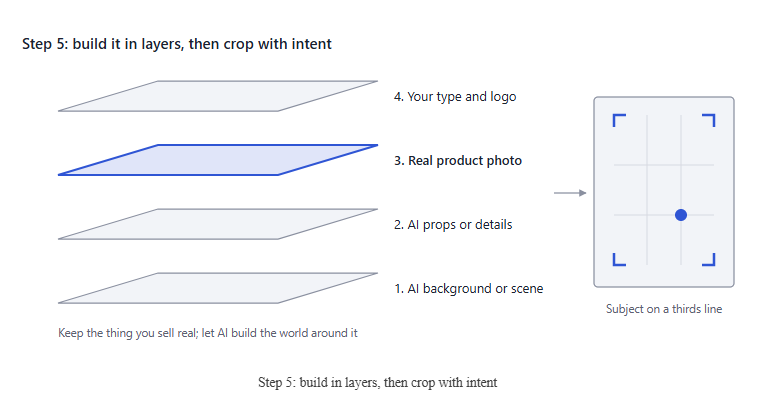
The most convincing “AI” adverts are only partly AI. Photograph your real product on your phone, cut it out, and place it into an AI-generated scene. Customers trust the thing they’re buying looking exactly like the thing they’ll receive.
Then crop. AI tools centre everything, so move your subject onto a thirds line, trim the edges and let one element bleed off the frame. When you composite, match the direction of light and add a soft shadow under the product so it sits in the scene instead of floating on it.

Step 6: Add real-world texture and a consistent grade

AI images are too clean: perfect gradients, no noise, everything sharp and bright at once. Real photos and printed posters have grain, softness and a colour “personality”.

A few small moves in any photo editor (Lightroom, Snapseed, Photoshop or your phone’s built-in editor) remove most of that sheen.
Go gently: the aim is “nobody notices”, not a heavy Instagram filter. You can also overlay a subtle paper or print texture on posters, which makes them feel physical even on screen. Using the same grade and your brand colours on every advert makes the set look like a campaign, and campaigns look human-made.

Step 7: Do the squint test, then run the checklist

Shrink your advert to the size it will appear in a phone feed, then squint or blur it. A good advert still shows one clear headline and one clear subject. AI images often turn to busy mush at this point because they’re full of detail nobody asked for.

Finally, show it to someone who hasn’t seen it and ask what it’s advertising, not whether it looks like AI. If they answer quickly, you’re done. Before you publish, tick off the list:

  • Made from a written brief, at the right size and ratio
  • Prompt describes light, lens and setting, with no “stunning 8k” filler
  • Hands, edges, skin and background text checked and fixed
  • All words set by hand, no more than two typefaces, not centred by default
  • Real product and real logo in the image
  • Cropped off-centre with deliberate empty space
  • Saturation and sharpness toned down, fine grain added
  • Passes the squint test at phone size

The finished example

Here’s what all seven steps look like together, on a poster for a (fictional) neighbourhood bakery.

Notice what it does: a single message (“Baked at 6am.”), two typefaces set by hand and aligned left, a real photo of real bread fading up into the dark so the headline has room, a restrained palette, and fine grain over the top. The practical details (price, hours, address) sit where a real shop would put them. Here the loaf is a stock photo; in your version, step 5 would swap in a photo of your own bread.

Bonus: event posters for social media

Scroll any local events page and you’ll see the same poster over and over: a glowing title, a crowd of silhouettes with their hands up, light beams and a purple-orange sky. Quiz nights, craft fairs and gigs all end up looking identical, so none of them stands out.

The steps above still apply, but event posters have their own traps. This is the look to avoid.
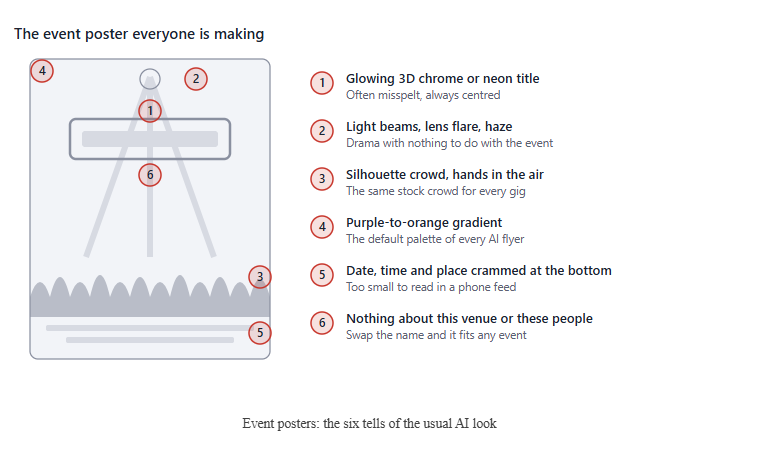
The real problem is point 6. A good event poster could only be for your event: your venue, your people, your date. Everything below is about getting that back.

Event step 1: Make the information the design

Someone scrolling gives your poster about a second. In that second they need four answers, in this order: what it is, when, where (and how much), and what to do next. AI posters get this backwards, spending all the space on atmosphere and squeezing the facts into a strip at the bottom.

Write those four lines first, then design around them. On a type-led poster, the date or the event name can be the image.

Event step 2: Design for the feed, not a noticeboard

Make two versions from the start: a 4:5 feed post (1080 x 1350 px) and a 9:16 story (1080 x 1920 px). In stories, the account name at the top and the reply bar at the bottom cover roughly the first and last 250 px, so keep your text in the middle.
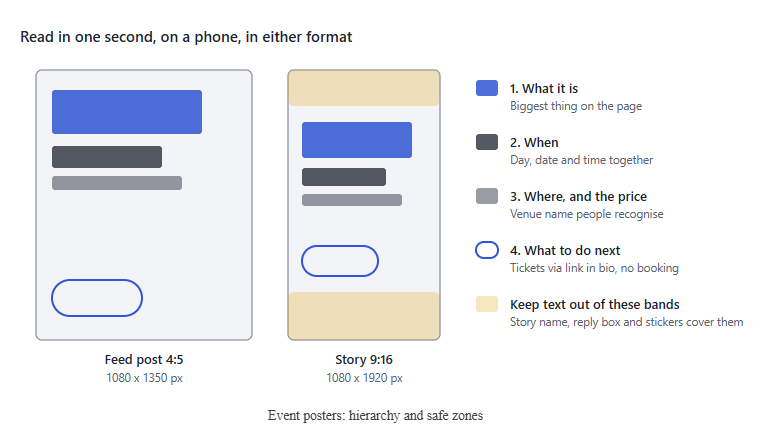
Check it at actual phone size. If the date isn’t readable at thumbnail size, make it bigger and cut something else.

Event step 3: Use one real idea instead of a generic crowd

Pick a single idea that could only belong to this event. A photo of the actual venue, last year’s crowd, the band’s own press shot, or one object that sums it up (a pint glass for a pub quiz, a record for a vinyl fair). If you have none of those, go type-led: huge date, bold colour, nothing else.

If you do use AI, use it for a background texture or a single prop, then follow steps 3 to 6 above. Ban the words “epic”, “neon”, “cinematic” and “crowd” from your prompts.

Event step 4: Build a template, not a one-off

Regular events (monthly quiz, weekly open mic, a festival line-up) should share one layout: same grid, same typefaces, same logo position. Change only the colour, the date and the image. After three or four posts, people recognise yours before they read it, which is exactly what the identical AI posters can’t do.

Event step 5: Let the caption and alt text do the work too

Repeat the key details in the caption: what, when, where, price and how to book. Add alt text describing the poster (on Instagram it’s under Advanced settings when you post). It helps people using screen readers, and it means your details are searchable text rather than pixels.

The finished example: an event poster (Looks better with a real photorgraph in the foreground)

Here’s a 4:5 feed poster for a (fictional) night market, built with the five event steps.

The date is the hero and readable from across the room. The only picture is a string of festoon lights, which says “evening market” in a way a silhouette crowd never could. All four answers (what, when, where and price, what next) sit in their own clear spot, and there’s no glow, no gradient and no lens flare. Swap the colour and the date and it becomes next month’s poster.
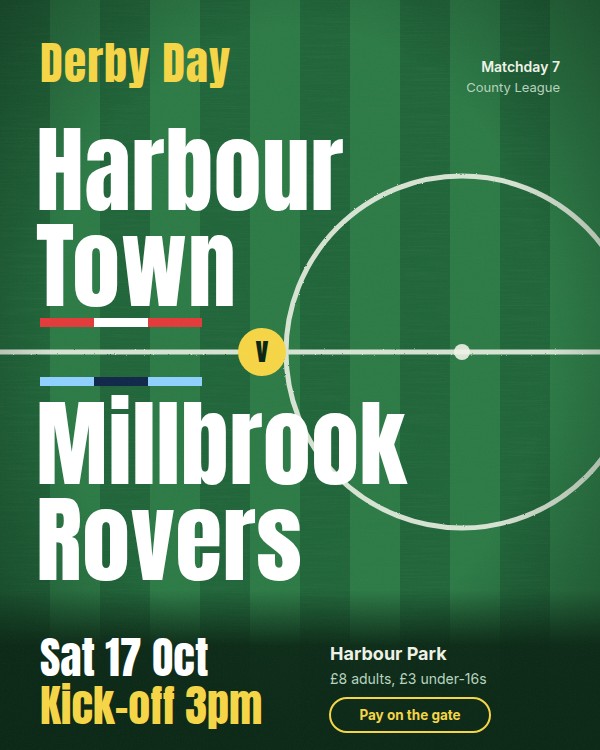
ai event poster example

The pitch itself is the image: mown stripes, the halfway line and the centre circle, pushed off to the right and cropped by the edge. The two club names sit either side of the halfway line, like the teams at kick-off, each with a scarf stripe in its kit colours. Date, kick-off, ground and prices sit in a clear footer, readable at phone size. For the next fixture, change the away team and its colours, and it’s done.

The hack: copy-and-paste prompts

These prompts build every step above into one go. Replace each [BRACKETED PLACEHOLDER] with your own details (examples are after “e.g.”), delete the examples, and paste the result into your image tool. Each one asks for no text, so you add your words yourself afterwards (step 4).

1. Product or advert poster

Editorial product photograph of [PRODUCT, e.g. a sourdough loaf] on [REAL SURFACE, e.g. a flour-dusted oak counter] in [SETTING, e.g. a small bakery kitchen]. [TIME OF DAY, e.g. early morning] light from [DIRECTION, e.g. a window on the left], soft natural shadows. Shot on a [LENS, e.g. 50mm] lens at f/2.8, [FILM STOCK, e.g. Kodak Portra 400] colour, fine film grain. [PRODUCT] placed [POSITION, e.g. in the lower right third], with plain empty space [WHERE, e.g. across the top half] for a headline. Muted, true-to-life colours, small natural imperfections. [ASPECT RATIO, e.g. 4:5 vertical]. No text, no lettering, no logos.

2. Event poster with a real scene

Documentary-style photograph of [VENUE OR SCENE, e.g. a village hall set up for a quiz night], with [DETAILS THAT MAKE IT REAL, e.g. trestle tables, answer sheets and paper bunting]. [TIME, e.g. evening], lit by [REAL LIGHT SOURCE, e.g. warm ceiling lights], shot on a 35mm lens, natural colour, visible film grain. Wide shot with [EMPTY AREA, e.g. the top third] kept plain and uncluttered for text. [ASPECT RATIO, e.g. 4:5 vertical]. No text, no signs, no logos, no crowd silhouettes, no lens flare, no light beams.

3. Type-led event poster background

Flat, straight-on photograph of [TEXTURE, e.g. recycled card / painted brick wall / worn felt] in [COLOUR, e.g. deep forest green], even soft lighting, no shadows, subtle natural texture and small imperfections. Plain and uncluttered, to be used as a poster background. [ASPECT RATIO, e.g. 9:16 vertical]. No text, no objects, no gradient, no glow.

4. Sports match poster

Top-down aerial photograph of a [SPORT, e.g. football] pitch at [GROUND TYPE, e.g. a small non-league ground], freshly mown [STRIPE DIRECTION, e.g. vertical] stripes, crisp white line markings. [LIGHT, e.g. flat overcast afternoon light]. The [PITCH FEATURE, e.g. centre circle] sits [POSITION, e.g. right of centre, partly cropped by the edge]. Realistic grass texture, muted natural greens, no players, no crowd. [ASPECT RATIO, e.g. 4:5 vertical]. No text, no logos, no stadium lights, no lens flare.

5. Fixing one detail (inpainting)

Select just the problem area in your tool’s edit or generative-fill mode, then use:

Regenerate only the selected area: [WHAT IT SHOULD BE, e.g. a hand holding a coffee cup] with [CORRECT DETAIL, e.g. five fingers and a relaxed grip]. Match the existing light direction, colour and film grain exactly. No text.

Generate four to six versions of each, pick the least “perfect” one, then carry on from step 3.

The takeaway: use AI for the draft, not the decisions

Adverts look “AI” when the AI made every decision. Brief it properly, direct it like a photographer, fix the tells, set your own type, composite in the real product and finish it by hand. The result is simply good design that happened to use a fast tool.

A quick note on honesty

Making an advert look polished is fine; misleading people isn’t. Don’t use AI to show a product doing something it can’t, invent customers or testimonials, or create fake photos of real people. Some platforms, such as Meta and TikTok, ask you to label realistic AI-generated content, and UK advertising rules still require ads to be accurate. Check the rules for wherever you’re posting, and when in doubt, disclose
SEO & Digital Marketing News Round-Up: What Actually Happened in the Last Two Weeks (Mid-September 2026)

The September deadlines have started to pass. Some quietly, some noisily. Here’s what actually matters for UK small businesses since the last round-up – with the least amount of panic possible.

TL;DR: The Five Things Worth Knowing

#What ChangedWhenWho It AffectsUrgency
1Google’s /goto redirect confirmed across search resultsConfirmed 26 Aug, near-full rolloutAnyone using rank tracking tools or GA4 attribution🟠 High
2AI Overviews got significantly bigger (dynamic expansion + generative UI)19 Aug and 27–28 AugEvery business with informational or how-to content🔴 Critical
3ChatGPT changed how it searches the web overnight8 Aug (still playing out)Anyone chasing AI citations🟠 High
4Parasite SEO enforcement paused inside the EEA (but not the UK)30 AugUK sites competing against EU-hosted parasite content🟡 Medium
5Google Content API for Shopping starts failingProgressive from 1 SeptEcommerce sites with old Merchant Center integrations🟠 High

1. Google’s /goto Redirect: Your Rank Tracker Might Be Lying

Hover over any Google search result now. The link no longer points to the site you’re about to visit. It goes to google.com/goto?url=... first, then bounces to the destination.

Google confirmed this on 26 August. By late August, one SERP tracking firm (Nozzle) reported the redirect on nearly 100% of results across several residential IP ranges. The change is quiet, the impact is not.

Why this matters for you (even if you don’t scrape SERPs)

There are two knock-on effects worth watching.

The first is rank tracking. Tools that used cheap HEAD requests to resolve destination URLs can’t any more; Google blocks them on /goto links, forcing a full GET request for every single result. One SEO estimated a standard five-page ranking report now takes 500 to 1,000 requests instead of the handful it used to. Which means your tracker either eats the cost or delays your data.

The second, and more important for small business owners, is GA4 attribution. If the redirect strips referrer data on a click, that organic session can quietly reclassify as (direct) / (none). Your organic channel shrinks. Direct traffic swells. Neither number is real.

Who’s affected -and who says they aren’t

ToolImpact reported
Google Search ConsoleNo impact – still reliable
SE RankingConfirmed no impact on position tracking
SemrushConfirmed no impact on position tracking
AhrefsTemporary data inconsistency, fix in progress
SerpAPIMultiple products affected; resolved 5 Sept

What to do

  • Cross-check any recent traffic dip against Search Console before blaming your site. GSC data still comes from the source.
  • If your GA4 organic traffic has fallen since late August but Search Console impressions and clicks are stable, that’s the redirect at work – not a ranking loss.
  • Ask your rank tracking provider directly whether they’re impacted. They will have an answer, or they’ll be lying to you.

2. AI Overviews Just Ate More of the Page

Two changes landed within about ten days of each other, and together they change how much space Google’s own answer occupies before a searcher ever reaches a blue link.

Change one: Generative UI arrived in AI Overviews (19 August)

Custom visual layouts, interactive tools, calculators, comparison widgets. All built by AI on the fly. Google demonstrated it with a pH scale visualisation. In practice this hits any business built around explainer tools, calculators, converters, comparison tables or interactive guides. If Google can build a working mortgage calculator inside its own answer, a searcher has one less reason to click.

Change two: Dynamic expansion (27–28 August)

AI Overviews can now grow into a longer, AI-Mode-style answer automatically. The manual “Show More” button , the one that used to give you a fighting chance below the fold -has been removed for some queries. Google decides when to expand. You don’t.

Independent tracking put AI Overview presence at around 48% of Google searches in early 2026. Health, education and B2B tech queries can hit 80%. AI Mode sessions themselves end in a click to an external website only about 4.5% of the time, compared with roughly 24% for traditional search. That is not a small delta.

What to actually do

  • Assume the top of your service pages will be summarised. Write the first 60 to 80 words as if that’s the only thing Google will show. Get to the answer.
  • Check the new Generative AI performance report in Search Console (rolled out worldwide on 31 August). This is the only place you’ll see AI Overview impressions attributed properly.
  • If your business runs on interactive tools, treat the tool page like a lead magnet. The tool result itself is now in competition with Google’s own answer, so the value has to sit around it – data, context, next steps.

3. ChatGPT Rewrote How It Searches the Web

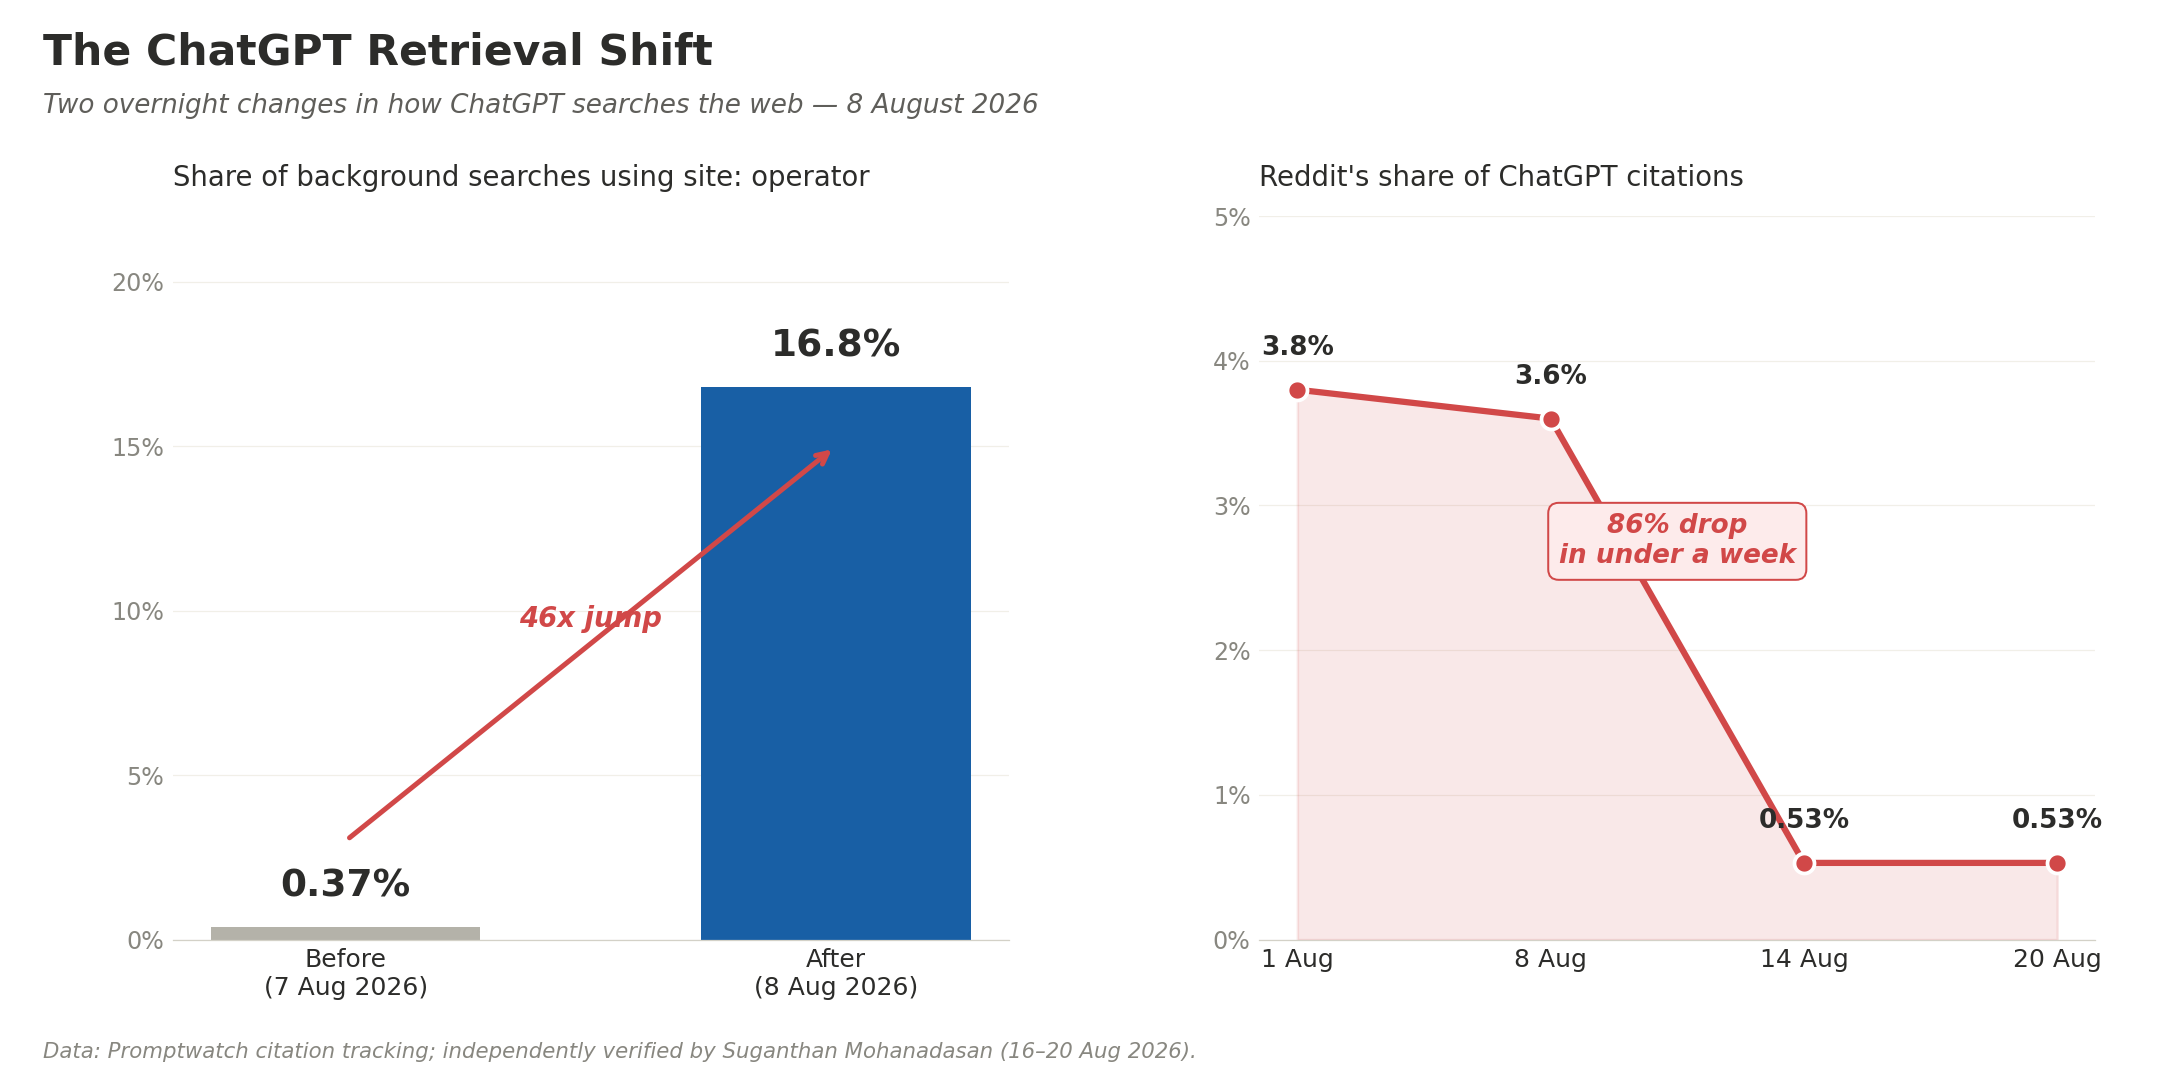
On 8 August, ChatGPT started scoping most of its background searches to specific trusted domains instead of the open web. Two independent tracking firms caught it in real time. The chart below shows the scale of the change:

Chart showing the ChatGPT retrieval shift on 8 August 2026 — site: operator use jumped 46x, Reddit's citation share fell 86%. Data: Promptwatch citation tracking; independently verified by Suganthan Mohanadasan (16–20 Aug 2026).
Between 16 and 20 August, ChatGPT also swapped its search tool from a JSON structure to a compact query language with freshness windows, domain targeting and separate verticals for products, places, images and widgets. Which sounds dry until you notice what it means: ChatGPT is now behaving less like a search engine that reads whatever comes back, and more like a research assistant that already knows which sites to trust for each topic.

What actually changed for citations

Domains that gained ground: official brand sites, documentation, government sources, primary research, standards bodies. Domains that lost: forums, aggregators, Reddit, community discussion sites.

What to do

If getting cited by ChatGPT matters to your business:

  • Make sure OAI-SearchBot and ChatGPT-User can crawl your site. Cloudflare’s crawler changes (covered last time) matter here.
  • Own your own answers. If someone else’s page is the primary source for a topic in your niche, ChatGPT will scope its search to them and skip you.
  • First-party data, original research, and clear factual pages beat blog posts stitched together from other sources. The shift rewards the source, not the summariser.

4. Parasite SEO Enforcement Paused in the EEA (But Not the UK)

From 30 August, Google stopped applying manual actions under its site reputation abuse policy to searchers inside the European Economic Area. That’s the 27 EU states plus Iceland, Norway and Liechtenstein. The change followed a European Commission investigation under the Digital Markets Act.

Here’s the awkward part for UK businesses: the UK is not in the EEA. Post-Brexit, the UK sits outside the change. Google’s enforcement continues here exactly as before.

Which creates a strange competitive dynamic worth understanding.

RegionSite reputation abuse enforcement (from 30 Aug)
UK searchersFull enforcement third-party content on trusted sites still gets manual actions
EU + EEA searchersManual actions no longer applied; system may separate section and let it rank on its own
Rest of world (US, Canada, Australia, etc.)Full enforcement continues

For a UK small business, the practical read is that competitors relying on parasite SEO tactics against your keywords will still be penalised in UK search results. But if your competitors are getting European traffic through EU-hosted parasite pages, that content is now less exposed to enforcement across the channel. Interesting, more than alarming.

Google also clarified four factors it uses to identify site reputation abuse: extent of first-party involvement, integration with the host site, whether the section brings any value to the host site’s users, and whether the content is presented in a way that misleads.


5. Google’s Old Shopping API Starts Failing Today (Well, 1 September)

If you’re on Shopify, WooCommerce, BigCommerce or any modern platform, this probably isn’t your problem most have already migrated. If you’re running a custom-built store, or an older integration, read on.

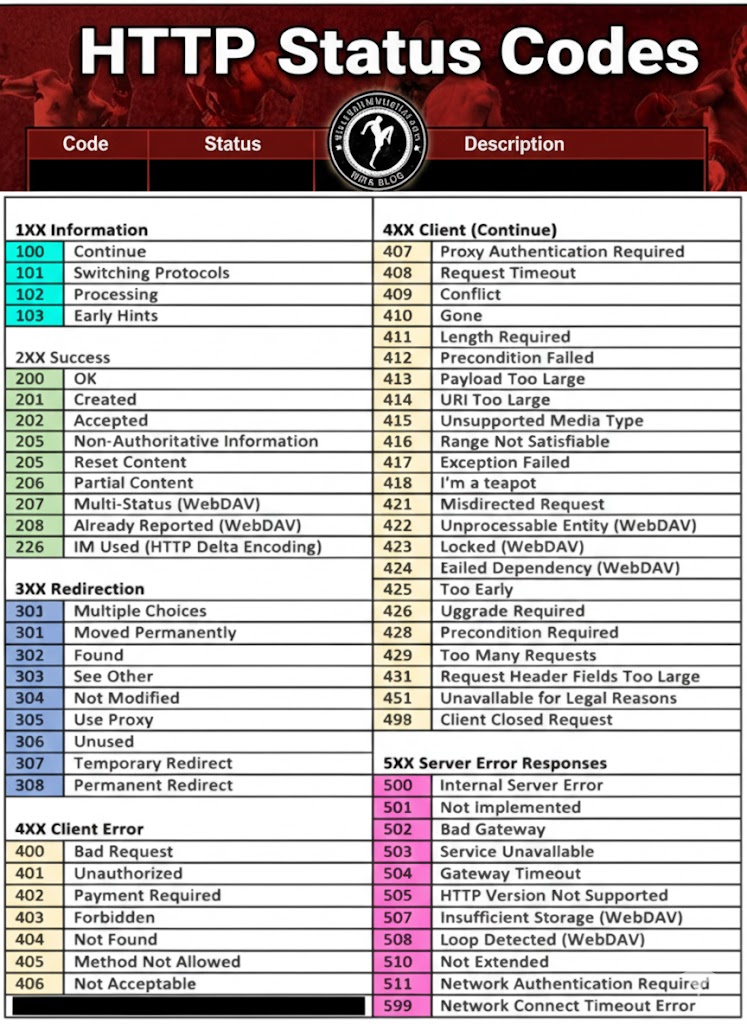
Google’s Content API for Shopping officially reached its sunset on 18 August. From 1 September, requests from any client without an active extension start failing intermittently with an HTTP 410 error. Full shutdown is scheduled for early 2027.

What to do

  • Ask your developer or agency whether your Merchant Center feed uses the Merchant API (new, still working) or Content API for Shopping (old, now failing).
  • If it’s the old one, you can request an extension via Google’s form. Don’t wait for products to start disappearing from Shopping listings.
  • Symptoms to watch for: sudden drops in Merchant Center feed processing, products vanishing from Shopping ads, sync errors in your ecommerce backend.

Quick-Fire Round-Up: The Rest of What Happened

UpdateWhat HappenedWhat To Do
Google Search Console: AI reports go globalThe Generative AI performance report is now available in every market as of 31 AugustLog in and check impressions from AI Overviews and AI Mode – new data source you haven’t seen before
Google Preferred Sources buttonAn embeddable button (20 Aug) that lets publishers ask readers to prefer them in AI Overviews, AI Mode and Top StoriesOnly relevant if you publish news or industry content; if so, drop the button somewhere prominent
Meta Ads placement exclusions removedMeta is removing the option to exclude specific placements from ad setsAudit brand safety exclusions now -Audience Network placements will be forced back into your delivery
Gemini 3.8 Flash added to Google AI ModeUsers can pick 3.8 Flash from the “+” menu in AI Mode’s ask barNothing to action – but useful to know when testing how your business appears in AI Mode responses
ChatGPT desktop app updatesSite URL changes without redeploying; Codex chat sharing; Box/Dropbox/SharePoint in LibraryHandy if you use ChatGPT Work; low-priority for most small businesses

The Bigger Picture

Two themes emerged over the last fortnight, and both are worth internalising.

AI is now the source of truth for citations, not the middleman. ChatGPT’s shift towards scoping searches by domain, combined with Google’s expanding AI Overviews, means the sites AI systems already trust for a topic keep getting more visibility. Everyone else has to compete on being the primary source, not a good summariser of primary sources. Original data, first-hand expertise and clear factual pages compound. Rewritten explainers don’t.

Measurement is getting harder before it gets easier. /goto obscures organic attribution. AI Overviews absorb the click. Rank tracking changes accuracy. If you make decisions based only on what a single tool tells you, the odds of making one bad call go up this month. Cross-check Search Console against GA4 against your ecommerce or CRM data before changing anything.


Your Mid-September Action Checklist

  • ☐ Cross-check organic traffic in GA4 against Search Console – the /goto redirect can misclassify sessions
  • ☐ Open the Generative AI performance report in Search Console (now global) and note baseline impressions
  • ☐ Ask your ecommerce developer whether your Shopping feed uses Merchant API or Content API
  • ☐ Audit your top service pages for a clear, extractable answer in the first 60–80 words
  • ☐ Check that OAI-SearchBot and ChatGPT-User aren’t blocked at your CDN or firewall
  • ☐ Review Meta ad set placement exclusions before they get removed
  • ☐ Add fresh content or a photo to your Google Business Profile if it’s been more than 30 days

Final Thought

None of this is an emergency for a well-run small business. Most of it can be checked in a Sunday evening pass through the tools you already use. The real value of a fortnight like this is spotting the pattern – which is that AI systems are getting better at deciding what to show and worse at explaining why. Original content, clear pages, real expertise and clean measurement still win. They just win a bit quieter now.

Sources for this round-up include Search Engine Land, Search Engine Roundtable, Search Engine Journal, Google Search Central Blog, Google Developers documentation, SUSO Digital, Promptwatch, Suganthan Mohanadasan, Nozzle, SerpAPI, and reporting from PPC.land, Digital Applied and Adido Digital. Snapshot as of 15 September 2026.

Scraping Reviews with Screaming Frog? [2025]

You can scrape reviews if they are :

– In Schema
– Have their own specific class of <p> tag

e.g. class=”review-tex text-base font-secondary”

Can you scrape the reviews then?

Yes, you can scrape the reviews if they are formatted in schema markup (like Review, AggregateRating, etc.) or if they belong to a specific class. Screaming Frog’s Custom Extraction feature will allow you to do this.

✅ How to Scrape Reviews in Schema or Specific HTML Classes Using Screaming Frog

1️⃣ Enable Structured Data Extraction (for Schema Reviews) If the reviews are in schema markup (JSON-LD, Microdata, or RDFa), Screaming Frog can directly extract them:

✔ Open Screaming Frog SEO Spider.

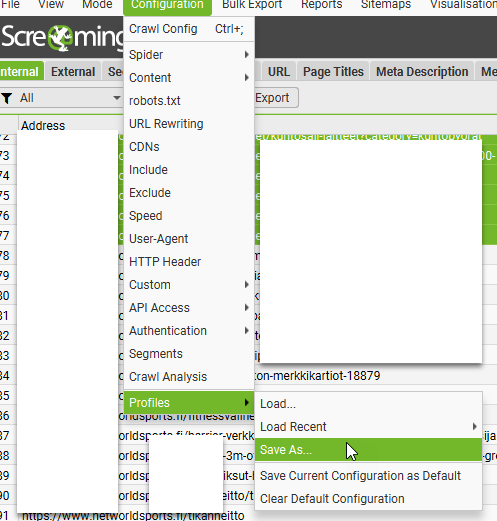
✔ Navigate to Configuration > Spider > Enable Structured Data.

✔ Start a crawl, and Screaming Frog will pull JSON-LD, Microdata, and RDFa formats.

✔ Once the crawl is finished, go to Reports > Structured Data > Review Schema to export the data.

2️⃣ Extract Reviews from a Specific Class (e.g., class=”review-text text-base font-secondary”) If the reviews are located within a specific tag that has a class, you can use Custom Extraction to get them:

✔ Open Screaming Frog and go to Configuration > Custom Extraction.

✔ Select XPath or CSS Selector based on your data structure. ✔ Use these extraction methods: 📝 Option 1: Using CSS Selector (Ideal for Class-Based Extraction) css Copy Edit p.review-text.text-base.font-secondary ✔

This will retrieve all tags that have the class review-text text-base font-secondary. 📝 Option 2: Using XPath (For More Complex Queries) xpath Copy Edit //p[contains(@class, ‘review-text text-base font-secondary’)] ✔

This will locate all elements with a class that includes “review-text text-base font-secondary”.

3️⃣ Run the Crawl and Export the Review Data

✔ Start the crawl and allow Screaming Frog to extract the reviews.

✔ After it’s done, go to Custom Extraction > Export Data.

✔ Open the resulting file in Excel or Google Sheets for further analysis. 🚀 Alternative Approach: Scraping JSON-LD Schema Reviews If the reviews are included in JSON-LD schema markup, you can extract them using: Custom Extraction (JSON-LD): xpath //script[@type=’application/ld+json’]/text()
✔ This extracts all JSON-LD data, which you can filter for reviews.
✔ Use JSON formatting tools (like jq or Python json.loads()) to clean and parse the data.

🔹 Summary: Can Screaming Frog Scrape Reviews?
✅ YES, if reviews are inside Schema Markup (JSON-LD, Microdata, RDFa).
✅ YES, if they have a specific class, using Custom Extraction.
✅ YES, if the reviews are static HTML, meaning they exist in the page source.
❌ NO, if reviews are loaded dynamically via JavaScript (use Selenium instead).

SEO News & Tips – September 2024

Actionable Points:

  1. Impact Assessment:
    • Analyze Core Update Impacts: If your site was affected, investigate potential causes such as relevance adjustments, intent shifts, or quality issues.
    • Run Delta Reports: Isolate dropped queries and landing pages using delta reports to identify the reasons for traffic decline.**
  2. Content Strategy:
    • Reassess Content Strategy: Move away from generic content aimed at search engines (SEO-first) and focus on user-first content that aligns with intent and provides real value.
    • Avoid Overloading Pages: Do not overload pages with excessive information. Make them clear and relevant to user intent.
  3. Quality Over Quantity:
    • Holistic Quality Evaluation: Improve overall site quality, including UX, ads, presentation, and sources. It’s not just about content but the experience as a whole.
    • Long-Term Quality Improvements: Use a “kitchen sink” approach—continuous, holistic improvements to demonstrate significant quality enhancement over time.
  4. Utilize User Engagement Data:
    • Measure User Engagement: Focus on engagement metrics like click-through rates (CTR), time on page, and interactions (Navboost signals) to improve rankings.
  5. Consider the Intent Shifts:
    • Study Intent Shifts: Understand changes in user intent. Ensure your content targets the appropriate search intent, whether transactional, informational, or navigational.
    • Use Natural Language Processing (NLP) Tools: Leverage NLP tools to analyze how well your content aligns with searcher intent.*
  6. RankBrain and Vector Search:
    • Optimize for RankBrain: Vector search re-ranks results based on intent. Focus on improving content relevancy through quality rater feedback and actual user interactions.
  7. Monitor Industry-Specific Trends:
    • Industry Trends: Be aware of specific industry shifts (e.g., pet insurance, tech products) and adjust your SEO strategy accordingly. Specialized retailers and informational sites are gaining over commercial giants like Amazon.
  8. Consider Site Authority:
    • Balance Domain and Brand Authority: Tom Capper’s study suggests sites with higher brand authority (BA) performed better than those relying solely on domain authority (DA). Focus on building brand recognition alongside traditional SEO efforts.
  9. Core Update Response:
    • Future-Proofing: Continue producing high-quality, intent-driven content as Google aims to reward helpful content over SEO-first strategies. Sites that improve post-HCU or core updates will continue to see gains.
  10. Action for Content Creators:
  • Engage with the Community: Marie plans to collaborate with SB Pro members to develop a system for scoring intent alignment, potentially enlisting community support to study core update effects.

Marie also encourages community engagement, suggesting that producing authentic, user-focused content will be a key driver of success in the evolving search landscape.

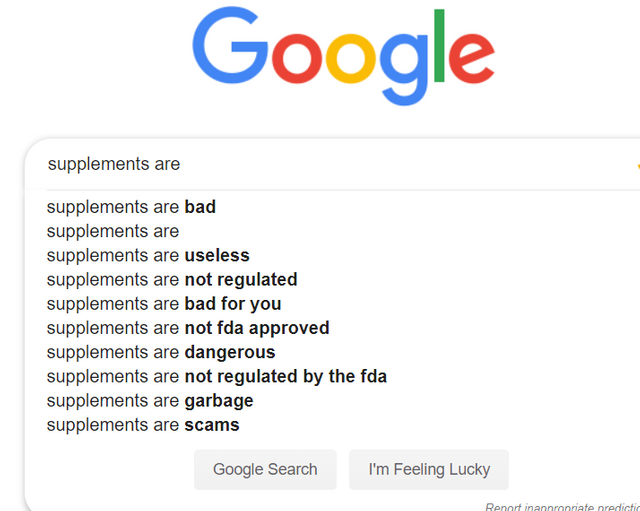
supplements are bad

*1. Use Natural Language Processing (NLP) Tools to Analyze Content Alignment with Searcher Intent

What is NLP?

Natural Language Processing (NLP) is a branch of artificial intelligence that focuses on the interaction between computers and humans through natural language. In the context of SEO and content creation, NLP tools help analyze and understand the nuances of language, enabling better alignment of your content with what users are searching for.

Why Align Content with Searcher Intent?

Searcher intent refers to the primary goal a user has when typing a query into a search engine. Understanding and aligning your content with this intent ensures that your pages meet the needs of your audience, leading to higher engagement, better rankings, and increased conversions.

How to Leverage NLP Tools:

  1. Identify Searcher Intent:
    • Types of Intent:
      • Informational: Users seeking information (e.g., “How to fix a leaky faucet”).
      • Navigational: Users looking to reach a specific website or page (e.g., “Facebook login”).
      • Transactional: Users intending to make a purchase or complete a transaction (e.g., “Buy iPhone 14”).
      • Commercial Investigation: Users researching products or services before making a decision (e.g., “Best DSLR cameras 2024”).
  2. Analyze Your Content:
    • Keyword Analysis:
      • Use NLP tools to analyze the keywords and phrases within your content to determine if they align with the identified searcher intent.
    • Content Structure:
      • Ensure your content is structured in a way that directly addresses the user’s query. For instance, use clear headings, bullet points, and concise paragraphs for better readability and relevance.
    • Semantic Analysis:
      • Assess the context and relationships between words to ensure your content comprehensively covers the topic.
  3. Optimize Content Based on Insights:
    • Content Gap Analysis:
      • Identify areas where your content may be lacking in addressing certain aspects of the searcher intent and enhance those sections.
    • Content Enrichment:
      • Add relevant information, multimedia elements, or interactive features to better satisfy user needs.
    • Language Refinement:
      • Adjust the tone, complexity, and style of your content to match the preferences and expectations of your target audience.

Recommended NLP Tools:

  1. Google Natural Language API:
    • Offers powerful text analysis capabilities, including sentiment analysis, entity recognition, and syntax analysis.
    • Google Cloud Natural Language
  2. IBM Watson Natural Language Understanding:
    • Provides comprehensive text analysis features such as keyword extraction, concept tagging, and emotion analysis.
    • IBM Watson NLU
  3. Ahrefs Content Gap Tool:
    • While not a pure NLP tool, it helps identify content gaps by comparing your site with competitors, which can be complemented with NLP analysis.
    • Ahrefs Content Gap
  4. Surfer SEO:
    • Integrates NLP techniques to optimize content structure and keyword usage based on top-ranking pages.
    • Surfer SEO
  5. Clearscope:
    • Uses NLP to provide keyword suggestions and content optimization recommendations to improve relevancy.
    • Clearscope

Implementation Steps:

  1. Choose the Right NLP Tool:
    • Select a tool that fits your technical expertise and specific needs. For instance, Google Natural Language API is highly customizable but may require more technical setup compared to user-friendly platforms like Surfer SEO.
  2. Conduct a Content Audit:
    • Use the chosen NLP tool to analyze your existing content. Look for metrics like keyword density, semantic relevance, and sentiment alignment with user intent.
  3. Map Content to Search Intent:
    • Categorize your pages based on the primary search intent they fulfill. Ensure each page clearly aligns with its intended user goal.
  4. Optimize and Update Content:
    • Based on the analysis, make necessary adjustments to improve alignment. This could involve rewriting sections, adding new information, or restructuring content for better clarity and relevance.
  5. Monitor and Iterate:
    • After optimization, continuously monitor your content’s performance. Use analytics to assess improvements in rankings, engagement metrics, and conversions, and iterate as needed.

*2. Run Delta Reports: Isolate Dropped Queries and Landing Pages to Identify Reasons for Traffic Decline

What are Delta Reports?

Delta reports in SEO are comparative analyses that track changes in your website’s performance metrics over specific periods. By comparing data before and after a Google core update (or any significant change), you can identify which queries and landing pages experienced fluctuations in traffic.

Why Run Delta Reports?

Running Delta reports helps you pinpoint the exact areas of your website that are affected by algorithm changes. Understanding these changes allows you to take targeted actions to recover lost traffic and optimize your site for future updates.

How to Run Delta Reports:

  1. Gather Data:
    • Time Frames:
      • Pre-Update Period: Data from a period before the core update (e.g., two weeks before).
      • Post-Update Period: Data from a period after the core update has been fully rolled out (e.g., two weeks after).
    • Metrics to Collect:
      • Organic traffic
      • Impressions
      • Click-through rates (CTR)
      • Average position
  2. Use SEO Tools:
    • Google Search Console (GSC):
      • Provides comprehensive data on search performance, including queries and landing pages.
      • Google Search Console
    • Google Analytics:
      • Offers insights into overall traffic patterns and user behavior.
      • Google Analytics
    • Third-Party SEO Tools:
      • Tools like SEMrush, Ahrefs, and Moz can provide additional data and more sophisticated reporting features.
      • SEMrush
      • Ahrefs
      • Moz
  3. Generate Comparative Reports:
    • Google Search Console Steps:
      1. Access Performance Report:
        • Navigate to Performance > Search Results.
      2. Set Date Range:
        • Select a date range that covers both pre-update and post-update periods.
      3. Export Data:
        • Export the performance data for both periods to a spreadsheet for easier comparison.
      4. Calculate Delta:
        • Use formulas to calculate the percentage change in impressions, clicks, CTR, and average position for each query and landing page.
  4. Analyze the Data:
    • Identify Drops and Gains:
      • Highlight queries and pages that saw significant drops or gains in traffic.
    • Segment the Data:
      • Break down the data by categories such as content type, topic, or user intent to identify patterns.
    • Look for Correlations:
      • Determine if there are common factors among the affected queries/pages, such as content quality, relevance, or technical issues.
  5. Identify Potential Causes:
    • Relevancy Issues:
      • Content may no longer align with the updated search intent or relevancy criteria.
    • Technical Problems:
      • Issues like slow page speed, mobile usability problems, or broken links can impact rankings.
    • Content Quality:
      • Thin content, outdated information, or lack of depth can lead to declines.
    • Competitor Improvements:
      • Competitors may have enhanced their content, earning higher rankings.
    • User Experience (UX):
      • Poor UX, intrusive ads, or difficult navigation can negatively affect rankings.
  6. Develop an Action Plan:
    • Content Optimization:
      • Revise and enhance content to better match searcher intent and improve quality.
    • Technical SEO Fixes:
      • Address any identified technical issues to improve site performance.
    • Improve UX:
      • Enhance the overall user experience to keep visitors engaged and reduce bounce rates.
    • Monitor Competitors:
      • Analyze top-performing competitors to understand what changes they made that may have contributed to their gains.
    • Continuous Monitoring:
      • Regularly update and monitor Delta reports to track the effectiveness of your optimizations and stay ahead of future updates.

Tools and Techniques for Delta Reporting:

  1. Google Search Console (GSC):
    • Export and Compare:
      • Export performance data before and after the update and use spreadsheet tools to calculate differences.
    • Filtering Options:
      • Use filters to narrow down specific queries or pages for detailed analysis.
  2. Google Analytics:
    • Custom Reports:
      • Create custom reports to compare traffic sources, user behavior, and conversion metrics across different periods.
    • Annotations:
      • Use annotations to mark the date of the core update, helping correlate changes in data with the update rollout.
  3. SEO Platforms:
    • SEMrush’s Position Tracking:
      • Track keyword rankings over time and compare pre- and post-update positions.
    • Ahrefs’ Site Explorer:
      • Analyze backlink profiles and organic search traffic changes.
    • Moz’s Rank Tracker:
      • Monitor keyword performance and identify ranking fluctuations.
  4. Spreadsheet Analysis:
    • Pivot Tables:
      • Use pivot tables to summarize and analyze large datasets effectively.
    • Visualization:
      • Create charts and graphs to visualize traffic trends and identify significant changes.

Best Practices for Delta Reporting:

  • Consistent Time Frames:
    • Ensure the comparison periods are equivalent in length and cover similar days of the week to account for any variability.
  • Account for Seasonality:
    • Be aware of seasonal trends that might affect traffic independently of the core update.
  • Focus on Significant Changes:
    • Prioritize queries and pages with substantial traffic drops or gains to address the most impactful issues first.
  • Iterative Analysis:
    • Continuously refine your analysis by incorporating additional data points or adjusting your reporting criteria as needed.

Putting It All Together: Enhancing Your SEO Strategy

By integrating NLP-based content analysis and Delta reporting, you can create a robust SEO strategy that not only aligns your content with user intent but also allows you to proactively identify and address issues arising from algorithm updates. Here’s a step-by-step approach to combining these strategies:

  1. Initial Content Audit:
    • Use NLP tools to assess the alignment of your existing content with searcher intent.
    • Identify content areas that need enhancement or restructuring.
  2. Post-Update Performance Analysis:
    • After a core update, run Delta reports to identify affected queries and pages.
    • Cross-reference these findings with your NLP analysis to understand if misalignment with search intent contributed to the declines.
  3. Optimization and Implementation:
    • Optimize affected content based on insights from both NLP analysis and Delta reports.
    • Enhance content quality, adjust for better intent alignment, and fix any technical issues identified.
  4. Continuous Monitoring and Improvement:
    • Regularly use NLP tools to keep your content aligned with evolving search intents.
    • Continuously monitor your site’s performance with Delta reports to stay ahead of any negative trends.
  5. Community Engagement and Learning:
    • Engage with SEO communities (like the Search Bar Pro Community mentioned in your summary) to share insights and learn from others’ experiences.
    • Stay updated with the latest SEO trends and algorithm changes to adapt your strategy accordingly.

Additional Resources

  • Google’s Search Quality Evaluator Guidelines:
  • Moz’s Beginner’s Guide to SEO:
  • Ahrefs’ SEO Learning Center:
    • Offers tutorials and articles on various SEO topics, including content optimization and performance analysis.
    • Ahrefs Learning Center
  • Surfer SEO’s Guides:
    • Detailed guides on using their tools for content optimization and SEO analysis.
    • Surfer SEO Guides

Implementing these strategies effectively can lead to improved search rankings, better user engagement, and sustained organic growth. By continuously aligning your content with user intent and proactively monitoring your site’s performance, you can navigate algorithm updates with greater confidence and resilience.

If you have any further questions or need assistance with specific tools or techniques, feel free to ask!

Implementing Redirects with Filezilla and MTPutty (On a sonasi server)

This is our inhouse protocol, it might differ in normal places…

Open FileZilla – connect to M2 server (magento 2, rather than our magento 1 server)

Click domains folder –

Select relevant domain

Select Rewrites

Right Click – Config folder and click View/Edit – Open in a text editor like Sublime

Add redirects in the following format:

#Note to say who did redirects on what date

rewrite ^/rwl-x-la-new-member-starter-pack.html$ /gym-equipment.html permanent;
rewrite ^/rwl-x-la-ultimate-starter-pack-intermediate.html$ /gym-equipment.html permanent;
rewrite ^/rwl-x-la-new-member-dumbbell-pack.html$ /gym-equipment.html permanent;

- Save the file

This will redirect the URL example.com/rwl-x-la-new-member-starter-pack.html to example.com/gym-equipment.html

and so on…the other 2 below will also redirect to gym-equipment.html

Open MTPUTTY

Connect to relevant server – in my case – server 3

type in “ntest” and check for any error messages

if ok – type in “nreload”

That should be it!

How to Buy a House in Italy for 1 Euro [step by step guide]

Depopulation, has some potential benefits for property investors!

Buying a house in Italy for 1 euro is a great opportunity, promoted by several towns aiming to revive declining populations and renovate old properties.

Here’s a step-by-step guide tailored for a UK resident:

Step-by-Step Instructions:

Research and Choose a Town: Several Italian towns have offered homes for 1 euro. Each town has different terms and conditions. Here are some notable ones:

  • Sambuca di Sicilia
  • Ollolai, Sardinia
  • Mussomeli, Sicily
  • Bivona, Sicily
  • Laurenzana, Basilicata

    Visit the Official Websites: Each town usually has an official website or a dedicated page for the 1 euro house initiative. Here are some URLs:

      Understand the Conditions: Each town has specific conditions that buyers must meet, such as:

      • Committing to renovate the property within a specified timeframe (usually 3 years).
      • Paying a deposit (often around €5,000), which is refunded after renovations are completed.
      • Using local contractors for the renovation work.

        Contact the Municipality: Send an email or call the municipal office to express your interest and get detailed information.

          Plan a Visit: It’s highly recommended to visit the town and view the properties. Contact the municipality to arrange a visit.

            Prepare Your Documents:

            • Passport
            • Proof of income
            • Proof of funds for renovation

              Sign the Preliminary Agreement: During your visit, if you decide to proceed, you will sign a preliminary purchase agreement (compromesso).

                Open an Italian Bank Account: You will need an Italian bank account to handle transactions and utility payments. Many banks offer services in English.

                  Hire a Local Notary (Notaio): The notary will handle the legal aspects of the purchase, ensuring the property is free from debts and encumbrances.

                    Finalize the Purchase: After the preliminary agreement, you will sign the final deed (atto di vendita) before a notary. This completes the purchase.

                      Commence Renovation: Begin renovation work as per the conditions. Ensure you adhere to local building codes and regulations.

                        1. Enjoy Your New Home: Once renovations are complete, you can enjoy your new Italian home!

                        Useful Resources:

                        This is a general guide, so make sure to get detailed information from the specific municipality you’re interested in. Good luck with your house hunt in Italy!

                        Deleting White Space from Excel Cells

                        I had to use the VBA method at the bottom to remove whitespace from a Screaming Frog custom extraction:

                        Method 1: TRIM Function

                        The TRIM function removes all spaces from text except for single spaces between words.

                        1. Suppose your text is in cell A1.
                        2. In another cell, enter the following formula:excelCopy code=TRIM(A1)

                        Method 2: CLEAN and SUBSTITUTE Functions

                        If there are non-breaking spaces (which TRIM doesn’t remove), you can use the SUBSTITUTE function to replace them with regular spaces first.

                        1. In a cell, enter the following formula:excelCopy code=SUBSTITUTE(A1, CHAR(160), " ") This replaces non-breaking spaces with regular spaces.
                        2. Then, apply the TRIM function:excelCopy code=TRIM(SUBSTITUTE(A1, CHAR(160), " "))

                        Method 3: Find and Replace

                        You can also use the Find and Replace feature to remove extra spaces:

                        1. Select the range of cells you want to clean.
                        2. Press Ctrl + H to open the Find and Replace dialog box.
                        3. In the “Find what” box, enter two spaces (press the space bar twice).
                        4. In the “Replace with” box, enter one space.
                        5. Click “Replace All.”
                        6. Repeat the process until no double spaces are found.
                        7. For leading and trailing spaces, you can remove them manually by replacing leading spaces with nothing and trailing spaces similarly.

                        Method 4: VBA Macro

                        For more advanced cleaning, you can use a VBA macro:

                        1. Press Alt + F11 to open the VBA editor.
                        2. Insert a new module by clicking Insert > Module.
                        3. Copy and paste the following code into the module:

                        Sub RemoveSpaces()
                            Dim cell As Range
                            For Each cell In Selection
                                If cell.HasFormula = False Then
                                    cell.Value = Trim(WorksheetFunction.Clean(cell.Value))
                                End If
                            Next cell
                        End Sub
                        

                        1. Close the VBA editor.
                        2. Select the range of cells you want to clean.
                        3. Press Alt + F8, select RemoveSpaces, and click Run.

                        By using these methods, you can efficiently remove unwanted whitespace from your cells in Excel.

                        How to Automate a Crawl & Populate a Report with Screaming Frog [Like DeepCrawl but 99% Cheaper]

                        Screaming Frog is the greatest SEO tool of all time. Possibly the greatest tool of all time, closely followed by the George Foreman grill.

                        There’s a free version  and if you have massive ecommerce website, with thousands of URLs, the posh paid version is well cheap too – if I remember rightly, is only about £200.

                        Absolute bargain.

                        Scheduling a Report / Crawl

                        Before you start – create a crawl config file.

                        I usually go with default settings, plus exclude cart pages and follow redirects.

                        You’ll also need to create a Google Drive and Looker Studio Account.

                        Schedule a Screaming Frog Crawl

                        File > Scheduling:

                        click “+Add”

                        Give the scheduled crawl a name and set the time and date you want the first crawl to run

                        Also choose the frequency.

                        Note —> if you have a computer with a decent processor, that runs fine when you are crawling with Screaming Frog and you’re still able to do you work, then just set it for a date and time when you’ll be in work and on your computer.

                        However, if you have a slower computer, and running Screaming Frog at the same time as trying to do your normal work slows the computer down too much, you’ll probably want to set the crawl overnight, or at your lunchtime.

                        You can set windows computers to “wake up”, as long as they are plugged in. So that you’re able to run a crawl before or after work.

                        Although your IT department might not like it – computer running unattended with a battery etc could be in theory a fire harzard etc.

                        More on how to wake up your computer, later…

                        Back to scheduling on Screaming Frog:

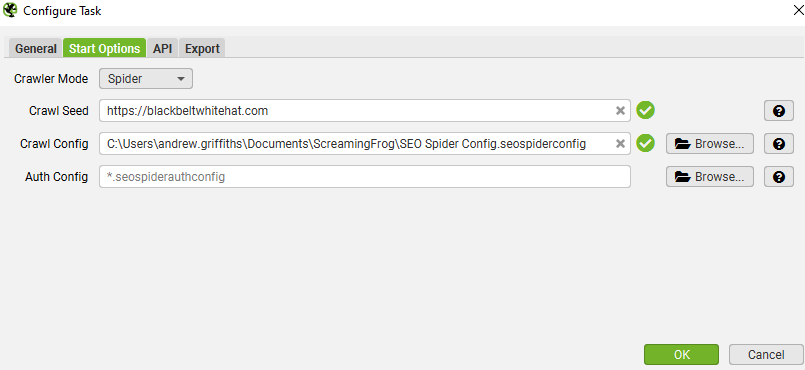
                        On the start options tab, enter the URL you want to crawl and select your config file

                        I didn’t choose anything for “auth config”

                        For crawl config – upload the config file you saved earlier

                        In the Export – choose a folder on your computer and your Google Drive account:

                        • Click the configure icon for “Export for Looker Studio” at the bottom.
                        • Click the 3 arrows to populate everything >>

                        By default, your crawl will go in a sheet in Google Drive at:
                        ‘My Drive > Screaming Frog SEO Spider > Project Name > [task_name]_custom_summary_report’.

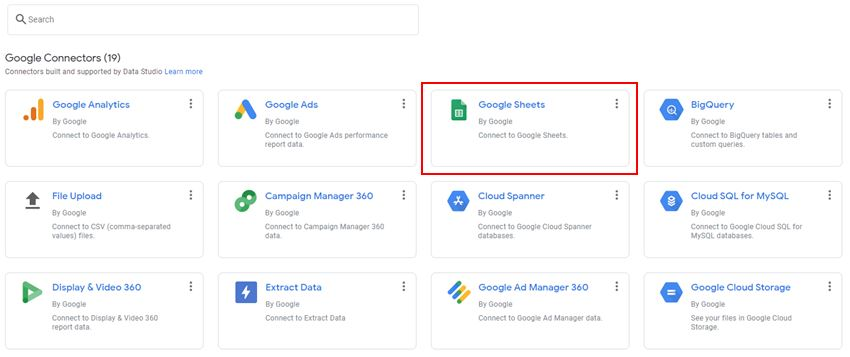
                        When asked – choose Google Sheets as a data source:

                        Ensure the ‘use first rows as headers’ option is ticked and select ‘Connect’ in the top-right.

                        • Add the Data Source to Each Table in the Report in Looker Studio

                        You can probably do this in bulk somehow, but I went to each table/graph and added the Google Sheet as the data source:

                        • When the scheduled crawl, crawls – the template should be populated
                        • Youll now have a nice looking visual report that automatically updates each week, or month, or as frequently as you like

                        Waking Up Your Computer so the Crawl Can Run

                        Screaming Frog won’t run unless your computer is on.

                        You can ‘wake up’ your computer though.

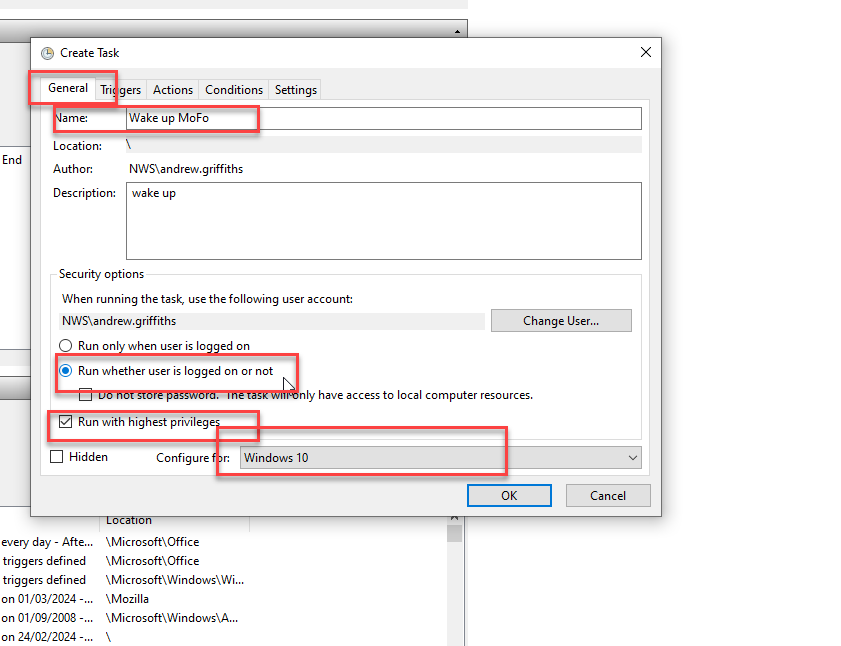
                        Search for “Task Scheduler”

                        • Create Task…

                        • Click the General Tab and use the following settings:
                        • Click on the “Actions” tab and choose a program to run. Doesn’t really matter what program, I usually choose chrome. SF should run automatically
                        • Click the “Triggers” tab and click new

                        schedule the computer to wake up at the same time and frequency that you’ve set for the screaming frog crawls.

                        Then, that should be it.

                        The best way to run automatic crawls, is to sin up to Google cloud. At the moment you get $300 worth of credits free, and each crawl on an average ecommerce sure, will cost around a dollar a go.

                        Here’s the tutorial on how to set up Screaming Frog on the cloud ☁️:

                        https://www.screamingfrog.co.uk/seo-spider/tutorials/seo-spider-cloud/

                        It’s a bit of a mission/long process, but worth it. I reckon.

                        Anyway, here is the report, in all her glory (well, 1 part of 1 page):

                        How to Make Coffee Stronger & Less Jittery [Reduces caffeine tolerance]

                        Okay so, caffeine is as necessary as oxygen to most parents.

                        **Drink coffee and consume everything else at your own risk, innit.**

                        Wait at Least 1 Hour Before Having a Coffee

                        You’re cortisol levels are high and adenesine levels are low in the morning, you can greatly reduce caffeine intake with minimal negative impact by waiting an hour after waking up, before consuming caffeine.

                        ^I robbed this concept from the Huberman Lab podcast…seems to work.

                        If youre a 3 or 4 a day type of guy, waiting an hour or two in the morning, you can usually cut back by 1 or perhaps 2 coffees per day.

                        Add These To Your Coffee ☕️

                        Make the fecker stronger by adding:

                        – 100mg agmatine – makes it more potent

                        – 100mg l theanine – makes it less jittery & last longer

                        Ideally take the agmatine 5 mins before the coffee, doesn’t make a massive difference though.

                        Agmatine is pretty potent and affects people differently.

                        There’s good research now on agmatine for depression and it had minimal side effects, usually GI upset and headaches for some at higher doses.

                        Studies on agmatine and depression used doses around 2.5g per day. Which is high.

                        Agmatine is classed as a “novel food” in the UK, so do your own research before necking ten ton of it in your next coffee.

                        Start with 100mg, people take much more but its best to find a sweet spot.

                        People use agmatine to drop caffeine intake and to reduce tolerance rather than to just make the daily coffee stronger.

                        1 coffee usually lasts me all day if I take 500mg agmatine in the morning.

                        Optimise Mitochondrial Function

                        Caffeine works by blunting the effects of adenosine. It can also increase dopamine levels slightly.

                        This isn’t the only way to get more energy. Research optimising mitochondrial function if you want to take your energy up another notch.

                        ALCAR, PQQ, coQ10, red light therapy and even methylene blue are options to fire up the powerhouses. Just do some research before jumping in, ALCAR can impact TMAO release which may or may not be bad for cardiovascular health (jury is still out), and methylene blue with red light therapy is highly effective but doctors and academics ha e different opinions on methylene blue and its long term effects.

                        Anything that reduces excessive inflammation will also help you feel better and more energised. Sounds woo woo, but look into the research on grounding and grounding mats (or just stand bare foot on the garden for 5 mins).

                        Other Stuff

                        Jumping in an ice bath with also give you a big hit of dopamine – the feel good motivational hormone – for at least a few hours.

                        getting sunlight in your eyes in the morning, and minimising light in the evening, especially blue light, is also good for optimising dopamine.

                        Light is important yo:

                        If you have chronic low energy, you could have burnout or even depression.

                        I’m not fully versed in burnout, but the way I understand it…you will normally derive energy and motivation from dopamine and feel good hormones, when you’re burnt out, you’ve depleted all your dopamine and it hasn’t been restocked – so you start relying on stress hormones to keep going.

                        Optimising dopamine levels and receptor sensitivity is pretty complex but you want to try and optimise sleep, and avoid too many dopamine peaking activities.

                        Positive intermittent reinforced is used in gambling and social media to keep people hooked – it hammers your dopamine levels. Adult / pawn films also does the same, as does coke, sugary foods and energy drinks.