
Creating a Heart Shape in Adobe Illustrator
- Select the circle tool
- Left click on the art board and add 100 and 100 as the dimensions
- Edit > Copy > Paste in place
- Hold shift and drag second circle to the right
- Rectangle Tool – create any sized rectangle
- Make sure SmartGuides are on
- Drag rectangle so that the rectangle’s left side, lines up with the middle of the left circle:

- Now line up the other side with the middle of the right circle:

- Go to the pathfinder menu and click the “Unite/Add” option:

- Now click the Rotate tool in the left-hand-menu
- Hold shift and rotate the shape 45 degrees
- Copy – paste in place
- Object>Transform>reflect (make sure it is vertical setting)
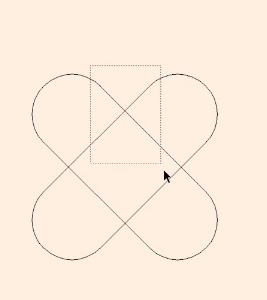
It should now look like this:
- Select all of the shape
- Hold alt & shift
- drag a copy
- On the copy, move one of the rounded rectangle shapes closer:

- Choose the shape that you want (probably the one on the right)
- Select the shape
- Go to pathfinder and select “Divide” (normally on the bottom left)
- Use the direct select tool, to remove the bottom left and right bits

taken from this free udemy course:
https://www.udemy.com/course/useful-tricks-and-tips-in-adobe-illustrator/
