Why Every SEO Should Learn Curl (And How to Start in 5 Minutes)
Most SEOs rely on Screaming Frog, Sitebulb, or Chrome DevTools to check how a website is performing technically. All brilliant tools, but there’s something faster, free, and already installed on your computer: a tiny program called curl.
First, what’s a “terminal”?
Before computers had pretty desktops and clickable icons, you controlled them by typing instructions. That text-based interface is called a terminal, or on Windows, Command Prompt. Think of it as texting your computer directly: you type a command, it does the thing, and prints text back at you.
It’s still around today because for certain technical jobs, typing one line is faster than clicking through ten menus.
What is curl?
curl stands for “Client URL.” It’s a built-in tool on Windows, Mac, and Linux that fetches webpages without rendering them. Instead of seeing the pretty version your browser shows you, you see the raw response the server sends back. Exactly what Googlebot sees when it crawls your site.
That’s the gold for SEO. Your browser hides things; curl shows everything.
Your first curl check in 4 steps
Open Command Prompt. Press the Windows key, type cmd, hit Enter.
Type the command:curl -I https://yourdomain.com (the capital I means “headers only”).
Hit Enter. The server’s response headers print out instantly.
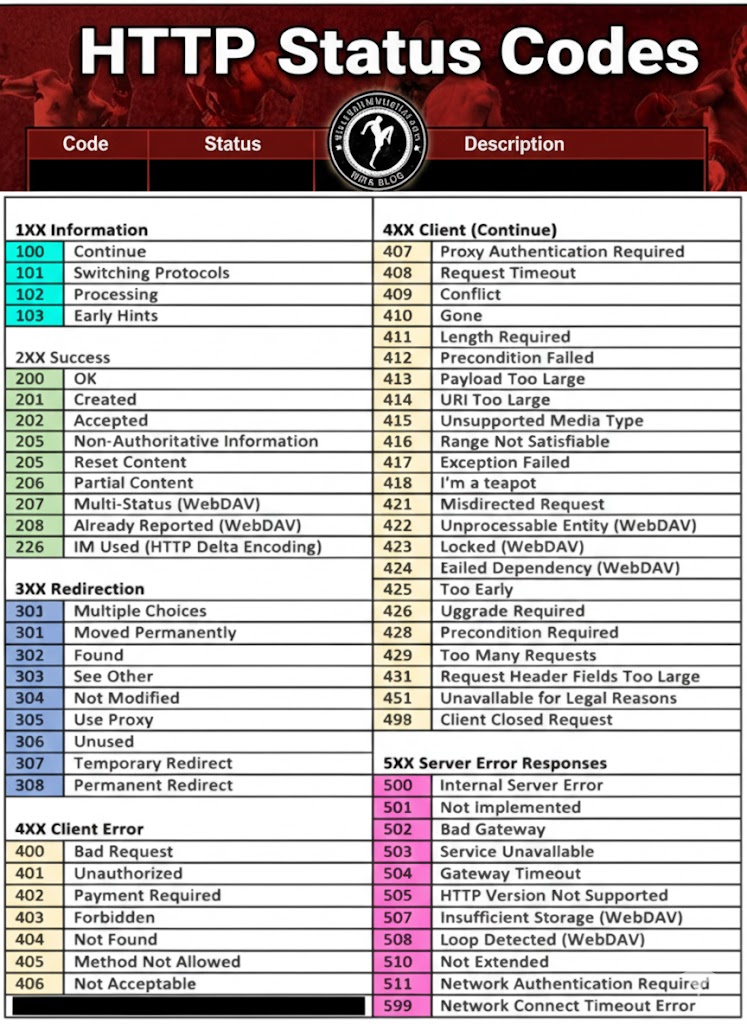
Read the results. Status code is on line one — 200 means OK, 301 means redirect, 404 means missing.
That’s it. You’ve just made the same request Google makes to your site thousands of times a day.
Why this matters for SEO
A single curl check reveals things a browser hides: status codes (is the page actually returning 200?), caching rules (is the CDN configured properly?), security headers (HSTS, X-Frame-Options), server fingerprints (what platform is the site built on?), and redirect chains (are there unnecessary hops slowing down crawling?).
It’s also the fastest way to spot staging environments accidentally leaking into Google’s index, broken canonicals, or compression that’s silently switched off.
That saves the complete response, headers and HTML- to a text file you can open in VS Code or Notepad++. Brilliant for auditing canonicals, hreflang, structured data, and meta tags in seconds.
The takeaway
Curl is the closest thing you’ll get to seeing your site through Google’s eyes. Five minutes to learn, a lifetime of faster audits. Open Command Prompt today and try it on your homepage, you’ll be amazed what it tells you.
It’s a way of pulling info from websites, without a browser. I think
Ever wondered how Google turns your lovingly handcrafted website into a ranking somewhere below a Reddit thread from 2013? It’s not magic, it’s just a long queue of tiny robot librarians fetching HTML, executing JavaScript, and occasionally having nervous breakdowns when they hit your React app.
This is the life cycle of a webpage inside Google’s digestive system: crawl, render, index, panic. Let’s go step by step before your sitemap starts crying.
1. Crawling: getting the raw HTML
1.1 URL discovery & crawl queue
Googlebot first has to discover your URLs. That can happen via:
Other Google systems (e.g. feeds, previous crawls)
Discovered URLs go into a crawl queue with priority based on things like page importance and your site’s crawl budget.
1.2 robots.txt and basic checks
Before requesting the URL, Googlebot:
Fetches robots.txt
Checks if the URL (and key resources like JS/CSS) are allowed
Applies host load limits and crawl budget rules
If the page or important JS/CSS files are blocked in robots.txt, Google:
Won’t crawl them
Won’t be able to fully render your JS content later
Practical implication: Never block /js/, /static/, /assets/, etc. in robots.txt.
1.3 Fetching the HTML (“first wave”)
Googlebot makes a normal HTTP request (like a browser without UI):
Gets the initial HTML (without having run JS yet)
Parses head tags (title, meta description, canonical, meta robots, hreflang, etc.)
Extracts links from the HTML and adds them to the crawl queue
Notes references to resources (JS, CSS, images)
At this stage, only what’s in the raw HTML is visible. If your content is 100% client-side rendered (React, Vue, etc.), Google might see almost nothing yet.
Google can sometimes do basic indexing directly from the HTML (e.g. if content is already there), but JS-heavy pages need the next phase.
2. Rendering: running your JavaScript
Google describes the JS pipeline as: Crawling → Rendering → Indexing. Rendering happens in a separate system using an evergreen version of Chromium (a headless Chrome kept relatively up-to-date) called the Web Rendering Service.
2.1 The render queue (“second wave”)
After the initial crawl:
Google adds the page to a render queue.
When resources allow, that queue feeds URLs into the rendering system.
Until rendering happens, Google only “knows” what was in the raw HTML.
This is why people talk about “two waves of indexing” for JavaScript:
Wave 1: Index from HTML (if possible)
Wave 2: Index updated content after JS has run
Modern research suggests the process is smoother and faster than years ago, but there is still a render queue and potential delay for JS content.
2.2 How Google’s renderer behaves
When a page reaches the renderer:
Google loads it in an evergreen Chromium environment (no UI).
It fetches JS, CSS, and other resources (subject to robots.txt, CORS, etc.).
It executes JavaScript for a limited amount of time (shorter than a user session).
JS can:
Modify the DOM
Inject content
Fetch JSON/XHR/data and add it to the page
Add structured data (application/ld+json) dynamically
Important constraints (from Google’s docs & tests):
No user interactions: Google doesn’t click, type, or scroll like a user.
Time limits: Long chains of async calls may never complete before the renderer stops.
Resource limits: Heavily blocking scripts or endless network calls can break rendering.
“Noindex = no render” effect: If a page is noindex, Google generally won’t bother rendering it.
2.3 Post-render snapshot
Once JS finishes (or time runs out), Google:
Takes the final DOM snapshot (what a user would see after JS).
Extracts:
Visible text content
Links added by JS (e.g. SPA navigation)
Structured data present in the DOM
Meta tags if they are changed or added by JS
This rendered snapshot is what feeds into the real indexing stage.
3. Indexing: storing & scoring the rendered content
With the rendered HTML/DOM in hand, Google moves to indexing.
3.1 Understanding the content
From the rendered DOM, Google:
Tokenizes and stores text (words, phrases, headings).
Maps entities, topics, and relationships.
Reads links (anchor text + target URL) added by your JS navigation.
Parses structured data (schema.org, etc.) that JS may have injected.
This is the version of the page that can now rank for queries matching that content.
3.2 Canonicals, duplicates & signals
Indexing also handles:
Canonical selection (HTML tags, redirects, link signals).
Duplicate / near-duplicate detection, especially if JS rewrites similar pages.
Applying meta robots and HTTP headers from the final state after JS (for most cases).
If Google decides another URL is the canonical, your rendered JS content might be stored but not shown as the main result.
3.3 Final result: searchable document
After indexing, the document is:
Stored in Google’s index with:
Content (from rendered DOM)
Links
Structured data
Various quality & relevance signals
Ready to be retrieved and ranked when a user searches for related queries.
4. Where JavaScript sites usually break this flow
Because JS adds extra moving parts, a bunch of things can go wrong between crawl → render → index:
Blocked JS/CSS in robots.txt Google can’t render layout or content if the files are disallowed.
Content only after interaction If key text appears only after a click/scroll or in a modal that never opens, Google won’t see it.
Too slow or broken rendering Heavy JS, long waterfalls, or failing XHR calls mean the DOM never contains the content when Google takes the snapshot.
Infinite scroll / SPA routing without proper URLs If content is loaded endlessly on one URL without crawlable links or pagination (e.g. no ?page=2, no anchor links), Googlebot may only see the initial “page”.
Client-side only structured data that doesn’t materialise in time If JS injects JSON-LD but too slowly (or fails), rich results won’t trigger.
5. How to see what Google sees (JS-specific)
To understand how your JS is being processed:
Use URL Inspection → “View crawled page” & “Screenshot” in Search Console to see the rendered DOM.
Compare “HTML” vs “Rendered HTML” to spot what content only appears post-JS.
Use “Test live URL” if you suspect render-queue delay.
Check Coverage / Pages report for “Crawled – currently not indexed” patterns that often show render/index issues.
So there you have it — from lazy bots fetching half your HTML to a headless Chrome pretending to be a real user for 0.3 seconds. Somewhere in that chaos, your content might actually get indexed.
If your JavaScript site isn’t showing up, don’t blame Google just yet — try unblocking your own files and giving the crawler half a chance. Think of it as SEO mindfulness: eliminate obstacles, breathe deeply, and let the bots eat your content in peace.
Explained in simpler terms – How Googlebot Crawls Javascript –
Stage 1 – Discovery & Crawling: “Finding your page and grabbing the first copy”
1. Google finds your URL
Google finds pages from things you already know:
Links on other sites
Your internal links
Your XML sitemap
Stuff you submit in Search Console
It puts those URLs in a big to-do list (crawl queue).
2. robots.txt check
Before visiting a URL, Google checks your robots.txt file:
If the page or important files (JS/CSS) are blocked, Google is basically told: “Don’t look here.”
If they’re allowed, it moves on.
Simple rule for you: Never block your JS/CSS folders in robots.txt.
3. Google downloads the HTML (Wave 1)
Google now requests the page, just like a browser:
It gets the basic HTML (before any JavaScript runs).
From that HTML it grabs:
Title, meta description, canonical, meta robots, etc.
Any plain text that’s already there
Links to other pages
Links to JS/CSS/images
At this point, Google has not run your JavaScript yet.
If your important content is already in the HTML (e.g. server-side rendered), Google can often index it right away from this “first wave”.
Stage 2 – Rendering: “Actually running your JavaScript”
Now Google needs to know what your page looks like after JS runs – like a real user would see it.
Because this is heavy work, Google doesn’t do it instantly for every URL.
4. Render queue (waiting line)
After the first crawl, JavaScript pages go into a render queue:
Think of it like: “We’ve saved the HTML. When we have time, we’ll come back and run the JS.”
So for a while, Google might only know the bare HTML version of your page.
5. Headless Chrome renders the page
When your page reaches the front of the queue, Google loads it in something like Chrome without a screen (headless browser).
This browser:
Downloads JS/CSS (if not blocked)
Executes the JS for a short amount of time
Lets JS:
Change the DOM (the page structure)
Insert more text
Add more links
Inject structured data (JSON-LD)
Then it takes a snapshot of the final page – the “after JS” version.
This is basically:
“What a user would see if they opened your page and waited a bit.”
6. Things that can go wrong here
This is where JS sites often break:
Blocked JS/CSS → Google can’t see the layout or content properly.
Very slow JS → content appears after Google stops waiting.
Content only after a click/scroll → Google doesn’t usually click buttons or scroll like a human.
Broken scripts / errors → content never appears at all.
Result: Google’s snapshot may miss your main content.
Stage 3 – Indexing: “Filing your page in the library”
Now Google has:
Version 1: HTML-only (first wave)
Version 2: Rendered DOM (after JS runs)
7. Understanding the rendered page
From the rendered snapshot Google:
Reads all the visible text
Sees headings and structure
Follows any extra links added by JS
Reads structured data (schema)
Applies canonical tags / meta robots, etc.
This updated information is used to update your page in the index (second wave).
8. Search results
When someone searches:
Google looks through its index of pages (which contains that rendered version).
It decides which pages are most relevant.
It shows your URL in the results.
When the user clicks it, they go to your live site, not to Google’s stored copy.
Quick “JS SEO” checklist for you
If you remember nothing else, remember these:
Can I see my main content in the raw HTML?
If yes → you’re mostly safe (e.g. SSR or hybrid).
If no → you’re relying heavily on rendering; be extra careful.
Are JS & CSS allowed in robots.txt?
They should be.
Does important content require a click/scroll?
Try to have key text and links visible without interaction, or use proper URLs for loaded content.
Is the page reasonably fast?
If it takes ages for content to appear, Google may bail before seeing it.
Use Search Console’s URL Inspection → “View crawled page”
Compare:
HTML Google saw
Rendered HTML
If you don’t see your text in the rendered version → that’s a problem.
Verify that product schema (JSON-LD) is implemented correctly on example.co.uk after the migration to Adobe Commerce (Magento). The script crawls your chosen product URLs and reports if required fields like price, brand, sku, and availability are present.
Step 1 – Open a terminal
Click the black terminal icon on the Pi desktop.
Step 2 – Check Python 3
python3 --version
You should see something like Python 3.9.2 (any 3.7+ is fine).
import requests, json, csv, time
from bs4 import BeautifulSoup

# ---------- configuration ----------
# Put your product URLs here (you can add as many as you like)
urls = [
    "https://www.example.co.uk/example-product-1",
    "https://www.example.co.uk/example-product-2"
]

# Fields you want to confirm exist in the Product schema
required_fields = ["name", "brand", "sku", "price", "priceCurrency", "availability"]

# Optional delay between requests (seconds)
delay = 2

# ---------- functions ----------
def extract_product_schema(url):
    try:
        r = requests.get(url, timeout=15)
        soup = BeautifulSoup(r.text, "html.parser")
        for tag in soup.find_all("script", type="application/ld+json"):
            try:
                data = json.loads(tag.string)
                if isinstance(data, list):
                    for item in data:
                        if item.get("@type") == "Product":
                            return item
                elif data.get("@type") == "Product":
                    return data
            except Exception:
                continue
    except Exception as e:
        print(f"Error fetching {url}: {e}")
    return None

def check_fields(product_json):
    found = json.dumps(product_json)
    return [f for f in required_fields if f not in found]

# ---------- main ----------
results = []
for u in urls:
    print(f"Checking {u} ...")
    product = extract_product_schema(u)
    if not product:
        print(f"❌ No Product schema found: {u}")
        results.append([u, "No Product schema", ""])
    else:
        missing = check_fields(product)
        if missing:
            print(f"⚠️ Missing: {', '.join(missing)}")
            results.append([u, "Missing fields", ", ".join(missing)])
        else:
            print(f"✅ All key fields present")
            results.append([u, "All fields present", ""])
    time.sleep(delay)

# ---------- save to CSV ----------
with open("schema_results.csv", "w", newline="") as f:
    writer = csv.writer(f)
    writer.writerow(["URL", "Status", "Missing Fields"])
    writer.writerows(results)

print("\nDone! Results saved to schema_results.csv")
Save and exit:
Ctrl + O, Enter → save
Ctrl + X → exit
Step 6 – Edit your URLs
Later, open the script again (nano check_schema.py) and replace the two example links with your 10–50 product URLs. Each URL must be inside quotes and separated by commas.
Step 7 – Run the script
python3 check_schema.py
It will:
Fetch each page
Extract the Product JSON-LD
Report any missing fields
Save a summary to schema_results.csv in the same folder
The above example, was based on this product schema:
Current product schema

<script type="application/ld+json">
{
"@context": "http://schema.org",
"@type": "Product",
"description": "Best boxing gloves for any level martial arts fighter. Thanks to the range of sizes on offer, these sparring gloves are suitable as adults or kids boxing gloves. Crafted from premium Maya hide leather material, these are long-lasting boxing training gloves. Pink or Black available.", "name": "BlackBeltWhiteHat Boxing Gloves",
"image": "https://nwscdn.com/media/catalog/product/cache/h265xw265/b/o/boxing-gloves-black_1.jpg",

"sku": "BlackBeltWhiteHat-boxing-gloves",

"url": "https://www.nicemma.com/BlackBeltWhiteHat-boxing-gloves.html",

"brand": "BlackBeltWhiteHat",

"offers": [

{

"@type": "Offer",

"itemCondition": "http://schema.org/NewCondition",

"price": "7.99",

	"availability": "InStock",

	"priceCurrency": "GBP",

	"url" :"https://www.nicemma.com/BlackBeltWhiteHat-boxing-gloves.html"

}

]

,

"review": [

{


"@type": "Review",


"author": {


"@type": "Person",


"name" : "Danny "

},


"datePublished": "2020-08-20",


"description": "These gloves are great- really comfortable and easy to handle. I have got a good amount of use out of these so far and would highly recommend these to anyone looking for a pair of both long lasting and high quality gloves!

",

"name": "Amazing All Round",
"reviewRating": {
"@type": "Rating",
"bestRating": "5",
"ratingValue": "5",
"worstRating": "1"

}


} ]

,

"aggregateRating": {

"@type": "AggregateRating",

"ratingValue": "5",

"reviewCount": "1"

}

}

</script>
Please note:
You want the full productGroup Schema on the “main product” page.
On the variant pages e.g. nicemma.com/mma-t-shirt?red-XL – You still want the ‘normal’ product schema NOT productGroup
Here’s a brief overview of some of Jung’s essential concepts. Enjoy…
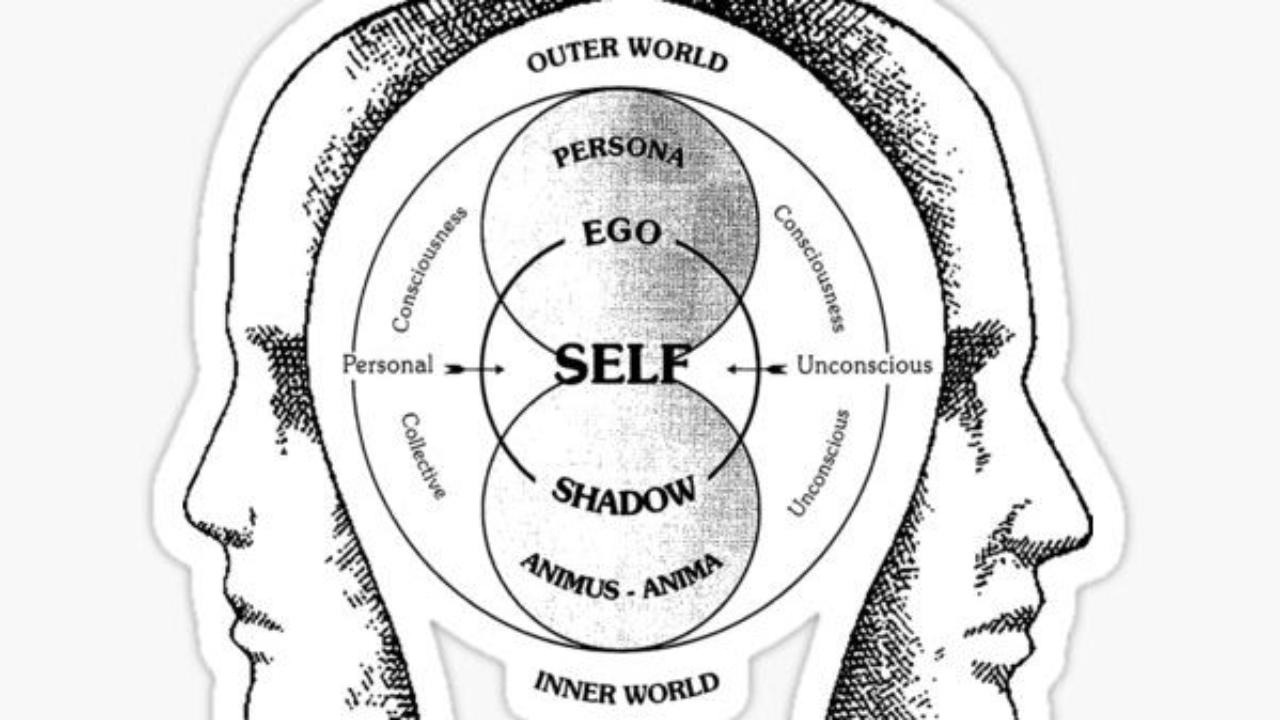
Jung’s Model of the Psyche
The Structure of the Psyche that big Carl Jung introduced, was a three-part, cool as fuck model that collectively kicked his old pal Fraud square in the ball sack:
Ego: This is our conscious mind, where we keep thoughts, memories, and emotions (those things weak people have) that we’re aware of.
Personal Unconscious: This part holds forgotten or repressed memories and experiences, like the time your ma dropped you on your head when you were 1.
Collective Unconscious: A shared, universal layer of the unconscious that connects all humans. In theory. This could explain why all ancient cultures have similar myths and stories about dragons and mermaids and stuff.
Core Concepts
Archetypes: These are universal, inherited patterns of thought or symbolic imagery that come from the collective unconscious.
What does that mean?
Imagine your mind is a big library, and it has books with characters that everyone in the world can see and shares in this library.
These characters show up in loads of different ancient stories, even back in the day when the world was very segregated – because we had to walk or get on a horse to travel places…so people in the Scottish Highlands for example, probably didn’t share information that much with the French. Cos you know, fuck walking that far. Also languages and translating iPhones weren’t all that back in the 11th century.
Despite this, similar myths and stories with similar characters emerged across the world at this, ancient/old time – we’re talking a few thousand years ago. Well a few hundred anyway.
The hero for example, still shows up in modern stories. The hero’s journey – bloke is living day to day life, gets a call to action, kills loads of baddies, discovers himself, goes home.
Jung thought that these similar stories and characters emerged across the world, because of the “collective unconscious”.
Basically, we all have some kind of default programming that we are not conscious of. This is shown in the stories we tell, and they shape how we see the world and possibly, how we classify everyone.
Side note- this sounds similar to “morphic resinence” theory. Which states that when a species learns something new on one side of the world, the new knowledge is somehow used and adopted by the same species then other side of the world.
Examples include: The Mother, The Hero, The Wise Old Man, The Child, The bellend, and The Trickster.
Individuation: This is the journey of integrating both conscious and unconscious elements.
You know that you are aware when someone else is a complete c*nt? Well, we are not so good at being objective with ourselves.
Individuation kinda starts with knowing yourself, your own issues, your traumas, and how you project them.
Individuation is a process of self-discovery – becoming self aware and less of a knobhead that runs on default and auto-pilot.
People need to get to know themselves better, and stop distracting themselves with social media, TV, gaming etc if they want to develop in this way.
Keeping a dream journal can help – as this can, in theory, tell you what your subconscious is processing and ‘doing’. Incidentally, taking l-theanine before bed really gives you vivid dreams.
Understand what triggers you, why you feel the need to do certain things like judge people and get angry.
Face your mother fucking shadow. The part of you that you don’t like and try to hide. Everyone gets jealous, angry etc – this is fine, as long as you don’t act on it. It’s normal, move into and explore these feelings.
Be honest with yourself and accept your faults, so you can then work on them.
Complexes: Often caused by trauma, complexes can be good or bad.
Sometimes seen as clusters of thoughts, feelings, and memories centred around a specific idea within the personal unconscious.
Common complexes relate to parents, inferiority and power/status. Being aware of these complexes can help us grow and be ‘better’. Remember – You are enough and all that, but you can still grow and learn as along as you live.
Psychological Types
Jung identified two attitudes and four functions of consciousness:
Attitudes: Extraversion (like attention) and Introversion (likes to be alone).
Functions: Thinking, Feeling, Sensation, and Intuition.
Shadow: This represents the unconscious, often negative or repressed sides of our personality. Lots of memes about this fucker. Probably why you criticise people based on your own insecurities.
Anima/Animus: The feminine aspect found in males (Anima) and the masculine aspect found in females (Animus).
Persona: This is the “mask” or public persona we show to the world.
Self: The central archetype that symbolizes the unified psyche and the ultimate goal of individuation. Key Principles The psyche is self-regulating and always striving for balance and wholeness.
Dreams and symbols play a crucial role in helping us understand the unconscious. The collective unconscious shapes behaviours and experiences across different cultures.
The Jungian Approach to Therapy takes a fresh look at mental health by focusing on the present and future, rather than getting stuck in past experiences. It highlights how crucial dreams and active imagination are for tapping into the unconscious mind.
The goal is to guide individuals toward individuation and self-realization, helping them become their true selves. It also acknowledges the healing power of engaging with images and symbols, which can be incredibly transformative.
Diagram (above^)
Jung’s Model of the Psyche text [Collective Unconscious] | v [Personal Unconscious] | v [Ego] This simple diagram shows the layered structure of the psyche based on Jung’s theory.
At the deepest level is the collective unconscious, followed by the personal unconscious, with the ego sitting at the surface of our conscious awareness. The ego is a right wanker.
Jung’s psychology is all about integrating every part of our personality, including the shadow and spiritual aspects, to achieve a sense of psychological wholeness. His ideas have left a significant mark on the field of psychology, influencing areas like personality assessment (think Myers-Briggs Type Indicator) and dream analysis.
Carl Jung’s idea of synchronicity
Carl Jung’s idea of synchronicity refers to those coincidences that happen to us when we are more self aware.
Jungian psychologists think that these coincidences connect our inner thoughts & feelings with the ‘outside ‘real’ world, exposing how our minds and the material universe are intertwined.
What is Jungian Synchronicity?
Acausal Connection: Synchronicity connects our internal psychological experiences—like dreams and thoughts—with external events based on meaning rather than a straightforward cause-and-effect relationship.
Example: Imagine a patient dreaming about a golden scarab, only to have a real scarab beetle show up at Jung’s window during their therapy session.
Collective Unconscious: This phenomenon occurs when personal unconscious elements resonate with universal archetypes that are common to all of humanity.
Relativity of Time/Space: Jung proposed that synchronicity reveals a “psychically relative space-time continuum,” where our unconscious experiences blur the usual boundaries of time and space.
(Western Science) | Synchronicity (Jungian View)
Based on cause-effect chains | Meaningful, acausal parallels Governs physical phenomena Connects psyche and matter Objective, measurable | Subjective, symbolic
How to Generate Synchronicity
While you can’t force synchronicity, there are practices that can help you become more open to those meaningful coincidences:
Heighten Awareness – Pay attention to patterns in your dreams, symbols, numbers, or recurring themes. Example: If you keep encountering a specific animal or phrase, it might be a sign that you’re tapping into an archetypal message.
Engage the Unconscious – Try using active imagination (Jung’s technique of conversing with your unconscious) or journaling to delve into your inner imagery.
Synchronicity often pops up during transitional states, like meditation or when you’re in a creative flow. Interpret Symbolism Look for personal or archetypal meanings in coincidences.
Example: A chance meeting could reflect something unresolved in your emotional landscape. Cultivate Openness Try to step back from relying solely on rational thought; allow yourself to track patterns
Keep a synchronicity journal to spot recurring themes or symbols as they emerge over time.
Clinical and Philosophical Context Therapeutic Use: About 70% of therapists see the value of synchronicity in uncovering unconscious material, although patients often feel a bit misunderstood when they share these experiences.
Individuation: Synchronicity plays a key role in Jung’s idea of self-realization by helping to blend conscious and unconscious elements.
Criticism: Focusing too much on synchronicity can sometimes veer into superstition or delusion, so it’s important to interpret it with balance.
A Modern Perspective Jung teamed up with physicist Wolfgang Pauli to connect synchronicity with the non-local aspects of quantum theory. While it hasn’t been scientifically proven, it still serves as a fascinating tool for exploring the unity of psyche and matter, as well as our search for existential meaning. By being mindful of coincidences and archetypal symbols, people can harness synchronicity’s insights for personal growth and creativity.
As Jung wisely said:
“Synchronicity is an ever-present reality for those who have eyes to see”.
As others say
“Shut up you mad cunt, it’s just coincidence”.
I had synchronicity happen once – which could be just the law of averages, but I dreamt about seeing an old mate in a specific street in Wrexham, and he was wearing a green jacket…this then actually happened a few weeks later. Which freaked me out.
– In Schema
– Have their own specific class of <p> tag
e.g. class=”review-tex text-base font-secondary”
Can you scrape the reviews then?
Yes, you can scrape the reviews if they are formatted in schema markup (like Review, AggregateRating, etc.) or if they belong to a specific class. Screaming Frog’s Custom Extraction feature will allow you to do this.
✅ How to Scrape Reviews in Schema or Specific HTML Classes Using Screaming Frog
1️⃣ Enable Structured Data Extraction (for Schema Reviews) If the reviews are in schema markup (JSON-LD, Microdata, or RDFa), Screaming Frog can directly extract them:
✔ Open Screaming Frog SEO Spider.
✔ Navigate to Configuration > Spider > Enable Structured Data.
✔ Start a crawl, and Screaming Frog will pull JSON-LD, Microdata, and RDFa formats.
✔ Once the crawl is finished, go to Reports > Structured Data > Review Schema to export the data.
2️⃣ Extract Reviews from a Specific Class (e.g., class=”review-text text-base font-secondary”) If the reviews are located within a specific tag that has a class, you can use Custom Extraction to get them:
✔ Open Screaming Frog and go to Configuration > Custom Extraction.
✔ Select XPath or CSS Selector based on your data structure. ✔ Use these extraction methods: 📝 Option 1: Using CSS Selector (Ideal for Class-Based Extraction) css Copy Edit p.review-text.text-base.font-secondary ✔
This will retrieve all tags that have the class review-text text-base font-secondary. 📝 Option 2: Using XPath (For More Complex Queries) xpath Copy Edit //p[contains(@class, ‘review-text text-base font-secondary’)] ✔
This will locate all elements with a class that includes “review-text text-base font-secondary”.
3️⃣ Run the Crawl and Export the Review Data
✔ Start the crawl and allow Screaming Frog to extract the reviews.
✔ After it’s done, go to Custom Extraction > Export Data.
✔ Open the resulting file in Excel or Google Sheets for further analysis. 🚀 Alternative Approach: Scraping JSON-LD Schema Reviews If the reviews are included in JSON-LD schema markup, you can extract them using: Custom Extraction (JSON-LD): xpath //script[@type=’application/ld+json’]/text()
✔ This extracts all JSON-LD data, which you can filter for reviews.
✔ Use JSON formatting tools (like jq or Python json.loads()) to clean and parse the data.
🔹 Summary: Can Screaming Frog Scrape Reviews?
✅ YES, if reviews are inside Schema Markup (JSON-LD, Microdata, RDFa).
✅ YES, if they have a specific class, using Custom Extraction.
✅ YES, if the reviews are static HTML, meaning they exist in the page source.
❌ NO, if reviews are loaded dynamically via JavaScript (use Selenium instead).