JS is a high level, object oriented multi paradigm programming language
Lexical scoping – scoping is controlled by placement of functions and blocks in the code
Scope is the space or environment in which a certain variable is declared.
There are 3 main types of scope for variables:
Global scope
Function scope
Block scope
The Scope of a variable, is the region of our code where a certain variable can be accessed.
Scope Chain in JavaScript
I asked Chat GPT “what is scope chain in JavaScript?”
A scope chain in JavaScript refers to the hierarchical order of scopes, with each scope having access to its own variables and those of its parent scopes.
This hierarchy is established based on where functions and blocks are physically located within the code (lexical scoping).
When a variable is referenced in JavaScript, the engine looks for the variable in the current scope.
If it doesn’t find it there, it moves up the chain to the parent scope. This process continues all the way up to the global scope if necessary. If the variable isn’t found in the global scope, a ReferenceError is thrown.
Here’s a simple example to demonstrate the concept:
let globalVar = "global"; // global scope

function outer() {
    let outerVar = "outer"; // outer function scope

    function inner() {
        let innerVar = "inner"; // inner function scope

        console.log(innerVar); // "inner", found in inner scope
        console.log(outerVar); // "outer", not found in inner scope but found in outer scope
        console.log(globalVar); // "global", not found in inner or outer scopes but found in global scope
    }

    inner();
}

outer();
In the above example, the inner function’s scope chain includes the inner scope, the outer scope, and the global scope. The outer function’s scope chain includes the outer scope and the global scope. The global scope is at the top of every scope chain.
The scope chain is fundamental to understanding variable lookup and closure behavior in JavaScript.
Hoisting in JavaScript
I asked chatgpt to explain hoisting to me:
In JavaScript, hoisting is a behavior in which variable and function declarations are moved to the top of their containing scope during the compile phase, before the code has been executed. This means you can use a variable or function before it’s been declared in the code.
However, it’s crucial to note that while the declarations (not initializations) are hoisted, the assignments are not. This is why a variable declared and initialized after it’s used will return undefined.
In this example, the declaration (var myVar) is hoisted to the top of the scope, but the assignment (myVar = 5) is not. That’s why the first console.log outputs undefined, and the second outputs 5.
Now, let’s see an example with functions:
console.log(myFunction()); // Output: This is hoisted!

function myFunction() {
  return "This is hoisted!";
}

Here, the entire function declaration (including the body) is hoisted, so you can call the function before it's declared in the code.

However, if we use function expressions and try to call it before it's defined, it will return undefined because only declarations are hoisted, not initializations:


console.log(myFunction); // Output: undefined

var myFunction = function() {
  return "This is not hoisted!";
}

In JavaScript ES6, let and const were introduced, which have different scoping rules from var. While var is function-scoped, let and const are block-scoped. However, they too are hoisted, but due to a mechanism known as the Temporal Dead Zone (TDZ), you cannot access them before declaration.


console.log(myVar); // Output: undefined
console.log(myLet); // ReferenceError: Cannot access 'myLet' before initialization

var myVar = 5;
let myLet = 10;

In this code, trying to log myLet before it's declared results in a ReferenceError, while myVar is undefined due to the hoisting and the difference in behavior between var and let/const.
Then I asked Bard:
JavaScript hoisting is a concept that refers to the fact that variable declarations are moved to the top of their scope before the code is executed. This means that you can access a variable even if it is declared after the line of code where you first try to use it.
For example, the following code will print “Hello World!” even though the message variable is declared after the line where it is first used:
JavaScript
console.log("Hello World!");
var message = "Hello World!";
This is because the JavaScript engine will hoist the variable declaration to the top of the scope, before the code is executed. This means that the variable will be defined and accessible even though it is declared after the line where it is first used.
It is important to note that hoisting does not affect the value of the variable. In the example above, the value of the message variable will still be “Hello World!” even though it is declared after the line where it is first used.
Hoisting can be a useful concept to understand, but it can also lead to errors if you are not careful. For example, the following code will throw an error because the message variable is not defined when it is first used:
JavaScript
var message = "Hello World!";
console.log(message);
This is because the message variable is not defined until after the line where it is first used. To avoid this error, you should always declare variables before you use them.
Here are some tips for avoiding errors when using hoisting:
Always declare variables before you use them.
Use the const keyword to declare constant variables.
Use the let keyword to declare local variables.
Use the strict mode to prevent errors from being thrown when variables are not declared.
I hope this explanation of JavaScript hoisting was helpful. Please let me know if you have any other questions.
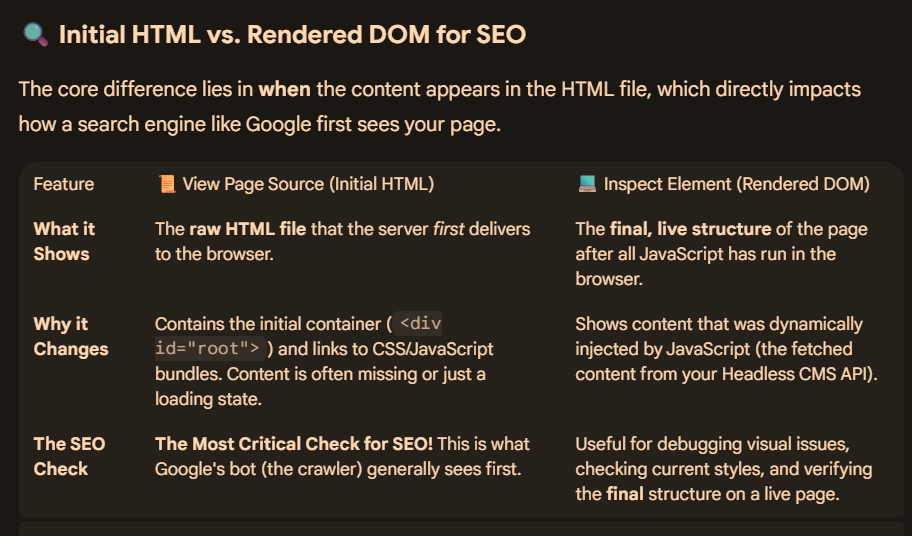
When you visit a page, the website sends HTML code to your browser. Often this source code includes additional resources such as scripts, which must be loaded, and which may alter the page code.
How to view Source HTML (Ctrl + U)
Right-clicking “show source” typically shows only the original page code returned to the browser, before scripts and other resources have been loaded and run. But there are many instances, particularly when troubleshooting your page, when you need to see the code of the final, rendered page on the browser, after all resources have been loaded, and any scripts run. For example:
To search for Google Analytics or Google Tag Manager tags used in verification.
To debug page loading and display (that is, to check that all libraries and other resources that you want to be loaded are).
To look at structured data on the served page.
How to view the rendered source (Inspect Element)
Here are a few methods to view the rendered source code for a web page:
In the Chrome browser: Right-click any part of the page and select Inspect to see all the HTML from the rendered page. Search for items in the rendered HTML with Control + F (Windows) or Command + F (Mac).
For a page on your own site:
Inspect the URL, either by entering the URL directly in the URL Inspection tool, or by clicking an inspection link next to a URL shown in most Search Console reports.
Click Test live URL > View tested page.
The HTML tab shows the rendered HTML for the page.
For a page on any site, not just a site that you own:
Update – I don’t think all the process below is required.
Just download the 404 – inlinks report from Screaming Frog
Bulk Export (very top, slightly to the left on the GUI)> Response Codes > Internal > Client Error 4**s
Copy the “Destination” (column C on report) column and paste into an new Excel tab/sheet and remove duplicates
In the first sheet, copy and paste the source column into column D
In the second sheet, do a vlookup using the first destination URL, and “lookup” in the first sheet – columns C and D, to return the relevant source URL
Copy the vlookup and Paste – values – into column A into the second sheet
You can also copy and paste the anchor text and location into column C
Follow this protocol, to produce a sheet you can send to devs etc, to remove 404s
This will get rid of the site-wide 404s and some individual 404s
In Excel – Copy and paste the “destination” URLs into a new sheet – into column A
Remove duplicates from the destination URLs that you’ve just copied into a new sheet
rename the colum – 404s Destination
Copy and paste the Source URLs and the Anchor Text into a new sheet.
Paste Source URLs in column A, and Anchor Text into column C
In cell B1 type – ” | ”
In cell D1 – give the column the heading “Source | Anchor”
In cell D2 concatenate – =CONCATENATE(A2,$B$1,C2)
Drag the formula down.
You’ll now have the anchor text and the source URL together, so you can vlookup the destination (404) URL
create a new sheet
Copy and paste all of the source URLs | Anchor Text (from the concatentate formula – paste special -values only
Copy & Paste Destination URLs from the original sheet into columns B and C in the new sheet you just made.
You need “destination” in column B and “Source | Anchor Text” in column C, as vlookup has to go left to right
So you’ll have – 404s Destination – Destination – Source | Anchor Text
Name column D in the new sheet “Example Source URL & Anchor Text” and in cell D2 enter the lookup – VLOOKUP(B2,B:C,2,0) (put “equals sign” before the V. Drag the formula down
Copy column A and paste into a new sheet. Name the sheet “Final”.
Copy column D with the vlookup and paste values into column B in the “Final Spreadsheet”
In “final”, you should now have all the unique 404s and an example of a page that links to those 404s with the anchor text.
You can use “text to columns” to seperate the source URLS and anchor text if you wish
If you’re sending the spreadsheet onto a dev or someone to fix the 404s, you are probably best sending the full sheet with all the inlinks to the 404s, plus the one you’ve just made. It depends how they go about fixing the 404s.
Once 404s have been fixed, rerun a crawl and recheck them.
look out for 404s that are classed as HTTP Redirects in the “type” column – these don’t seem to have a unique source URL. You may have to search for the URL in the search box in Screaming Frog and click the “inlinks” tab to see original link to the non-secure http page
If you like, before you send off the report to someone, you can double check the “destination” URLs definitely are 404s, by pasting them into screaming frog in “list” mode
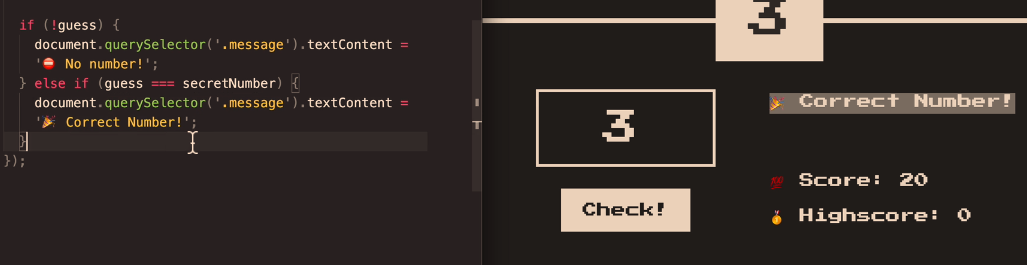
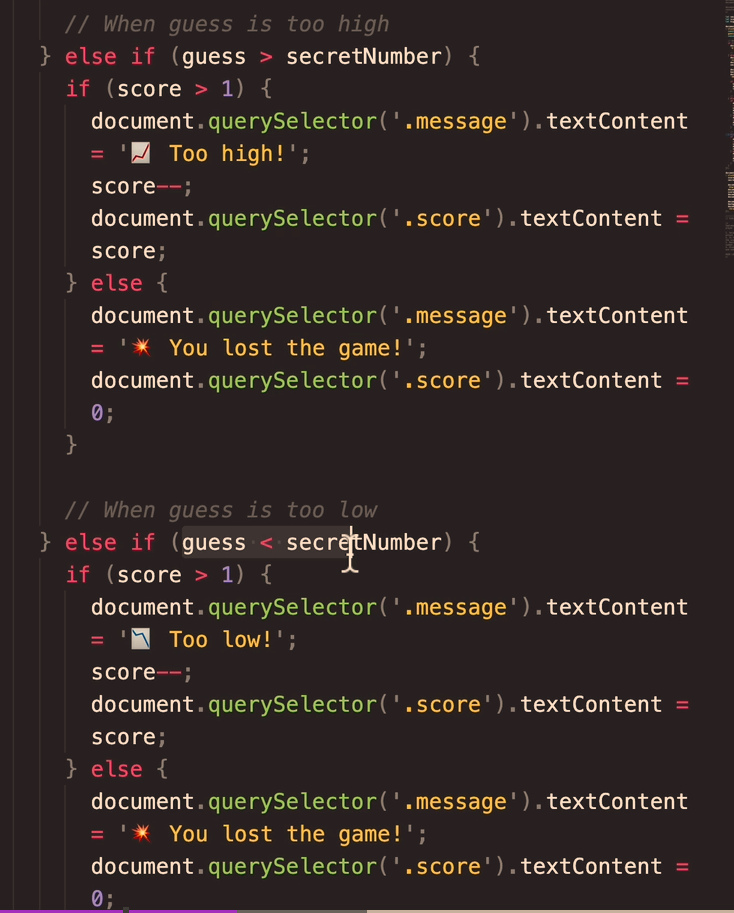
The code above will print “No number” if a number isn’t entered into the relevant form field.
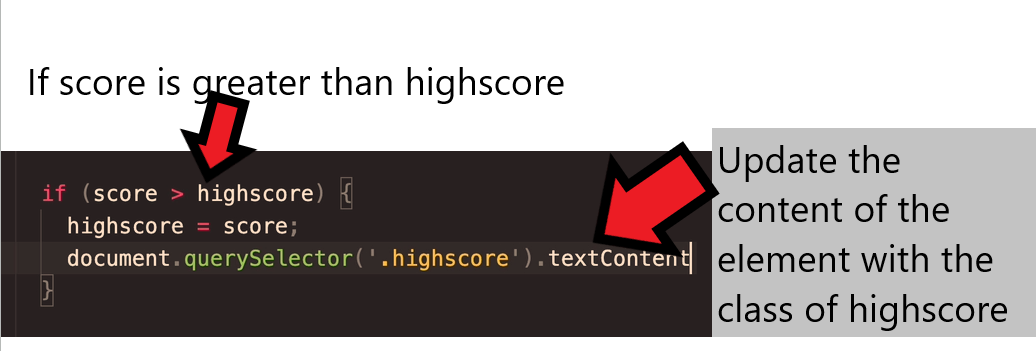
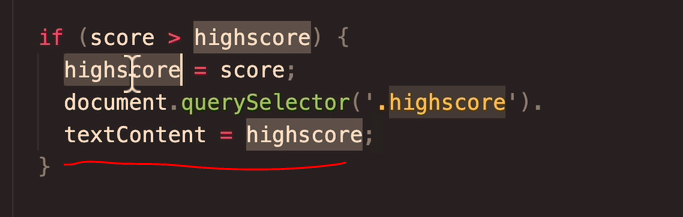
if the number entered (the guess), is equal to the secretNumber – then the code will print “Correct Number!” – to the element with the class of “message“.
What if the guess is greater than the Secret Number?
TLD;R – I just set everything in “rem” units instead of pixels and it keeps padding etc relatively-relative on all devices
First – you may want to use “padding-block:” – which is the padding for the top and the bottom only.
You can also use a “min()” statement or line of code, or whatever it’s called in CSS
If you type:
section {

padding-block: min(10vh, 10rem)
Min, Max & Clamp
Min
To use “min” – you may for example have a back-ground colour, with width:70% and max width:500px
width: min(500px, 70%)
Min will “look” for the smallest value – either 500px, or 70%
Min will choose the smallest value.
If you are on a mobile for example, 70% width, is less than 500px – so on mobile the background will be 70% of the viewport for a mobile.
If you are on a desktop computer, 500px will be less than 70% of the screen width – so the background will be 500px wide.
Responsive Equal Padding Top & Bottom
If you wanted to pad the top and bottom of text in the background:
padding-block: min (30px; 10%) ;
Max
width: max(500px, 70%)
max is the opposite – now it will use the maximum value.
on Mobile, 500px will be the largest
On Desktop – 70% will be the largest.
Padding with a Percentage
Calc Rem + VW
Yet another way to add padding, is to use “calc” and then add parameters/values for rem and vw
Rem (short for “root-em”) units dictate an element’s font size relative to the size of the root element. By default, most browsers use a font size value of 16px.
The full form of VW is viewport width. It works like the percentage unit. Specifying 10vw is equivalent to occupying 10% of entire visible screen width.
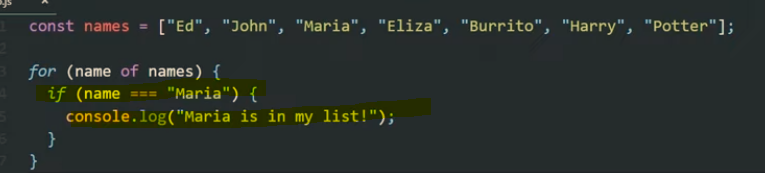
The code below the array in the screenshot below, starting with “for”, loops through the variable called “names” above it. Once it loops through it create “name” and then “console.log(name);” will get it to print on the console.log screen
console.log just provides a way of testing and outputting stuff using web developer tools, inspect element etc.
The code below, will do the same as above, but this time it will add “Hello there” before each of the names:
You can also add if conditions. For example, in the code below, the loop will check if “Maria” is in the list, and if so, will print out “Maria is in my list”
You can get the loop to stop once it finds “Maria” by using the “break” keyword.
The above code will print “Ed, John and then Maria and “Maria is in my list”. It will then stop and it won’t print all the names up to “Potter”.
As well as using the for loop with arrays, you can also use it with a single variable like “age”, and add an incremented – for example “age++”
The code shown below will print out and loop 10 times. starting at 0, and then 1, 2 etc. until finally the condition age <10 is no longer met
When the age is 10, it will stop.
A web dev example
Get all the links on a page, and return the number of the links on the page.
When the loop gets to the 6th link, it is no longer less than links.length, and so the loop stops:
(you can click the image to see a lager version, the important code is :
for (i = 0; i < links.length; i++)
To print out the final link, change “<links.length” to “<= links.length” – meaning “less than or equal to links.length”
for (i = 0; i <= links.length; i++)
For In Loops
For in loops, are the same as for loops except they are shorter to write but less flexible.
For Loop Example with an Array
Work out the age of people, given an array with their year of birth in it.
start with the array and then a new array, which will hold the ages:
If you are making multiple objects, it’s best to use the object constructor.
You can use a constructor to create a new object by calling the constructor with the new keyword. The new keyword will create an instance of an object and bind the this keyword to the new object.
The this keyword is a reference to the object itself.
function Fighter(name, age, nationality) {
    this.name = name;
    this.age = age;
    this.nationality = nationality;
    this.bio = function () {
        console.log(`My name is ${this.name}. I'm ${this.age} years old. I'm from ${this.nationality}`)
    }
};

const oladele = new Profile("Izzy", 29, "Nigeria" );
console.log(oladele.bio()); //My name is Izzy. I'm 29 years old. I'm from Nigeria
Here’s another example, using the this keyword from w3schools
<script>
// Constructor function for Person objects
function Person(first, last, age, eye) {
  this.firstName = first;
  this.lastName = last;
  this.age = age;
  this.eyeColor = eye;
}

// Create a Person object
const myFather = new Person("John", "Doe", 50, "blue");

// Display age
document.getElementById("demo").innerHTML =
"My father is " + myFather.age + ".";
</script>
The above code gives the output “my father is 50”. (which is printed to the paragraph with the id of “demo”)
Adding a method to an object
We can add a method simply by adding another property that is a function. This function will be able to read the values of the object and work with them.
We will add an example that will print out the color of the table.
myTable.whatIsMyColor = function() {
 console.log("My color is: " + this.color);
};