In normal crawl mode – add homepage URL to the main bar
In the top menu:
Click Configuration > Include and add folder with * at the end
E.g. to crawl just the cricket folder on a sports website add:
https://www.example.com/cricket.*


In normal crawl mode – add homepage URL to the main bar
In the top menu:
Click Configuration > Include and add folder with * at the end
E.g. to crawl just the cricket folder on a sports website add:
https://www.example.com/cricket.*
You will need:
At the time of writing, this feature is only available in EU countries.
Create a summary page that lists multiple products, each linking to a detailed product page.
For example, a category page that lists “Top 5 Winter Coats.”
Add the ItemList structured data to your summary page. Here’s an example in JSON-LD format:
<html>
  <head>
    <title>Top 5 Winter Coats</title>
    <script type="application/ld+json">
      {
        "@context": "https://schema.org",
        "@type": "ItemList",
        "itemListElement": [
          {
            "@type": "ListItem",
            "position": 1,
            "item": {
              "@type": "Product",
              "name": "Puffy Coat Series by Goat Coat",
              "image": [
                "https://example.com/photos/1x1/photo.jpg",
                "https://example.com/photos/4x3/photo.jpg",
                "https://example.com/photos/16x9/photo.jpg"
              ],
              "offers": {
                "@type": "AggregateOffer",
                "lowPrice": 45.00,
                "highPrice": 60.00,
                "priceCurrency": "USD"
              },
              "aggregateRating": {
                "@type": "AggregateRating",
                "ratingValue": 4.9,
                "reviewCount": 50
              },
              "url": "https://www.example.com/puffy-coats"
            }
          },
          {
            "@type": "ListItem",
            "position": 2,
            "item": {
              "@type": "Product",
              "name": "Wool Coat Series by Best Coats Around",
              "image": [
                "https://example.com/photos/1x1/photo.jpg",
                "https://example.com/photos/4x3/photo.jpg",
                "https://example.com/photos/16x9/photo.jpg"
              ],
              "offers": {
                "@type": "AggregateOffer",
                "lowPrice": 189.00,
                "highPrice": 200.00,
                "priceCurrency": "USD"
              },
              "aggregateRating": {
                "@type": "AggregateRating",
                "ratingValue": 4.7,
                "reviewCount": 827
              },
              "url": "https://www.example.com/wool-coats"
            }
          },
          {
            "@type": "ListItem",
            "position": 3,
            "item": {
              "@type": "Product",
              "name": "Antarctic Coat by Cold Coats",
              "image": [
                "https://example.com/photos/1x1/photo.jpg",
                "https://example.com/photos/4x3/photo.jpg",
                "https://example.com/photos/16x9/photo.jpg"
              ],
              "offers": {
                "@type": "Offer",
                "price": 45.00,
                "priceCurrency": "USD"
              },
              "aggregateRating": {
                "@type": "AggregateRating",
                "ratingValue": 4.9,
                "reviewCount": 1290
              },
              "url": "https://www.example.com/antarctic-coat"
            }
          }
        ]
      }
    </script>
  </head>
  <body>
  </body>
</html>robots.txt or noindex tags.Each product linked from the summary page should have its own detail page with structured data. For example:
<html>
  <head>
    <title>Puffy Coat Series by Goat Coat</title>
    <script type="application/ld+json">
      {
        "@context": "https://schema.org",
        "@type": "Product",
        "name": "Puffy Coat Series by Goat Coat",
        "image": [
          "https://example.com/photos/1x1/photo.jpg",
          "https://example.com/photos/4x3/photo.jpg",
          "https://example.com/photos/16x9/photo.jpg"
        ],
        "description": "A stylish and warm puffy coat perfect for winter.",
        "offers": {
          "@type": "Offer",
          "price": 45.00,
          "priceCurrency": "USD",
          "url": "https://www.example.com/puffy-coats"
        },
        "aggregateRating": {
          "@type": "AggregateRating",
          "ratingValue": 4.9,
          "reviewCount": 50
        }
      }
    </script>
  </head>
  <body>
  </body>
</html>
That should be it!
The TRIM function removes all spaces from text except for single spaces between words.
=TRIM(A1)If there are non-breaking spaces (which TRIM doesn’t remove), you can use the SUBSTITUTE function to replace them with regular spaces first.
=SUBSTITUTE(A1, CHAR(160), " ") This replaces non-breaking spaces with regular spaces.TRIM function:excelCopy code=TRIM(SUBSTITUTE(A1, CHAR(160), " "))You can also use the Find and Replace feature to remove extra spaces:
Ctrl + H to open the Find and Replace dialog box.For more advanced cleaning, you can use a VBA macro:
Alt + F11 to open the VBA editor.Insert > Module.Sub RemoveSpaces()
Dim cell As Range
For Each cell In Selection
If cell.HasFormula = False Then
cell.Value = Trim(WorksheetFunction.Clean(cell.Value))
End If
Next cell
End Sub
Alt + F8, select RemoveSpaces, and click Run.By using these methods, you can efficiently remove unwanted whitespace from your cells in Excel.
Had to categorise some keywords, if there’s a quicker way of doing it – please let me know
=IF(SUMPRODUCT(--ISNUMBER(SEARCH($D$1:$D$19,A2)))>0, "Contains value from range", "Does not contain value from range")
Add another list of relevant words – for example, above I have added sports, to highlight sports netting keywords.
Drag formula down and repeat
I found a quicker way – use Chat GPT and the prompt:
“please can you group these keywords by theme or words containing – e.g. keywords containing “golf”.
Please include the search volume.
The list is set out with a keyword – then a comma, – then the search volume for the keyword, – then a second comma – before the next keyword is listed
funny polo shirts , 170 ,
funny polo shirt , 30 ,
“
replace “funny polo shirts” with a list of your own keywords.
Put URLs into column A – Find and Replace – enter domain to find and replace with nothing
in column b – add a heading in B1 of “string of words”
in cell b2 enter the formula:
=SUBSTITUTE(SUBSTITUTE(A2, "/", " "), "-"," ")
^The formula will find and replace forward slashes with spaces and hyphens/dashes with spaces.
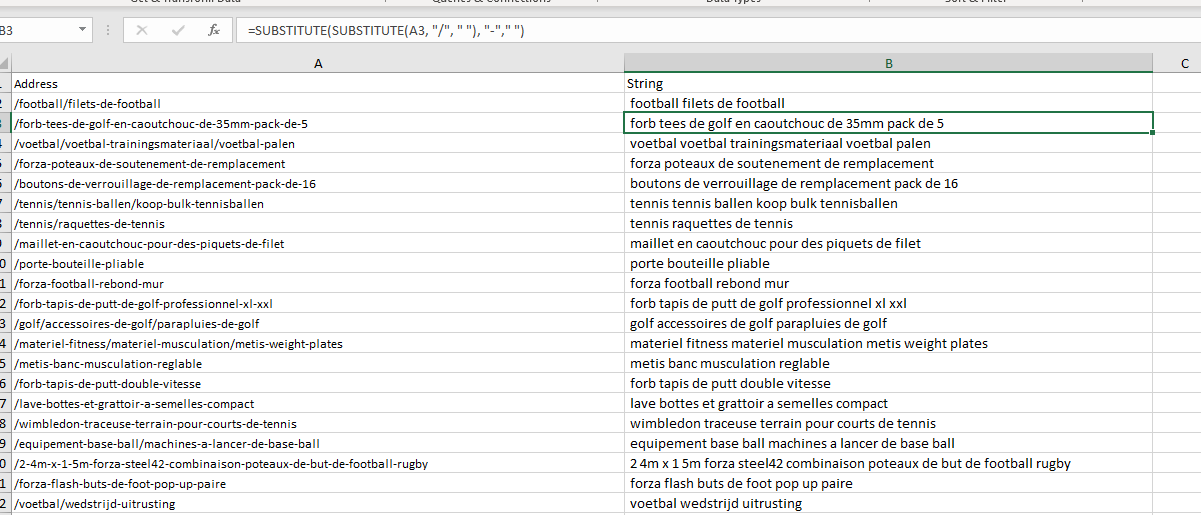
I used this, to then use the Google Sheets formula DETECTLANGUAGE to check URLs where in French / Dutch
Handy if you have loads of custom extractions set up etc.
Under the Configuration Menu – go to – Profiles>Save As
Configuration > Profiles > Load…


Which can be a nice time saver too!
I pretty much always add the following to the excludes ‘file’, so it’s easier to keep it in the default setup:
^https?://[^/]+/customer/account/.*
^https?://[^/]+/checkout/cart/.*

^.\?.

.js$

.css$
If you work in SEO –
Walk into the developers office/pit/den
Say the following:
“Look, it’s not my fault you were bullied in school for being a bunch of gimps, and if I get another passive-aggressive comment or tut from you bunch of pizza-munching wankers, I’ll drag each of you outside one by one and beat the fuck out of you using my own technical skillset. Now stop being finger-pointing, arrogant pricks and start communicating properly”
Job done
Screaming Frog is the greatest SEO tool of all time. Possibly the greatest tool of all time, closely followed by the George Foreman grill.
There’s a free version and if you have massive ecommerce website, with thousands of URLs, the posh paid version is well cheap too – if I remember rightly, is only about £200.
Absolute bargain.
Before you start – create a crawl config file.
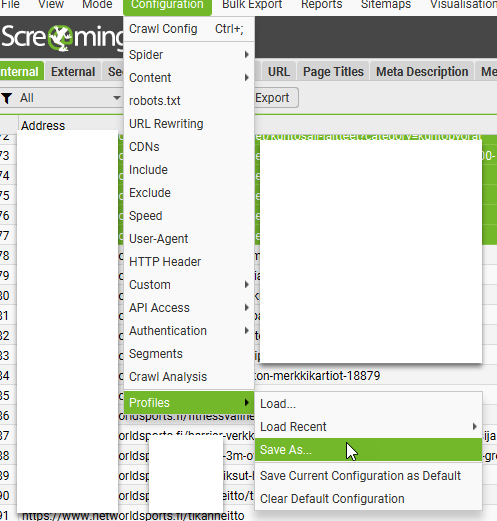
I usually go with default settings, plus exclude cart pages and follow redirects.
You’ll also need to create a Google Drive and Looker Studio Account.
File > Scheduling:

click “+Add”

Give the scheduled crawl a name and set the time and date you want the first crawl to run
Also choose the frequency.
Note —> if you have a computer with a decent processor, that runs fine when you are crawling with Screaming Frog and you’re still able to do you work, then just set it for a date and time when you’ll be in work and on your computer.
However, if you have a slower computer, and running Screaming Frog at the same time as trying to do your normal work slows the computer down too much, you’ll probably want to set the crawl overnight, or at your lunchtime.
You can set windows computers to “wake up”, as long as they are plugged in. So that you’re able to run a crawl before or after work.
Although your IT department might not like it – computer running unattended with a battery etc could be in theory a fire harzard etc.
More on how to wake up your computer, later…
Back to scheduling on Screaming Frog:
On the start options tab, enter the URL you want to crawl and select your config file
I didn’t choose anything for “auth config”
For crawl config – upload the config file you saved earlier
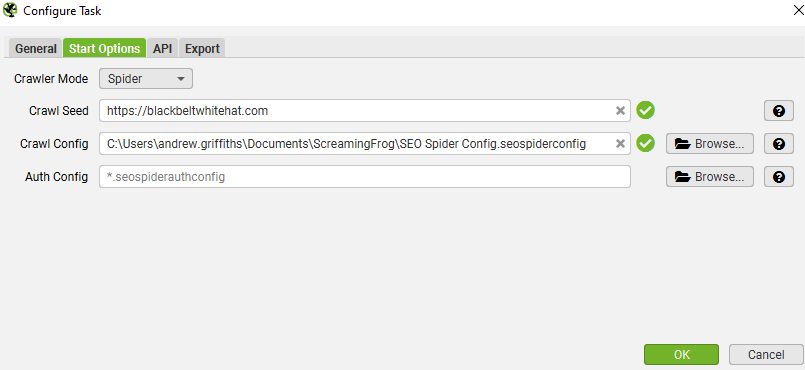
In the Export – choose a folder on your computer and your Google Drive account:


By default, your crawl will go in a sheet in Google Drive at:
‘My Drive > Screaming Frog SEO Spider > Project Name > [task_name]_custom_summary_report’.

When asked – choose Google Sheets as a data source:
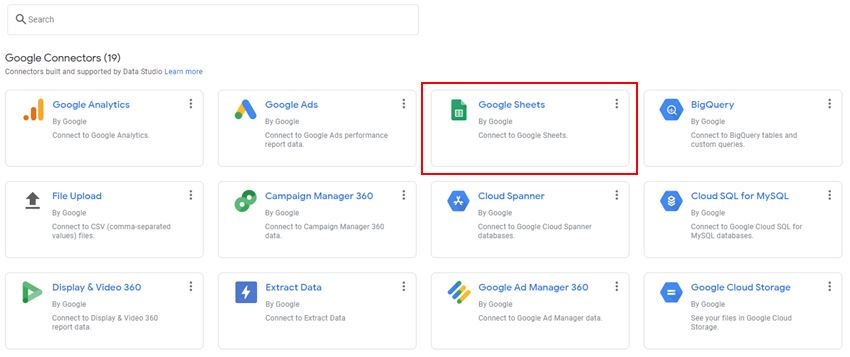
Ensure the ‘use first rows as headers’ option is ticked and select ‘Connect’ in the top-right.

You can probably do this in bulk somehow, but I went to each table/graph and added the Google Sheet as the data source:

Screaming Frog won’t run unless your computer is on.
You can ‘wake up’ your computer though.
Search for “Task Scheduler”

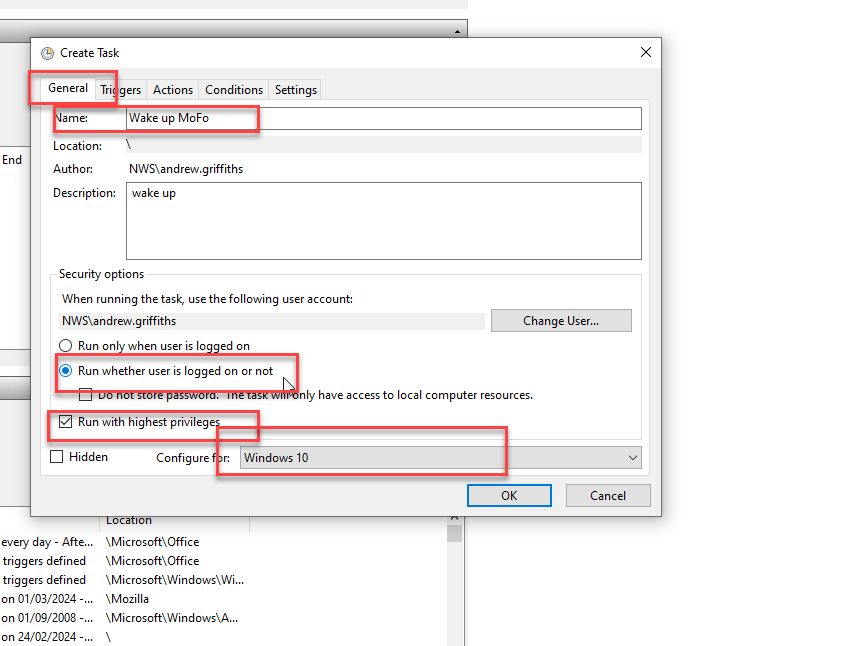

schedule the computer to wake up at the same time and frequency that you’ve set for the screaming frog crawls.
Then, that should be it.
The best way to run automatic crawls, is to sin up to Google cloud. At the moment you get $300 worth of credits free, and each crawl on an average ecommerce sure, will cost around a dollar a go.
Here’s the tutorial on how to set up Screaming Frog on the cloud ☁️:
https://www.screamingfrog.co.uk/seo-spider/tutorials/seo-spider-cloud/
It’s a bit of a mission/long process, but worth it. I reckon.
Anyway, here is the report, in all her glory (well, 1 part of 1 page):


Core Update and Helpful Content System:
Actionable To-Do List:
It generally helps, in theory, to write from experience rather than just giving an overview that anyone could scrape and rewrite from the internet. Include your own images, videos etc.
I don’t have any images of Google updates, see here’s a pic of my dog:

Big brands will still probably have a massive advantage regardless of what they do.
Spam Updates:
General Recommendations:
Hi, this schema is supposed to inform Google who you are targeting with your products and services.
In theory, this could mean that people who fit within your target audience, are more likely to see your website in the search results.
Here’s an example for an ecommerce football website, selling to parents and clubs:
<script type="application/ld+json">
{
  "@context": "http://schema.org",
  "@type": "Store",
  "name": "Ultimate Football Gear",
  "url": "https://www.ultimatefootballgear.com",
  "audience": [
    {
      "@type": "BusinessAudience",
      "audienceType": "Parents",
      "geographicArea": {
        "@type": "AdministrativeArea",
        "name": "Nationwide"
      },
      "suggestedMinIncome": 30000,
      "suggestedMaxIncome": 100000,
      "description": "Middle-class and working-class parents looking for affordable football gear for their children."
    },
    {
      "@type": "BusinessAudience",
      "audienceType": "Sports Clubs",
      "geographicArea": {
        "@type": "AdministrativeArea",
        "name": "Nationwide"
      },
      "description": "Local sports clubs seeking quality football equipment for team use."
    }
  ],
  "offers": {
    "@type": "Offer",
    "itemOffered": {
      "@type": "Product",
      "name": "Youth Football Kit",
      "description": "A complete football kit for young players, perfect for training and matches.",
      "category": "Sporting Goods > Team Sports > Football",
      "sku": "YFK123",
      "brand": {
        "@type": "Brand",
        "name": "Ultimate Football"
      }
    },
    "price": "49.99",
    "priceCurrency": "USD"
  }
}
</script>
^As you can see above, you can combine with product/offers schema.
Here’s a normal example:
<script type="application/ld+json">
{
  "@context": "http://schema.org",
  "@type": "Store",
  "name": "Ultimate Football Gear",
  "url": "https://www.ultimatefootballgear.com",
  "audience": [
    {
      "@type": "BusinessAudience",
      "audienceType": "Parents",
      "geographicArea": {
        "@type": "AdministrativeArea",
        "name": "Nationwide"
      },
      "suggestedMinIncome": 30000,
      "suggestedMaxIncome": 100000,
      "description": "Middle-class and working-class parents looking for affordable football gear for their children."
    },
    {
      "@type": "BusinessAudience",
      "audienceType": "Sports Clubs",
      "geographicArea": {
        "@type": "AdministrativeArea",
        "name": "Nationwide"
      },
      "description": "Local sports clubs seeking quality football equipment for team use."
    }
  ]
}
</script>

