The Chrome Inspect Element function is instrimental in making these changes to your WordPress theme.
Let’s say for example, that you want to change the main header on the homepage of your WordPress theme – then right click and choose “Inspect Element”.
Then click on the arrow icon on the top left of the window that opens, and your arrow should automatically select whatever you hover over.
Use a Text Document To Track Changes
Copy and paste code that you want to make changes to.
Make your changes in your notepad document and add a comment so that you can easily identify what you have changed.
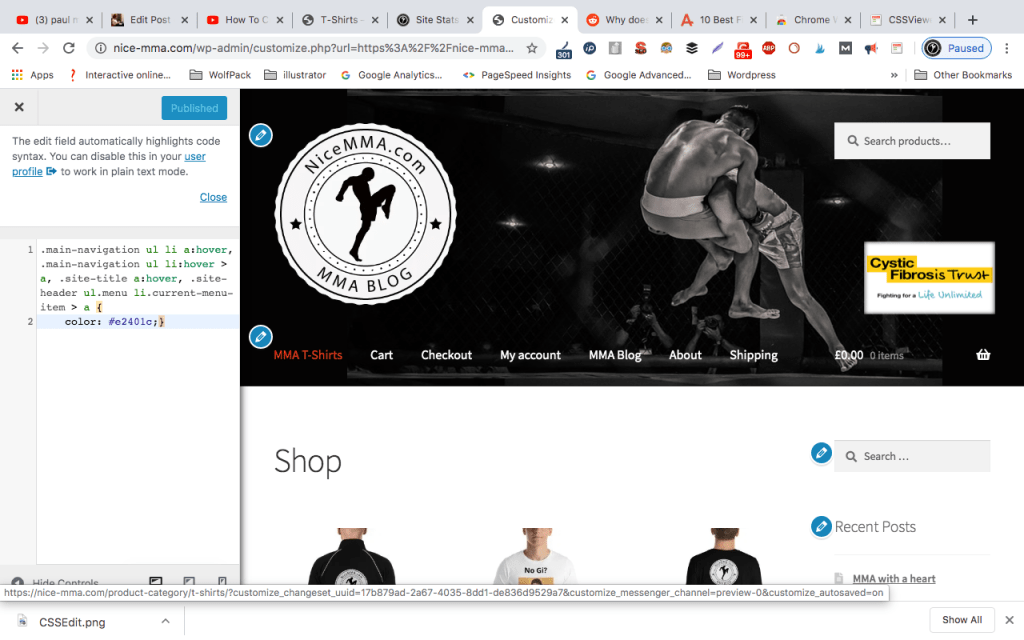
Paste Changes into the Appearance>Customize>Additional CSS window
Once you have selected your code from the text/notepad document, you can go to the WordPress admin section /wp-admin and the Appearance menu and then “Customize”, then near the bottom, you should be able to paste in your new CSS.
To Preview CSS Changes
In inspect element, click the “+” icon on the top right.
You can then add styles to different elements.
Be aware that you may need to edit the parent element, to see any changes (rather than the specific element)
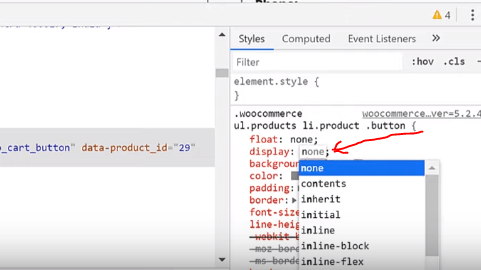
To Remove Elements on a Webpage
In CSS, if you change the “Display:” value to “none”, from inline-block etc.
display: none;
You’ll need to copy & paste the whole block of code from inspect element’s CSS window, into the Custom CSS menu’s window in WordPress’s (Appearance>Customize>Custom CSS)
The video below has more details on how to do this:
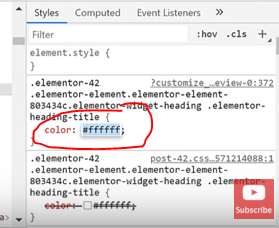
To Change the Colour of Elements
Use the same method as above – i.e. select the element with the inspect element tool.
Select the item that you want to choose using the arrow in the Inspect Element window (arrow is on top left)
Then change the colour using the panel on the right:
Finally, paste the new code for that element, into the Custom CSS window in WordPress (go to Appearance>Customize – wait for the Customize menu to load and then click either “Customize CSS” or “Additional CSS” which is normally located near the bottom left
Change the Colour of Font-Awesome Icons
This is easily done, the same way as shown above.
Select the icon, then change the colour in the CSS panel of inspect element on the right.
Select all the CSS in that window and then paste it into the Custom CSS/Additional CSS window on the left:
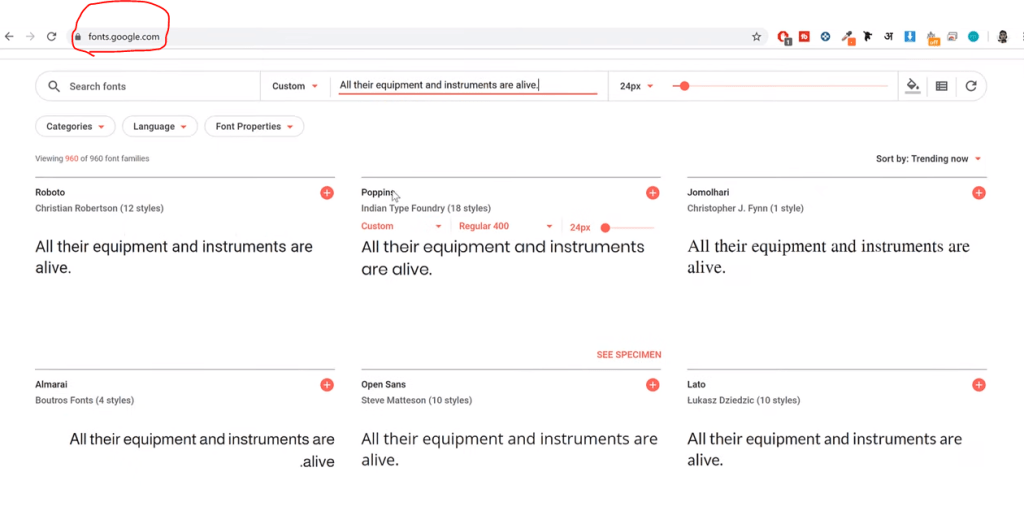
Changing the Fonts on Your WordPress Theme
Go to fonts.Google.com to see all the available fonts (well, most of them)
Open Inspect-Element – click the arrow on the top left of the window
Then, again just select the text that you want to change and this time change the font-family value to the one you want
Remember to add all the code/CSS from the window precise window that you edit on the right, to the Customize/Additional CSS panel on the left.
Using this method you can also change:
Padding & Margins Containers Background Image, Position etc. Sidebar
!Important
By adding !important to your CSS, you can ovveride all other rules relating to that element. Use this sparingly though as it will get confusing.
To follow along with this tutorial, please install and open Google Chrome, and then add the following extension (at your own risk etc. but I’m sure they’re fine):
Firebug for Chrome (or you can just use Developer tools by right-clicking on parts of your webpage and selecting “Inspect” or “Inspect Element” from the menu that appears – Firebug works well on Chrome on my desktop – but not on my Macbook)
To get used to using Firebug – open your website – or just go to a website of your choice.
Click the Firebug extension on the top right of your Google Chrome browser
Update – Using Dev Tools Inspect Element in Chrome is just as good. Just remember to click the arrow icon on the top left of the window that appears, so that you can easily select individual elements.
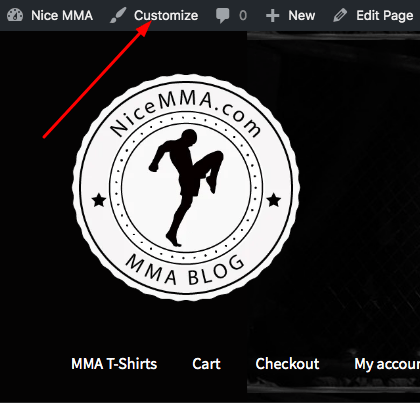
Adding CSS to WordPress – Additional CSS
Most WordPress themes, have a “Customize” option, that contains a menu item called “Additional CSS”
Login – on the ‘header menu’ click Customize – then Click “additional CSS”
You can then paste your CSS directly into the box provided:
Note that if you add CSS to the box on one page – but it refers to an element that is on other pages – e.g. the main-menu – then this will be applied to all pages.
If you wanted to make a change to one page only – to a ‘global-element’ such as the main-menu – you would need to add a new class or id – by editing the HTML in the Theme Editor in the dashboard/wordpress.
Try Out Your New CSS in Inspect Element or Firebug
Once you right click and “Inspect” the CSS – you can edit it.
When you have made a change to the CSS in the Inspect-Window, copy it by highlighting it and holding CTRL + V
Open the “Additional CSS” menu item, then paste in the edited snippet of code
Paste CSS into the Additional CSS Box
Now that the above code has been added, and published, the Menu Items turn red when the mouse-cursor hovers over them:
Basics of CSS
The basic concept and idea of CSS is that you can style multiple items, with one piece of code.
So for example, rather than adding a colour to every header on your website – you could ‘tell your CSS stylesheet – to make every H1 a specific colour.
Although you can use “inline CSS” by adding it directly to the HTML – best practice is to add all of your CSS to a stylesheet, which is then linked to the HTML. This is done for you already in WordPress, via the “Additional CSS” box in the Customize menu and the Appearance menu in WP-admin, under Theme Editor.
CSS Selectors
Understanding how CSS works is directly linked to understanding the concept of ‘selectors’.
CSS selects a certain HTML tag, a class or an ID and then ‘tells the browser/HTML’ what style to apply.
HTML Tags are already predifined, examples include – p (paragraphs) – H1 (main headers) – a (anchor text)
Classes and IDs are not predefined by any internet-standards such as W3. You can give a HTML tag a class or an ID – so that specific paragraphs or headers etc. can be styled and not others.
A stylesheet must ‘select’ an element, ID or class, to change the style.
To select an ID
e.g.
<div id = “main-nav“>
The ID selector is preceded by a hash character (“#”) in the stylesheet:
#main-nav {
    background-color: #ccc;
    padding: 20px
}
Selecting Classes
In the CSS, a class selector is a name preceded by a full stop
.intro {
    color: red;
    font-weight: bold;
}
Universal Selectors
The asterix * is the “universal selector”
The below CSS would select all items and make their background colour yellow:
* {
    background-color: yellow;
}
A Few Examples of CSS
Make the text within the main headers (h1s) – coral:
h1 {
    color: coral;
}
Make the text within the class called “main” centred
.main {
                text-align:center;
            }
CSS Animation
Animation in CSS, usually incorporates Keyframes.
The keyframes must then select an element, for example, this keyframe selector would determine the styles and/or rules for the element called “slidein”:
Step 1 – Configure the Animation
Style the element – a paragraph (p) in the example above. You would style the paragraph, or H1 or whatever element you want to animate, with the animation properties.
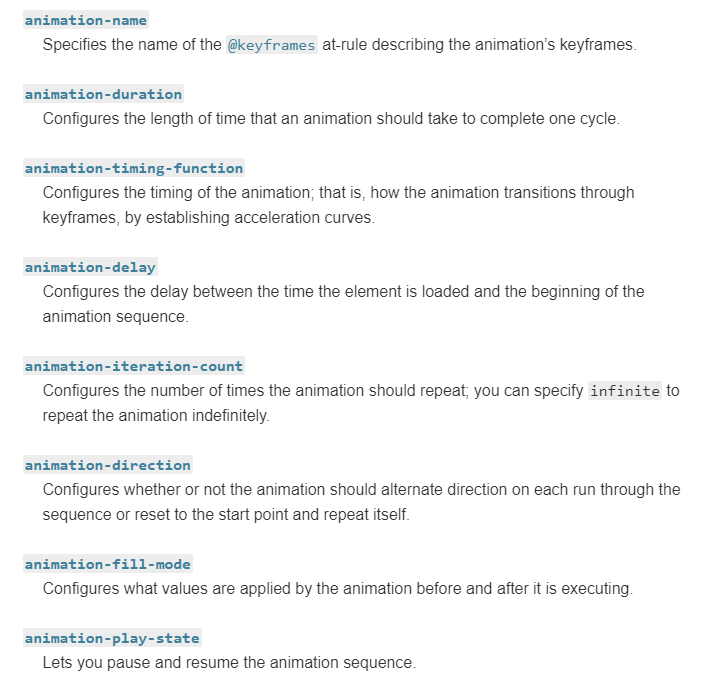
The animation properties are:
animation-name This must sync-up with the name with the@keyframes at-rule
animation-duration
animation-timing-function Configures the timing of the animation, relating to how the animation transitions through keyframes.
animation-delay How long between the element loading and the animation starting?
animation-iteration-count Defines the number of times the animation should loop
To see a good example of CSS animation, please see this one on impressivewebs.com (this free version of wordpress won’t allow me to embed code etc.)
To be fair, it’s probably a bit easier to animate with JQuery – but still very handy to know CSS animations, especially when you’re trying to work out what’s going on a give webpage in terms of SEO etc.
CSS Transitions
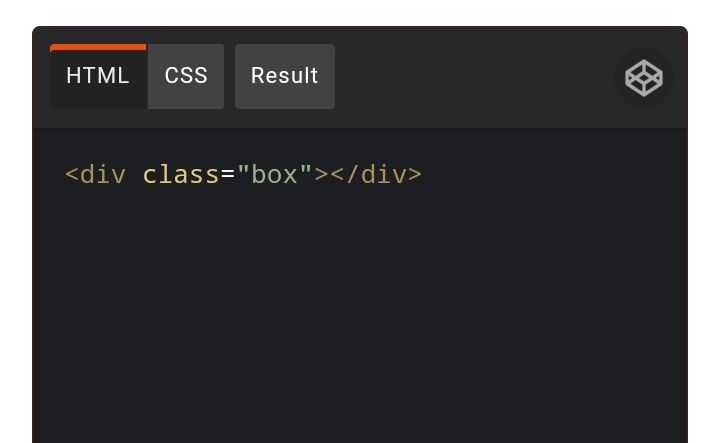
Properties are animated from “initial to “final states” using CSS Transitions.
In the example above:
a div class is created in HTML and named “box”
The box is then styled in CSS to be red and specific dimensions
Transition is added to animate the box
Transition used on itself is shorthand, instead of declaring what to transition, for how long etc.
In the example above, we transition the background colour, over 2 seconds and tell it to “ease out”
The background colour to change to on-hover is declared as green
moz-transition, webkit transition etc are included for other browsers – usually older ones
By using keyframes and changing the opacity of the ‘nth-child’ and altering the animation delay, you get the rotating word effect:
What is SaSS?
SaSS stands for “Syntactically Awesome Style Sheets”
SaSS look a bit different to standard CSS, as you don’t need the semi-colons or curly braces.
Variables
With SaSS, you can use the dollar symbol – $ to store variables.
You can, for example, create your own text variable, giving the text several styles such as size, font family, font style and a font weight – and store this information in a font variable called $my-font.
You can then call this variable to style various parts of a webpage
body {
  font: 100% $my-font;
}
or you could, create a colour variable, to save having to write out the hex code each time, e.g.
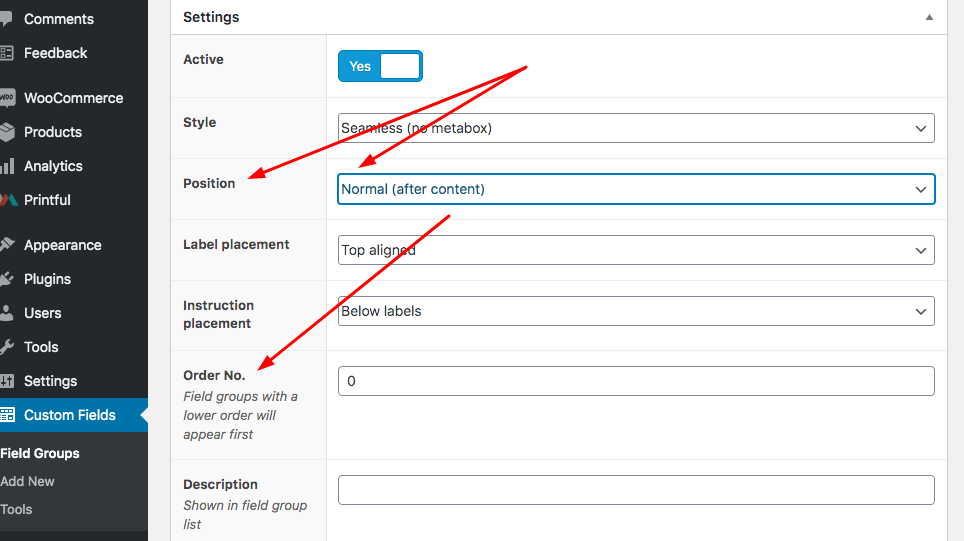
Add specific fields, to the new post-types using the Advanced Custom Fields plugin
Give new fields an id – so that you can then edit the styling with CSS
See our WordPress for CSS blog post for more information on customising CSS – this will be the next post to be published
Custom fields is probably the easiest way to implement significant layout changes to a WordPress theme.
It is also a great way to provide a client with specific pages, that they can populate and publish themselves.
It obvisouly helps, a lot, to know HTML and CSS, and ideally PHP and Javascript, but you should be able to effectively customise designs to your own, and to your clients’ needs by using plugins instead (along with the Customize features now available on WordPress sites.
If a client is very specific about a design, it can a be a bit of a nightmare if you are not savvy with editing WordPress CSS, HTML and JS – Advanced Custom Fields makes it easy – and easier for both you and your clients to update when required – by changing the visual editor in wp-admin to make it as simple as possible.
In fact, I first came across Advanced Custom Fields, when I worked for a UK Tourism company, and the Web Agency amended pages using the plugin.
Step by Step
Sort your hosting and domain out. Hostgator is decent (not an affiliate link)
Backup your website (you should do this before installing new plugins – ironically, you made need a plugin to do this!)
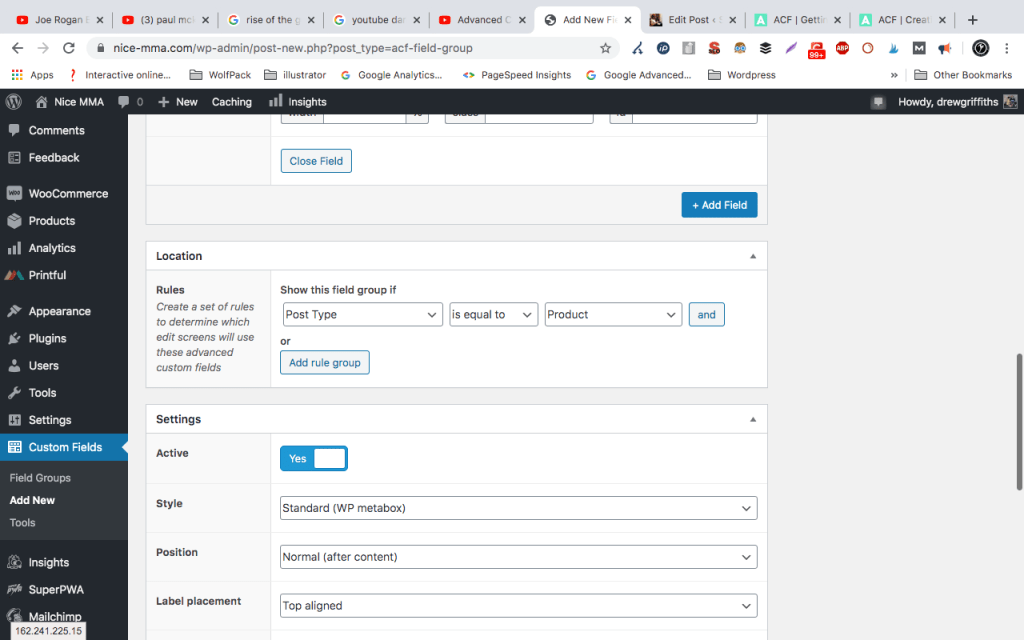
Click the “Add New” button next to “Field Groups” at the top of the page on the Custom Fields tab/menu item
Give the Field a Name e.g. “Product Description 2”
Now click the blue “+Add Field” button (near the top, to the right)
Now fill in the items required: – Field Name – give it a descriptive name – e.g. Product Description 2 – Field Type – for text entry/a text box – choose Text
Most items are quite straight forward – the Location part is very important thought – as this dictates on which pages or posts, this field will appear. For my wooCommerce store, I have chosen: Post Type – is equal to – product so that I get the text field on all my product posts.
when you are happy – click the “Publish” button on the right hand side.
Now when I create a new Product Post/Page – I have the option to add a second description via a text box:
“Product Description 2” is now shown at the bottom of the page
Other Text Fields that might be appropriate for a Product could be things like:
Manufacturer
Year
Price
Condition
You could also set the fields to “Required” – so that a product could not be posted to the website without all of the above details. This is particularly helpful if you have multiple people working on the same site.
Remember that Year and Price would be a “number” and not a text field.
Add A Rating Box Using Advanced Custom Fields
Click “Add Field” button
Give the Field a name in Field Label & an actual Field Name
Add Instructions for the admin-user
Add a min and max value, e.g. 0 and 10
Step size – 1 (means can’t give 1.5 etc. has to be a whole number)
Combining Advanced Custom Fields with Custom Post Type Plugin
Install CPT UI plugin and activate it
Add a new post type by clicking on the relevant part of the side menu to bring up the CPT UI options
Fill in the basic settings: Slug – what will appear in the URL of these posts Singular – e.g. “Offer” Plural – e.g. “Offers”
Add Post Type – it should appear on the left hand menu/nav
Go Back to CPT UI – this time click on !Edit Post Types”
Minimize or just skip over the “Additional Labels” section
Under “Settings” – Has Archive – change to “True” – Menu Position – Change to “6” so it appears below normal posts – Menu Icon – Change this to a relevant icon – 50 x 20 pxls
Now – when you go back to the Advanced Custom Fields section of the menu/backend – you can add specific fields to the “Offer” post type:
Positioning Fields on the Page
Simply use the options (in Settings) that custom fields gives you for positioning the field:
You can also add a class and id, so that you can edit the fields using CSS (see our next post about WordPress and CSS!)
“You’ll never get yourself off the treadmill of paid ads, if you don’t build your brand”
Someone on a Search Podcast, 2019
It’s very easy to dismiss online content, blogs, image assets and even display ads as pretty much useless – because you don’t have the instant gratification of seeing leads and/or sales.
This is completely understandable; especially if you have a background in sales – where your job has been to ‘finish off the lead’ and get a sale.
However, if you are in it for the long (or medium) run, then building your brand is a must. Whether you are a tradesman or a giant corporation, your brand’s reputation and the brand-awareness is your safety net when it comes to consistent website traffic, leads & sales.
It takes time to build a brand – but once it is built, those people who come to you direct because they know who you are – are effectively free – or at least very cheap in comparison to some of the cost per click of Google Search Ads these days.
Building a brand is not easy however. Take my other blog for example – Blackbeltwhitehat.com
The blog has over 600 pages of content, lots of it really long, in-depth and time-consuming to produce. The site has 5,000-10,000 visitors per month, but virtually nobody comes to my website via a branded search on Google.
This could be down to one specific reason – the domain name is crap and hard to remember.
I’ve bought a few more memorable domains (like WokeMMA.com “Woke” being an ironic term for self-awareness used in the MMA & Jiu Jitsu communities) and I am currently weighing up the time & effort of re-branding everything like GoogleMyBusiness, TrustPilot etc. – plus all my back-links currently point to blackbeltwhitehat.com (I’m aware of 301s etc. but I’ll still definitely see a drop in rankings).
My blog is ultimately a hobby that I’ve invested less than $50 into over 6 years. But if I had some more budget – I’d put together a plan to build my brand online…
First make sure you know your target audience & do one of those SWOT analysis. Then make specific goals to establish some brand KPIs.
Here are some ideas on what to do next:
Get a relevant, easy to remember domain name!
Learn from my mistake, a short catchy domain name is an easy-win if you are just starting out from scratch. A lot of the best and obvious domain name will be taken however, so you’ll have to do some research first. If you are just starting out, don’t name your business until you secure your domain name!
Display Ads
Depending on your niche, you can set tiny max CPC bids in some instances – and they’ll still get thousands of impressions for very little spend. Gmail ads work particularly well for (potential) low CPM (cost per 1000 impressions).
Rotate your display ads’ design & colours to stop people ignoring them due to ‘banner blindness’.
Blog & Outreach
Blog are great for reaching people who are researching a potential purchase.
For example, I landed on Perfect Keto’s blog a few times whilst researching Exogenous Ketones. Then ended up buying their branded product on Keto-pro.co.uk; because, for what ever reason, I trusted their brand.
Create great content, with statistics, images and video – and then outreach it – i.e. send it to relevant blogs and websites.
If you can afford it, use “PR-Level” outreach and contact national newspapers etc. This can be done via websites such as gorkana
If you content gets links too – then great – that’s good for Search Engine Optimisation (SEO). Doing some of your own exclusive research and generating tables of statistics are great for generating back-links naturally i.e. passively.
So consider doing some market research using Google surveys etc. These guys calculated RV/Campervan depreciation in value, just by looking at vehicles for sale online and get hundreds of back-links.
To turn blog’s into direct sales, you can also use relevant ‘CTA’ images below your blog.
For example, if you post a blog about the Walking Path’s of Snowdonia on your Snowdonia-based-bed-&-breakfast website; consider adding a relevant & clickable ‘book now’ and/or ‘get your free brochure’ button with eye-catching image at the bottom of the post. Many people now do this with newsletter sign up pop ups, which are a bit annoying but do work.
Content is great – but tools tend to do better than copy. For example, NerdWallet’s top page in terms of organic traffic – is their mortgage calculator.
Reviews
As well as brand awareness, you want some social-proofing of your brand. Start with a free account on Trustpilot and GoogleMyBusiness
Video & Social Media
The number 1 mistake people make on social media is to harp on about their brand all the time. Be entertaining, provide useful information and insightful comments. If you are over-promotional, people will not follow you. Build some authority by providing helpful insights that your target market will appreciate.
Videos & podcasts can be costly in terms of time. If you don’t want to set up your own podcast, guest-appearance on other people’s podcasts can generate valuable awareness and also back-links to your website (important for Search Engine Optimisation/Rankings).
Build an amazing product and/or service
This is your foundation and one of the reasons that Apple is so successful. An LSD-fueled Steve Jobs came up with some amazing ideas and concepts. The brand also turned itself into unique hybrid of tech & fashion thanks to their pioneering products.
The big, light-up apple on the back of Macbooks no doubt was a design aimed at building brand awareness too!
Please note – I realise this blog has a rubbish social media following. But that’s due to lack of time/money investment. I generally just use this blog as somewhere to record my thoughts & to remember how to do all things marketing related. E.g. here are my notes so I remember how to use Screaming Frog to scrape OG tags.
For some blogs and websites, even keywords with 0 monthly searches may be relevant.
My other blog – blackbeltwhitehat.com has built all of its traffic off KWs that Google KW planner says has 0 searches.
It all depends on how authoritative your website is and your competitors are. You can go after bigger, more popular KWs if you are a huge website with a DA of 90. It’s a different ball game if you are running a personal blog with a DA of 15
Try and include a number of the relevant searches in your articles etc.
Check Competitors & KWs Their Relevant Pages Rank for
If you have a tool like semrush.com,
Check what keywords competitors are ranking for.
If your head keyword is “football goals”, see who’s ranking top 5 for that term and see what other keywords the top URLs are ranking for.
If you don’t have an SEO Tool, you can just check the copy and meta title & description to see what keywords the top websites are trying to opimise for.
European Union (EU) referendum decision day is almost upon us and no-one truly knows what the implications of an exit from the EU will have on businesses or our day-to-day lives.
We can take an educated guess though, so here are some of the ways an EU exit could potentially impact small businesses in the UK. What is an EU exit?
The UK is currently part of the EU, a politico-economic union of 28 member states across Europe that enjoy freedom of trade and movement of workers. These trading rules also apply across the wider European Economic Area (EEA), which includes Norway, Iceland and Lichtenstein.
On June 28, 2016, the UK will held a referendum to decide whether or not the UK should remain as part of the EU – and we all know the result…
How does EU membership benefit UK small businesses?
EU membership means small businesses can move goods and services across both the EU and EEA without paying any customs duties, a system which opens up greater opportunities for small businesses to trade across the continent.
It’s estimated that being part of the EU has increased trade between the UK and some European countries by as much as 50%
This trade arrangement provides a standardised set of rules when it comes to customs procedures and this reduces a lot of the paperwork and admin faced by businesses doing business internationally.
If this freedom of movement is removed, not only will it make it more difficult for UK businesses to trade across Europe, it’ll also mean there’s more red tape to negotiate.
There is also free movement for all workers across the EU, which means talent can be brought in from a much bigger pool than if businesses were restricted to only employing UK nationals, else encounter more red tape.
How does EU membership hold back UK small businesses?
Current EU regulations on patents are strict and this can stifle innovation and hold back industries trying to enter new markets and attract new customers. It’s believed an EU exit will instantly see much of this red tape removed and allow imaginative small businesses to prosper.
The UK pays an annual net contribution of around £8.6 billion – that’s more than £23 million per day – to be a member of the EU, money which the pro-leave campaign argue could be invested directly back into UK small businesses to help both new start-ups and existing businesses.
While it would never be a simple case of splitting this money between all small businesses, the suggestion is that there would be more money to go around.
How does EU membership benefit UK consumers?
EU health and safety legislation means that any products designed and sold within the EU must adhere to strict safety regulations and stand up to scrutiny under stringent quality control, which means it’s harder for companies to cut corners and sell unsafe goods to turn a profit.
If UK companies no longer have to meet these stringent safety regulations we could see businesses selling sub-standard, even dangerous, merchandise. This issue could impact a number of manufacturing industries, but farmers and food distributors have voiced their concern regarding an array of chemicals, preservatives and farming methods, that are currently banned in the UK, but not in the USA. With a UK exit from the EU, the entire industry and food processing itself, could be changed drastically.
So what will an EU exit mean for UK small businesses?
It’s impossible to say whether UK small businesses will sink or swim if the ‘leave’ campaign is successful, as there are pros and cons for each eventuality – it really is a trip into the unknown.
The Open Europe think tank has estimated that while an EU exit could see UK Gross Domestic Product (GDP) grow by 1.6% by 2030, it also forecasts a worst-case scenario could cost the UK 2.2% of its GDP.
There are so many potential implications for UK businesses that could be impacted by either staying in, or voting out of the EU.
For example the EU data protection rules that became law in 2018 affected everyone in the EU. If we leave the EU, it could mean less restrictions on data – great for people working in digital marketing like myself (it’s much easier to target specific buyer-personas and demographics when I manage USA accounts vs UK ones), but is this in the interest of the consumers and internet-users?
This is one example of how subjective things can easily get. As a business owner you may prefer ‘looser’ laws around data, but the general public may not. To put this into context, let’s say you own a vegan food shop in Manchester, stricter EU laws make it more difficult to target vegans living in specific parts of Manchester…
One thing’s for sure, Brexit appears to be having a very positive impact on UK tourism and with more Brits likely to stay at home this summer, thanks to the push by protesters concerned with global warming; there could be a real boom in the industry.
Sub InsertRowsAtIntervals()
'Updateby20150707
Dim Rng As Range
Dim xInterval As Integer
Dim xRows As Integer
Dim xRowsCount As Integer
Dim xNum1 As Integer
Dim xNum2 As Integer
Dim WorkRng As Range
Dim xWs As Worksheet
xTitleId = "KutoolsforExcel"
Set WorkRng = Application.Selection
Set WorkRng = Application.InputBox("Range", xTitleId, WorkRng.Address, Type:=8)
xRowsCount = WorkRng.Rows.Count
xInterval = Application.InputBox("Enter row interval. ", xTitleId, 1, Type:=1)
xRows = Application.InputBox("How many rows to insert at each interval? ", xTitleId, 1, Type:=1)
xNum1 = WorkRng.Row + xInterval
xNum2 = xRows + xInterval
Set xWs = WorkRng.Parent
For i = 1 To Int(xRowsCount / xInterval)
    xWs.Range(xWs.Cells(xNum1, WorkRng.Column), xWs.Cells(xNum1 + xRows - 1, WorkRng.Column)).Select
    Application.Selection.EntireRow.Insert
    xNum1 = xNum1 + xNum2
Next
End Sub
Bitcoin and other cryptocurrency have come a long way since the days of Magic the Gathering. It’s now seen by every Wall-Street-Hero with a Mercedes, as a legitimate and sensible place to invest a few quid.
It literally takes 10 minutes maximum to buy some Bitcoin..as long as you can find your wallet…
Make sure that you are on a legitimate site and not a scam-site, always check for the https in the address bar of your browser before submitting sensitive information too.
Also, don’t try and explain Bitcoin to the Motherinlaw, as you have no chance.
How to Invest in Bitcoin
First grab your credit card, a valid photo driving license or Passport for ID & your mobile phone
Follow the instructions – firstly sign up and verify your email address
Verify your Mobile Phone number
Upload your ID – You just need to take a picture…it didn’t work for some reason when I choose to verify my ID with a mobile phone picture, but worked fine when I used my webcam instead
Enter you Credit Card info.
Buy Buy Buy!
At the end – Click the Massive blue “Buy Bitcoin Instantly” Button at the bottom
If you wish, you can also buy other cryptocurrencies such as Ethereum.
Whatever you do, keep all your login information safe!
I bought £50 worth last year and still can’t find my login details! #bellend
You should also get yourself a Bitcoin Wallet. This will mean that if Coinbase gets hacked, you’ll have an offline, backup of your Bitcoinage. You can also get App version for your phone, but it is recommended to get an offline version too.
My friend has an interview on Tuesday for a marketing manager role, and has never done any online marketing, so here goes my introduction to it…
About the title-image, sorry it’s a bit sexist – studies suggest that faces looking at you are the best for Calls to Action (CTAs) and for thumbnails on Youtube videos.
The above image is used for my marketing video and thought it would double up to get people to click on my blog post. May as well embed the video now! Here you go:
Internet Marketing Jargon
Online marketing has so many abbreviations, that if you don’t know them, it sounds like another language
What is a “Browser”?
A browser is Internet Explorer, Google Chrome, Firefox, Safari on an Apple device or Opera. It’s a piece of software for navigating the internet and downloading/rendering websites.
DO NOT say that you use Internet Explorer in an online marketing interview. Say that you use Chrome.
The main reason that people use Chrome and Firefox is that you can get plugins/extensions for Google Chrome. The most popular in online marketing is probably the ‘Mozbar’ which helps you see the ‘Domain Authority’ of a website.
What is a CMS?
Content Management System. A typical CMS is WordPress. This site is made using the free version of wordpress that uses the WordPress hosting platform, a free design template. The wordpress software can also be used when hosted with a different company such as GoDaddy, and the paid WordPress software allows plugins.
What are “WordPress Plugins”?
They are add-ons to your site that allows you to add ‘functionality’. For example you might add a Paypal plugin that allows you to create a shopping cart and payment system on your site to make in an online shop/ecommerce site.
What does “SEO” Stand For?
Search Engine Optimisation. This is the process of ranking as high as possible on Google and other search engines such as Bing.com.
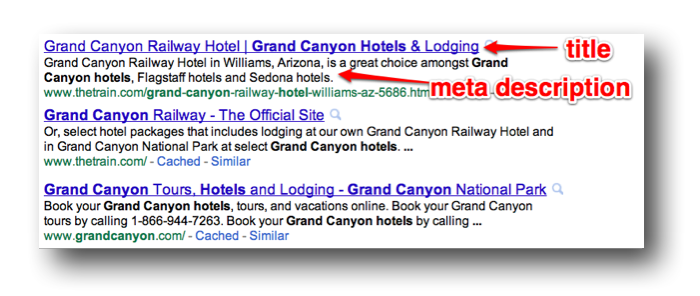
Some terms to be aware of in SEO: Meta Description – This is the description that you add the theof your website page’s code that shows in the Google Results. It just described what is on the page. Meta Descriptions should be 155 characters or less.
Meta Title .- this shows at the top of the tab in your browser and in the Google results pages.
Conversion Rate Optimisation. This is the process of getting people who visit your website to buy things or sign up for a newsletter or submit a form. If you have an online shop, a ‘conversion’ would normally be a purchase on your website.
What does “PPC” Stand for?
Pay Per Click advertising (not Payment Protection Cover as I thought in my interview at the bank I used to work at). The 2 most popular forms of this are Google Adwords and Facebook advertising. Facebook is usually more effective on a smaller budget.
HTML stands for hyper text markup language. It structures websites whilst something called CSS – Cascading Style Sheets.
The best place to start learning HTML is w3 Schools. It can be overwhelming at first, but it’s easy when you get the hang of it. It’s just a load of numbers and letters inside angle brackets <> to remember. There’s no working out or formulas to remember, just letters and numbers.
HTML is one of the ways a websites ‘talks’ to a browser, so that the browser can render the website and show you what’s on there.
CSS makes it looks nice, adding colours, styles etc. For example the CSS might tell the browser to make all the main headings red and all the list items italic.
What is DA?
DA stands for Domain Authority. DA is an indication of how ‘powerful’ or authoritative a website is. The higher the DA (score of 1-100), the more valuable a link is from that website.
What is a Link?
A link or a hyperlink is a bit of text or an image, that you click to go to another website. For example this red underlined text is a link to a fitness blog. When you click it, you should be taken to another blog.
The more links a website has, from high quality websites, the more likely it is to rank higher in Google. You can gain links by creating great content, you can create and run marketing campaigns that people will want to write about, or you can be naughty and pay for some links.
What is Guest Posting?
Guest posting is an old school tactic to gain links to your website and rank on Google. You create an article/blog post, send it to a blogger in an email and ask if they would like to use it on their website. The article will contain a link back to your own website. The typical response from a blogger is either “no thanks” or “okay, that will cost $50”.
Now, this is against Google guidelines and you can get penalised by Google for doing this. People still do though. In theory, if a blogger accepts a payment to link to another website, in any form, whether it is via a blog post or sidebar-link or banner, then it should be a ‘no-follow’ link.
What is a NoFollow Link?
A no follow link has the HTML code – rel=”nofollow” added to it.
This tells Google NOT to count this link and not factor it in to it’s ranking algorithm.
What is the Google Algorithm?
It’s the formula that Google uses to work out where to rank websites on their results pages. Apparently nobody knows all of it, but it looks at how many other websites link to yours, the quality of the websites linking to yours, the quality of your website and its content and how fast your website loads.
What are Keywords?
Keywords or KWs, are search terms used in Google. If I search for “Red apples” then the keyword is “red apples”.
Rather confusingly, search phrases are also called keywords. You want to find KWs with lots of monthly searches, that don’t have lots of competition and add them to your content and headings in a natural format. Don’t stuff them in everywhere.
Use the Keyword Planner Tool to find KWs with lots of monthly searches. And do a Google search to see which websites rank for those terms. If the top 10 websites for that KW are the likes of the BBC, Fox News and Amazon, you probably aren’t going to rank on the first page for that term.
Long Tail Keywords are less popular KWS, with less searches but often ‘convert’ to sales etc. better.
A Head Term might be “Tennis Balls”
A Long Tail Keyword might be “Buy Yellow Slazenger Tennis Balls UK”
“Tennis Balls” will have a much higher volume of monthly searches but will be very hard to rank on the first page of Google for. “Buy Yellow Slazenger Tennis Balls UK” will have less search volume each month, but will be easier to rank for and people searching for that term are more likely to buy/convert.
Tools for Internet Marketing
A CMS – such as WordPress so that you can create a website
A Keyword Tool such as the Google Keyword Planner. So that you can see what keywords to try and rank for or advertise with if you’re using PPC ads.
Google Analytics – to see who is coming to your site, where from and to what pages.
Google Chrome and some extensions such as the Moz Bar
Screaming Frog for Technical SEO. This gets all the information from a website and downloads it into an Excel Spreadsheet.
SEO Mofo – to make sure your meta titles & descriptions are the correct length. Add a CTA – Call To Action such as “Book Now!” or “Learn More” at the end of your descriptions.
Yoast SEO Plugin – This makes it easy to add meta titles and descriptions as you make your webpages and blog posts.