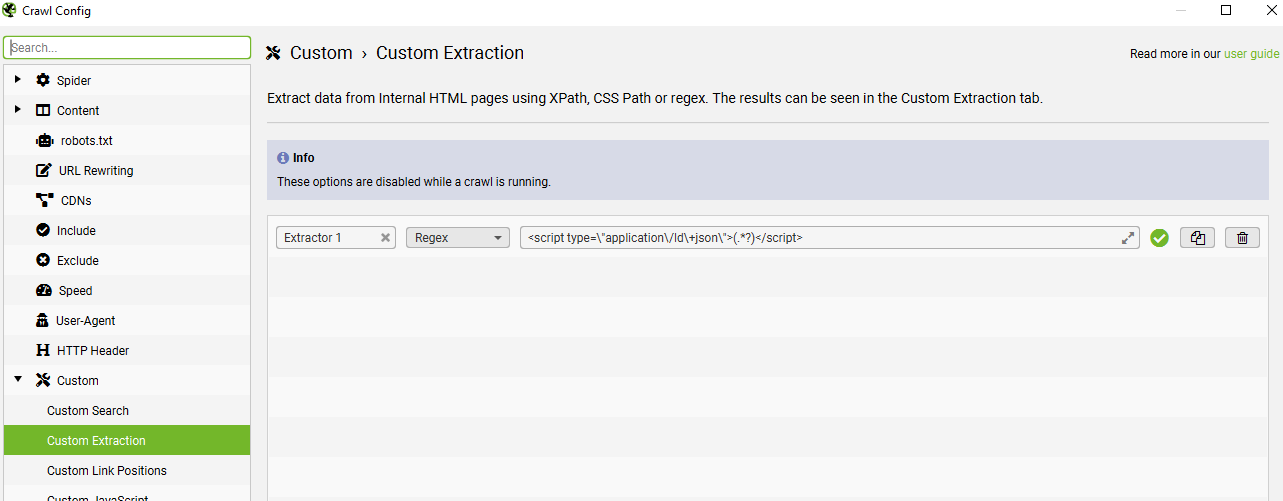
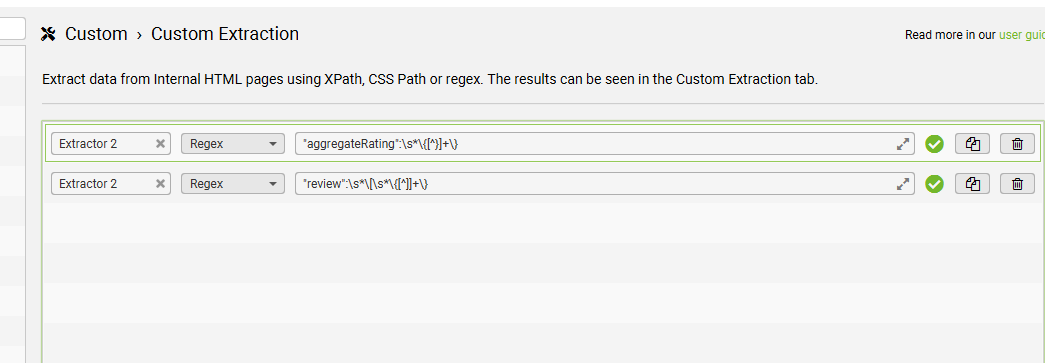
I’m using the code below, to extract product schema only – I can export to excel and filter the URLs containing product schema, but don’t have the aggregaterating:
The Magento configuration file is a critical document that contains important settings and directives for the operation of the Magento website. It acts as a site control panel where relevant information is stored and managed. As an SEO professional, even without a strong background in coding or server management, a basic understanding of this file can enable you to understand how the various technical aspects of a website work.
Here is a division of its purpose and functionality:
Stores basic settings: The Magento configuration file records key information such as database details (including data on products, customers and orders), security protocols, and caching mechanisms that affect site speed.
Regulates functionality: Directs Magento behavior by specifying preferences such as the language used, the currency displayed, and the activation status of certain features.
SEO considerations: URL structure: Some configurations affecting URL generation on a site can be managed here, which contributes to a cleaner, more optimized URL layout.
MTPuTTY Explained for Beginners (non-coders)
MTPuTTY (Multi-Tabbed PuTTY) is a tool that helps manage multiple server connections at the same time.
Here’s how it works in a simple, non-technical way:
By allowing users to open several tabs, MTPuTTY streamlines the process of connecting to various remote servers without the hassle of switching between different windows or applications. This means that you can seamlessly work on multiple projects concurrently, enhancing productivity and efficiency. Each tab operates independently, so you don’t lose your connection when navigating between tasks. Additionally, MTPuTTY provides a user-friendly interface, making it easier for newcomers to grasp the basic functionalities, while still offering advanced features for experienced users. This combination of simplicity and versatility makes MTPuTTY an invaluable tool for anyone who needs to maintain numerous server connections at once.
What is PuTTY?: PuTTY is software that enables developers or server administrators to connect to a server remotely, such as accessing the back-end of a Magento website to make changes or check performance.
What does MTPuTTY do?: MTPuTTY is like an upgraded version of PuTTY that allows people to open multiple server connections at once in different tabs. It’s particularly useful for someone managing several servers, because it keeps everything organized and easily accessible.
How is it relevant to you?:
You won’t likely use it, but developers or technical SEO experts might. They use tools like this to access your website’s server and make behind-the-scenes optimizations that can impact website speed, performance, and security, all of which are important for SEO.
For example, if your site is running slowly, they might use MTPuTTY to connect to your server and make improvements, which could help with SEO by improving site speed.
In summary: MTPuTTY is just a tool that helps manage technical tasks on servers. While you don’t need to know how to use it, it’s helpful to understand that your team might use this tool to maintain your website’s health, which indirectly affects SEO performance.
Google follows links and sitemaps provided in search console to crawl websites.
Pages are revisited to check if they have changed
The crawlers needs to prioriterise what and when to crawl different pages, and different domains/websites.
Successfully crawled pages are passed to the index
Google computes crawl rate of your website – according to what traffic your site can handle.
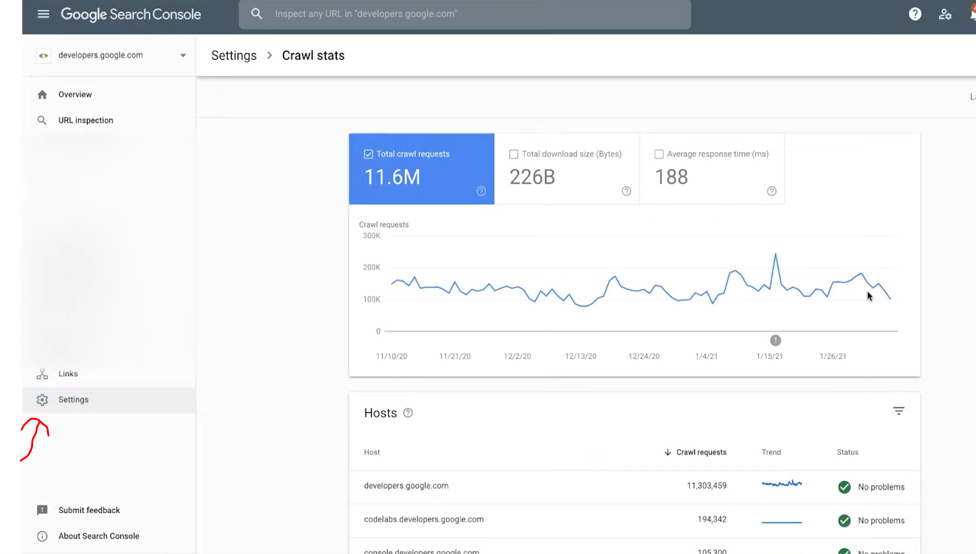
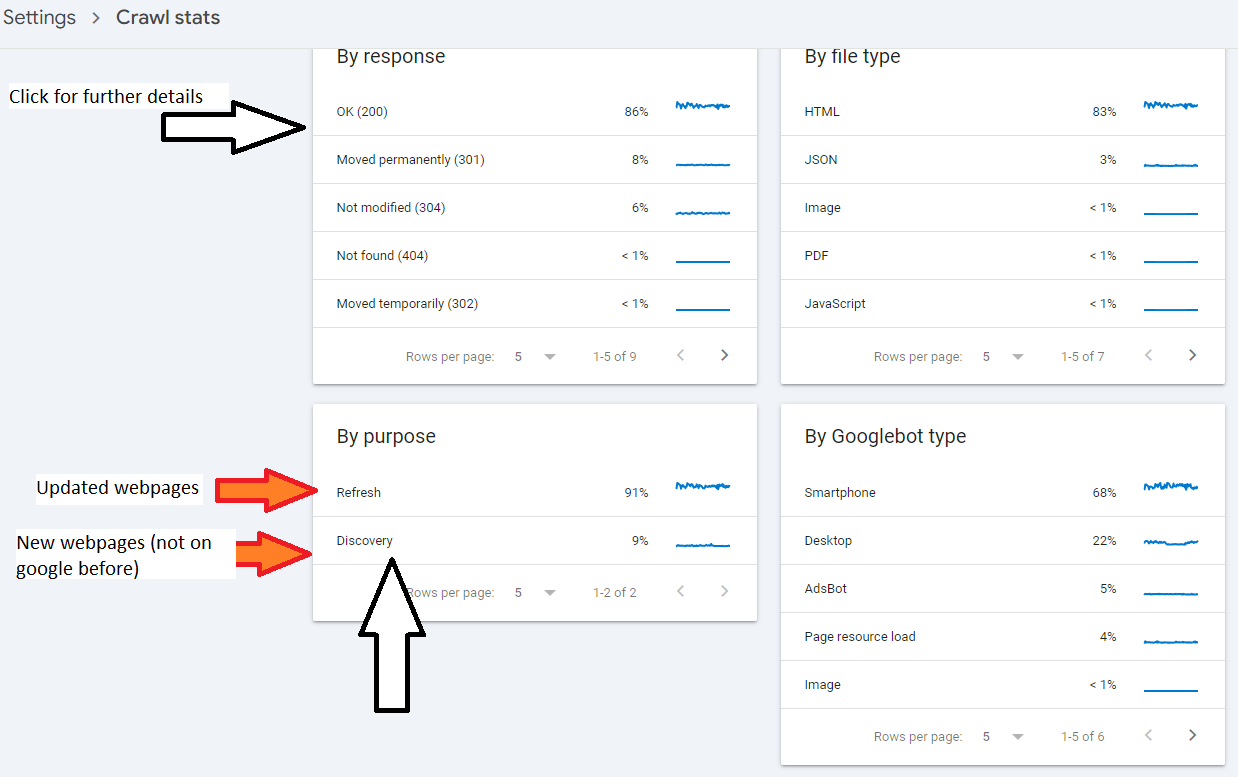
Crawl Stats Report
Provides stats about Googles crawling of your site.
Looks out for errors and drops & spikes in graphs.
Login to Search Console and click on settings
THIS REPORT IS ONLY AVAILABLE FOR PROPERTIES AT THE DOMAIN LEVEL – that don’t include https etc in the address
Look for spikes and drops in the data
E.g. to determine if robots.txt has been updated incorrectly – if there’s a sudden drop.
That’s about it.
Oh, check your server/host is ‘working okay’ too –
Find the above report by clicking “settings” on the left hand side-bar/menu > Crawl Stats > Choose a “host” in the middle panel (usually just your homepage address) > then “Host status”.
It’s good to check crawl stats and average response time before and after a migration or redesign.
Average Response Time:
Under 200ms: Excellent. Site is well optimized for crawling by Google etc.
200ms-500ms: Acceptable. That’ll do pig, that’ll do.
500ms-1s: Slightly too slow, especially if your site is 1,000 pages+
Analyze Core Update Impacts: If your site was affected, investigate potential causes such as relevance adjustments, intent shifts, or quality issues.
Run Delta Reports: Isolate dropped queries and landing pages using delta reports to identify the reasons for traffic decline.**
Content Strategy:
Reassess Content Strategy: Move away from generic content aimed at search engines (SEO-first) and focus on user-first content that aligns with intent and provides real value.
Avoid Overloading Pages: Do not overload pages with excessive information. Make them clear and relevant to user intent.
Quality Over Quantity:
Holistic Quality Evaluation: Improve overall site quality, including UX, ads, presentation, and sources. It’s not just about content but the experience as a whole.
Long-Term Quality Improvements: Use a “kitchen sink” approach—continuous, holistic improvements to demonstrate significant quality enhancement over time.
Utilize User Engagement Data:
Measure User Engagement: Focus on engagement metrics like click-through rates (CTR), time on page, and interactions (Navboost signals) to improve rankings.
Consider the Intent Shifts:
Study Intent Shifts: Understand changes in user intent. Ensure your content targets the appropriate search intent, whether transactional, informational, or navigational.
Use Natural Language Processing (NLP) Tools: Leverage NLP tools to analyze how well your content aligns with searcher intent.*
RankBrain and Vector Search:
Optimize for RankBrain: Vector search re-ranks results based on intent. Focus on improving content relevancy through quality rater feedback and actual user interactions.
Monitor Industry-Specific Trends:
Industry Trends: Be aware of specific industry shifts (e.g., pet insurance, tech products) and adjust your SEO strategy accordingly. Specialized retailers and informational sites are gaining over commercial giants like Amazon.
Consider Site Authority:
Balance Domain and Brand Authority: Tom Capper’s study suggests sites with higher brand authority (BA) performed better than those relying solely on domain authority (DA). Focus on building brand recognition alongside traditional SEO efforts.
Core Update Response:
Future-Proofing: Continue producing high-quality, intent-driven content as Google aims to reward helpful content over SEO-first strategies. Sites that improve post-HCU or core updates will continue to see gains.
Action for Content Creators:
Engage with the Community: Marie plans to collaborate with SB Pro members to develop a system for scoring intent alignment, potentially enlisting community support to study core update effects.
Marie also encourages community engagement, suggesting that producing authentic, user-focused content will be a key driver of success in the evolving search landscape.
*1. Use Natural Language Processing (NLP) Tools to Analyze Content Alignment with Searcher Intent
What is NLP?
Natural Language Processing (NLP) is a branch of artificial intelligence that focuses on the interaction between computers and humans through natural language. In the context of SEO and content creation, NLP tools help analyze and understand the nuances of language, enabling better alignment of your content with what users are searching for.
Why Align Content with Searcher Intent?
Searcher intent refers to the primary goal a user has when typing a query into a search engine. Understanding and aligning your content with this intent ensures that your pages meet the needs of your audience, leading to higher engagement, better rankings, and increased conversions.
How to Leverage NLP Tools:
Identify Searcher Intent:
Types of Intent:
Informational: Users seeking information (e.g., “How to fix a leaky faucet”).
Navigational: Users looking to reach a specific website or page (e.g., “Facebook login”).
Transactional: Users intending to make a purchase or complete a transaction (e.g., “Buy iPhone 14”).
Commercial Investigation: Users researching products or services before making a decision (e.g., “Best DSLR cameras 2024”).
Analyze Your Content:
Keyword Analysis:
Use NLP tools to analyze the keywords and phrases within your content to determine if they align with the identified searcher intent.
Content Structure:
Ensure your content is structured in a way that directly addresses the user’s query. For instance, use clear headings, bullet points, and concise paragraphs for better readability and relevance.
Semantic Analysis:
Assess the context and relationships between words to ensure your content comprehensively covers the topic.
Optimize Content Based on Insights:
Content Gap Analysis:
Identify areas where your content may be lacking in addressing certain aspects of the searcher intent and enhance those sections.
Content Enrichment:
Add relevant information, multimedia elements, or interactive features to better satisfy user needs.
Language Refinement:
Adjust the tone, complexity, and style of your content to match the preferences and expectations of your target audience.
Recommended NLP Tools:
Google Natural Language API:
Offers powerful text analysis capabilities, including sentiment analysis, entity recognition, and syntax analysis.
Select a tool that fits your technical expertise and specific needs. For instance, Google Natural Language API is highly customizable but may require more technical setup compared to user-friendly platforms like Surfer SEO.
Conduct a Content Audit:
Use the chosen NLP tool to analyze your existing content. Look for metrics like keyword density, semantic relevance, and sentiment alignment with user intent.
Map Content to Search Intent:
Categorize your pages based on the primary search intent they fulfill. Ensure each page clearly aligns with its intended user goal.
Optimize and Update Content:
Based on the analysis, make necessary adjustments to improve alignment. This could involve rewriting sections, adding new information, or restructuring content for better clarity and relevance.
Monitor and Iterate:
After optimization, continuously monitor your content’s performance. Use analytics to assess improvements in rankings, engagement metrics, and conversions, and iterate as needed.
*2. Run Delta Reports: Isolate Dropped Queries and Landing Pages to Identify Reasons for Traffic Decline
What are Delta Reports?
Delta reports in SEO are comparative analyses that track changes in your website’s performance metrics over specific periods. By comparing data before and after a Google core update (or any significant change), you can identify which queries and landing pages experienced fluctuations in traffic.
Why Run Delta Reports?
Running Delta reports helps you pinpoint the exact areas of your website that are affected by algorithm changes. Understanding these changes allows you to take targeted actions to recover lost traffic and optimize your site for future updates.
How to Run Delta Reports:
Gather Data:
Time Frames:
Pre-Update Period: Data from a period before the core update (e.g., two weeks before).
Post-Update Period: Data from a period after the core update has been fully rolled out (e.g., two weeks after).
Metrics to Collect:
Organic traffic
Impressions
Click-through rates (CTR)
Average position
Use SEO Tools:
Google Search Console (GSC):
Provides comprehensive data on search performance, including queries and landing pages.
Select a date range that covers both pre-update and post-update periods.
Export Data:
Export the performance data for both periods to a spreadsheet for easier comparison.
Calculate Delta:
Use formulas to calculate the percentage change in impressions, clicks, CTR, and average position for each query and landing page.
Analyze the Data:
Identify Drops and Gains:
Highlight queries and pages that saw significant drops or gains in traffic.
Segment the Data:
Break down the data by categories such as content type, topic, or user intent to identify patterns.
Look for Correlations:
Determine if there are common factors among the affected queries/pages, such as content quality, relevance, or technical issues.
Identify Potential Causes:
Relevancy Issues:
Content may no longer align with the updated search intent or relevancy criteria.
Technical Problems:
Issues like slow page speed, mobile usability problems, or broken links can impact rankings.
Content Quality:
Thin content, outdated information, or lack of depth can lead to declines.
Competitor Improvements:
Competitors may have enhanced their content, earning higher rankings.
User Experience (UX):
Poor UX, intrusive ads, or difficult navigation can negatively affect rankings.
Develop an Action Plan:
Content Optimization:
Revise and enhance content to better match searcher intent and improve quality.
Technical SEO Fixes:
Address any identified technical issues to improve site performance.
Improve UX:
Enhance the overall user experience to keep visitors engaged and reduce bounce rates.
Monitor Competitors:
Analyze top-performing competitors to understand what changes they made that may have contributed to their gains.
Continuous Monitoring:
Regularly update and monitor Delta reports to track the effectiveness of your optimizations and stay ahead of future updates.
Tools and Techniques for Delta Reporting:
Google Search Console (GSC):
Export and Compare:
Export performance data before and after the update and use spreadsheet tools to calculate differences.
Filtering Options:
Use filters to narrow down specific queries or pages for detailed analysis.
Google Analytics:
Custom Reports:
Create custom reports to compare traffic sources, user behavior, and conversion metrics across different periods.
Annotations:
Use annotations to mark the date of the core update, helping correlate changes in data with the update rollout.
SEO Platforms:
SEMrush’s Position Tracking:
Track keyword rankings over time and compare pre- and post-update positions.
Ahrefs’ Site Explorer:
Analyze backlink profiles and organic search traffic changes.
Moz’s Rank Tracker:
Monitor keyword performance and identify ranking fluctuations.
Spreadsheet Analysis:
Pivot Tables:
Use pivot tables to summarize and analyze large datasets effectively.
Visualization:
Create charts and graphs to visualize traffic trends and identify significant changes.
Best Practices for Delta Reporting:
Consistent Time Frames:
Ensure the comparison periods are equivalent in length and cover similar days of the week to account for any variability.
Account for Seasonality:
Be aware of seasonal trends that might affect traffic independently of the core update.
Focus on Significant Changes:
Prioritize queries and pages with substantial traffic drops or gains to address the most impactful issues first.
Iterative Analysis:
Continuously refine your analysis by incorporating additional data points or adjusting your reporting criteria as needed.
Putting It All Together: Enhancing Your SEO Strategy
By integrating NLP-based content analysis and Delta reporting, you can create a robust SEO strategy that not only aligns your content with user intent but also allows you to proactively identify and address issues arising from algorithm updates. Here’s a step-by-step approach to combining these strategies:
Initial Content Audit:
Use NLP tools to assess the alignment of your existing content with searcher intent.
Identify content areas that need enhancement or restructuring.
Post-Update Performance Analysis:
After a core update, run Delta reports to identify affected queries and pages.
Cross-reference these findings with your NLP analysis to understand if misalignment with search intent contributed to the declines.
Optimization and Implementation:
Optimize affected content based on insights from both NLP analysis and Delta reports.
Enhance content quality, adjust for better intent alignment, and fix any technical issues identified.
Continuous Monitoring and Improvement:
Regularly use NLP tools to keep your content aligned with evolving search intents.
Continuously monitor your site’s performance with Delta reports to stay ahead of any negative trends.
Community Engagement and Learning:
Engage with SEO communities (like the Search Bar Pro Community mentioned in your summary) to share insights and learn from others’ experiences.
Stay updated with the latest SEO trends and algorithm changes to adapt your strategy accordingly.
Additional Resources
Google’s Search Quality Evaluator Guidelines:
Understanding these guidelines can provide deeper insights into what Google considers high-quality content.
Implementing these strategies effectively can lead to improved search rankings, better user engagement, and sustained organic growth. By continuously aligning your content with user intent and proactively monitoring your site’s performance, you can navigate algorithm updates with greater confidence and resilience.
If you have any further questions or need assistance with specific tools or techniques, feel free to ask!
Performance Max (pMax) campaigns, are basically all forms of google advertising – lumped into one campaign.
Pmax does work really well, if you optimise it properly.
It is not keyword focused – it is audience focused.
You give it a CPA or ROAS target or goal, and basically let it run itself.
The downside of pMax, is that it does not give you much data. So it is difficult to really optimise campaigns to get the best out of them.
Pros and Cons of pMax Campaigns
Pros
It works!
It’s going to hit other channels, that most advertisers previously ignored.
Cons
No real insights
Limited control
Cannibalisation – it will take credit from your other campaigns – or show instead of them
Wasted spend – that you can’t identify
Can have wild swings in performance – make sure you have all tracking set up. It can still be hard to identify what goes wrong.
Takes a while to learn what performance best for your campaigns/company
URL extensions – can send users to irrelevant pages.
Does not tend to work well for Lead-Gen.
pMax Impact on Other Campaigns
You can run search campaigns, alongside pMax campaigns. Pmax will tend to get shown over broad match keywords, whilst exact and phrase match keywords/ads – will come down to ad rank (apparently).
PMax takes priority over standard Shopping Ads campaigns.
Display, YouTube and Discovery ad campaigns, will show according to their Ad Rank – i.e. if they have a high Ad Rank, they are more likely to show instead of pMax ads.
pMax Terminology
Asset Groups –
Similar to Ad Groups, Asset Groups contain:
Assets – logos, images, headlines and descriptions for your ads
Listing Groups – Products pulled from your merchant feed. you can segment and split these out into separate groups.
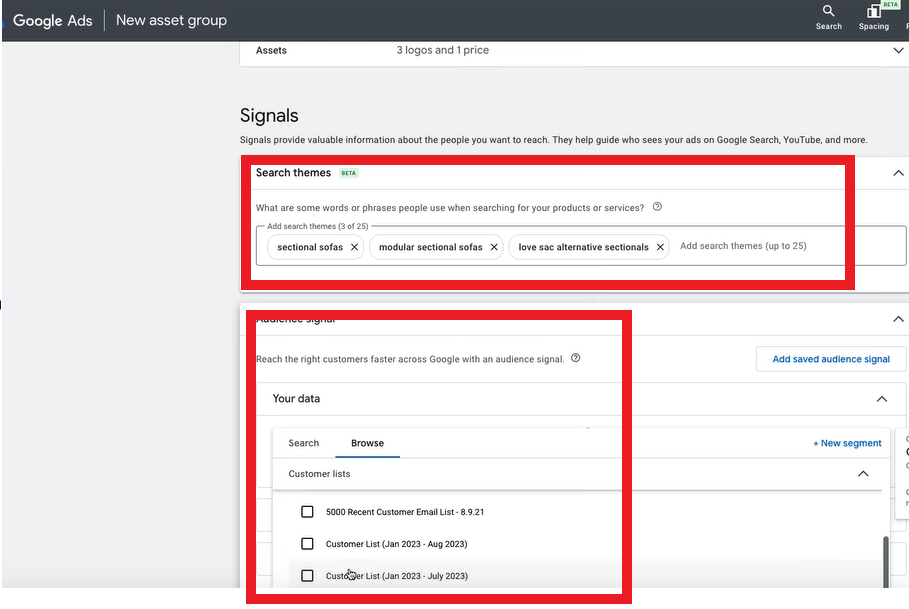
Audience Signals – instead of keywords – in pMax you will use audience signals, to tell Google who to show your ads to. Your audience signal can include your own customer data (remarketing and customer match lists), or any custom segments you have created.
They are no keywords in performance max.
How to Optimize pMax Campaigns
Optimise your product feed – this is the foundation of pMax success!
Ensure product titles are accurate, descriptions stand out, and images are clear and optimised for search. Try lifestyle images where possible – with someone using the product and A/B test against isolated product images. Don’t rely on standard and default feed setup from Shopify and WordPress plugins – review and optimise.
Product Feed Optimisation Variables – Most Important!
Price 🔥🔥🔥🔥🔥
Title 🔥🔥🔥🔥🔥
GTIN 🔥🔥🔥
Image 🔥🔥
Description 🔥
Category 🔥
As you probably can’t change price too much, Title is a big one to focus on.
Make sure to check Merchant Center often and review your Diagnostics tab for any feed or product issues.
Make sure you don’t have loads of disapproved products!
Titles
Product title optimization is a powerful lever for boosting impressions and clicks. It’s the most crucial feed attribute under your control. Keyword placement is critical. Front-load your titles with the most important terms, as Google only processes the first 150 characters. Keep in mind that search results may truncate titles after just 30 characters.
GTIN
If you have a GTIN – add it! ask your manufacturer for it, or visit GS1.org Google has put a huge emphasis on having a GTIN in your product feeds, so if you have it – add it!
Image
A/B test images for your top products. Make them stand out somehow.
Description
Make your descriptions high quality and make sure they have keywords in them
Category
Add the most relevant category, or Google will auto-apply one.
Understanding Customer Search Behavior
When crafting titles, consider:
Do customers prioritize brand names in their searches?
Are model or part numbers commonly used?
How often do searchers use product types or categories?
Analyze your Search Query Reports to identify top-converting keywords for each product. Incorporate these high-performing terms into your titles to maximize relevance and appeal
You need to be spending at least $50 a day on pMax – otherwise stick with standard shopping campaigns
You need correct conversion tracking – Use the Google Ads Purchase tag, not GA4 tracking. You can set up enhanced conversion on the Google Ads.
Feed pMax ONLY purchase data. Don’t give it conversions like Add to Cart – or it will go and get a load of clicks optimised for people who only Add to Cart, but don’t necessarily purchase.
Don’t go to granular – less is more, as you’ll get more data
You need 50+ conversions per month, for a pMax to work well. If you have 10 campaigns, with 5 conversions each, consider consolidating them to get better data.
When you have lots of data and your pMax campaign is running effficiently and hitting ROAS or CPA goals, then consider segmenting one campaigns, into several smaller campaigns.
For example, you could segemnt by:
Best sellers in one campaign, low performers in another
Seasonality
New products vs old
Products getting 0 conversions – put them in their own campaign to try and optimise
Here’s a way to structure your pMax campaigns in the beginning – if you have enough budget to spend $50 per day on each campaign, and to get at least 50 purcahses per campaign –
Best Sellers (Mid/low products excluded)
Mid/Low Performers (Best sellers excluded)
0 purchase products – exclude best sellers and mid/low performers.
Catch-All Standard Shopping Campaign
If you don’t have a $50 a day budget, then just have 1 pMax best sellers campaign, and have all of your mid/low selling products in the Catch-All shopping campaign.
If you have a massive budget, you can split out the best sellers, mid/low performers and 0 product categories into brand or categories. For example, you could have:
Football Goals – Best sellers, Mid/low performers/0 purchase products/standard shopping Football training equipment – Best sellers, mid/low performers/0 purchase products/standard shopping
Maintaining Your Campaigns
Move any top performing products in your mid/low performers into the best sellers, move any poorly performing products into the standard shopping campaign, where you can have more control over them.
Asset Group Structures
Feed only – Google will take all the information from just your data feed. This type of campaigns won’t show on display on video/Youtube. Some people do this and then run separate YouTube and Display campaigns. Or some people do this, because they don’t have any decent images!
All Assets Group – Add in images etc. Asset groups need to be split by brands and/or product categories.
Asset group are a bit like Ad Groups. Keep them specific and have multiple asset groups within a campaign.
Dont split test asset groups by audience signals!
How to set up Audience Signals
You would do this inside of your asset group – gind the signals section and Search Themes
Add top search terms to “Search Themes”
Add in customer Lists from your own data:
THe bottom ‘box’ allows you to add demographics and in market audiences. So sleect any that are directly relevant. For example, you could select a market audience for sofas – if you are selling sofas!
How to Set up Feed Only Asset Groups
Click the + in the blue circle
Click “Create new asset group”
Skip everything but make sure your products are set up:
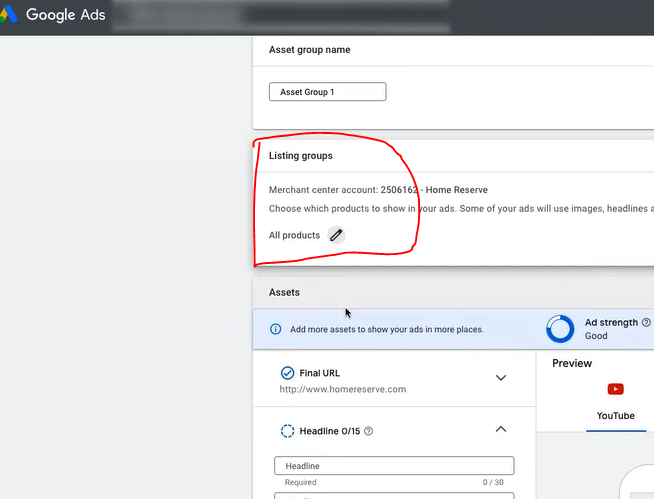
make sure “All products” are selected in the Listing groups section (shown above)
Don’t give the asset group any headline or anything – no images etc.
Name the asset group – “feed only”
Add audience signals (if you want to)
click “save”
Sometimes this will give you an error. If this happens
Go to an existing asset group – click the 3 vertical dots on the right – duplicate asset group
Delete all the headlines – final URLs etc, delete images
Leave business name
Setting up a Full PMax Campaign
In campaigns
Hit the blue circle with the + icon within it
select – Create a campaign without a goal guidance
select campaign type –> Performance Max
select “purchases” for conversion goals
link to merchant centre
give URL for landing page
Name
Bidding
stick to conversion value – get data and volume first before setting a target
for most cases – untick the Customer acquisition section:
only in specific cases, do people normally turn on customer acquisition.
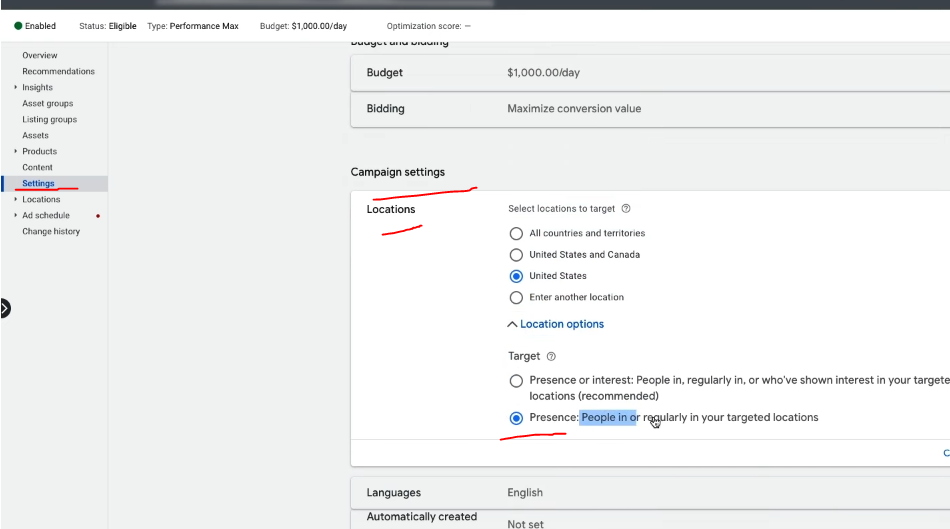
Locations – choose location you want – you need to go back and edit this again when the campaign is set up – Google won’t let you edit all teh advanced location settings at this point though!
Languages – English
Automatically Created assets – if you want to be conservative, turn this off. If you leave this on, Google will create new assets and send users to different pages on your website that it thinks will enhance conversions.
Brand exclusions
If you want to exclude your brand terms from the campaign. Add a brand exclusion. If you do exclude your brand terms, then make sure you have at least 1 shopping campaign to capture brand search terms.
Asset Generation
AI can generate assets like headlines and images for you – but it will be generic and pretty bad a lot of the time.
Listing Groups – this is your products.
Images – Add Images if you have some – or let Google crawl your website.
Logos – add logos
Business Name – add your business name!
Video – add a video – Google’s auto-generated ones are pretty bad at the moment.
Add sitelink extensions and Call-outs
Add USPs as Callouts
search themes – are similar to keywords, but think of them as more general. Please see video above for more info!
Look into asset reports, and pause badly performing assets.
Create more, assets that are likely to perform well based on the current data. For example, if your best performing image has a picture of someone using the product – get more images of people using the product.
Final URL expansion
If you want full control – turn this off. However, you can get better results. This lets Google send users to other landing pages on your site, and it can change the ad text.
Remember to exclude URLs you don’t want people sent to.
Negative Keywords pMax
At the time of writing, there is a work around to add negative keywords to pMax campaigns:
Add a shared library keyword list with negative keywords
contact a Google rep and ask them to add it to your pmax campaign
This is our inhouse protocol, it might differ in normal places…
Open FileZilla – connect to M2 server (magento 2, rather than our magento 1 server)
Click domains folder –
Select relevant domain
Select Rewrites
Right Click – Config folder and click View/Edit – Open in a text editor like Sublime
Add redirects in the following format:
#Note to say who did redirects on what date

rewrite ^/rwl-x-la-new-member-starter-pack.html$ /gym-equipment.html permanent;
rewrite ^/rwl-x-la-ultimate-starter-pack-intermediate.html$ /gym-equipment.html permanent;
rewrite ^/rwl-x-la-new-member-dumbbell-pack.html$ /gym-equipment.html permanent;

- Save the file
This will redirect the URL example.com/rwl-x-la-new-member-starter-pack.html to example.com/gym-equipment.html
and so on…the other 2 below will also redirect to gym-equipment.html
Open MTPUTTY
Connect to relevant server – in my case – server 3