Performance Max (pMax) campaigns, are basically all forms of google advertising – lumped into one campaign.
Pmax does work really well, if you optimise it properly.
It is not keyword focused – it is audience focused.
You give it a CPA or ROAS target or goal, and basically let it run itself.
The downside of pMax, is that it does not give you much data. So it is difficult to really optimise campaigns to get the best out of them.
Pros and Cons of pMax Campaigns
Pros
It works!
It’s going to hit other channels, that most advertisers previously ignored.
Cons
No real insights
Limited control
Cannibalisation – it will take credit from your other campaigns – or show instead of them
Wasted spend – that you can’t identify
Can have wild swings in performance – make sure you have all tracking set up. It can still be hard to identify what goes wrong.
Takes a while to learn what performance best for your campaigns/company
URL extensions – can send users to irrelevant pages.
Does not tend to work well for Lead-Gen.
pMax Impact on Other Campaigns
You can run search campaigns, alongside pMax campaigns. Pmax will tend to get shown over broad match keywords, whilst exact and phrase match keywords/ads – will come down to ad rank (apparently).
PMax takes priority over standard Shopping Ads campaigns.
Display, YouTube and Discovery ad campaigns, will show according to their Ad Rank – i.e. if they have a high Ad Rank, they are more likely to show instead of pMax ads.
pMax Terminology
Asset Groups –
Similar to Ad Groups, Asset Groups contain:
Assets – logos, images, headlines and descriptions for your ads
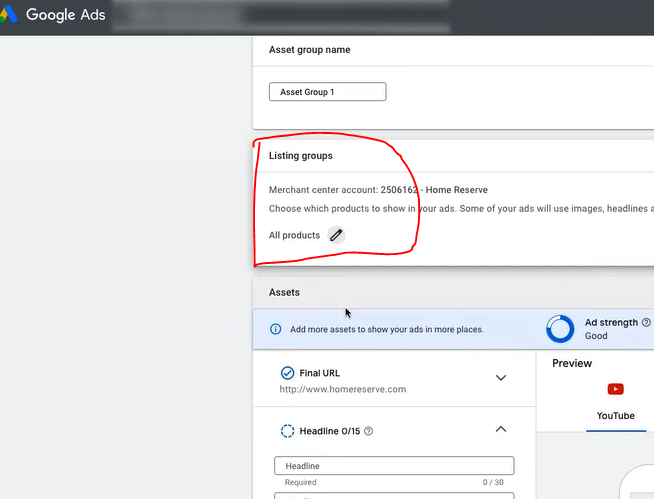
Listing Groups – Products pulled from your merchant feed. you can segment and split these out into separate groups.
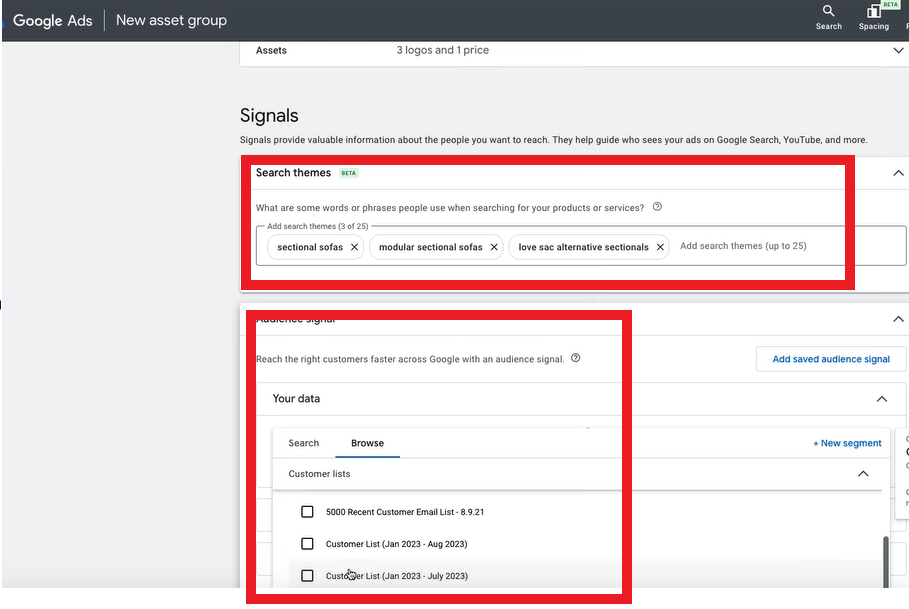
Audience Signals – instead of keywords – in pMax you will use audience signals, to tell Google who to show your ads to. Your audience signal can include your own customer data (remarketing and customer match lists), or any custom segments you have created.
They are no keywords in performance max.
How to Optimize pMax Campaigns
Optimise your product feed – this is the foundation of pMax success!
Ensure product titles are accurate, descriptions stand out, and images are clear and optimised for search. Try lifestyle images where possible – with someone using the product and A/B test against isolated product images. Don’t rely on standard and default feed setup from Shopify and WordPress plugins – review and optimise.
Product Feed Optimisation Variables – Most Important!
Price 🔥🔥🔥🔥🔥
Title 🔥🔥🔥🔥🔥
GTIN 🔥🔥🔥
Image 🔥🔥
Description 🔥
Category 🔥
As you probably can’t change price too much, Title is a big one to focus on.
Make sure to check Merchant Center often and review your Diagnostics tab for any feed or product issues.
Make sure you don’t have loads of disapproved products!
Titles
Product title optimization is a powerful lever for boosting impressions and clicks. It’s the most crucial feed attribute under your control. Keyword placement is critical. Front-load your titles with the most important terms, as Google only processes the first 150 characters. Keep in mind that search results may truncate titles after just 30 characters.
GTIN
If you have a GTIN – add it! ask your manufacturer for it, or visit GS1.org Google has put a huge emphasis on having a GTIN in your product feeds, so if you have it – add it!
Image
A/B test images for your top products. Make them stand out somehow.
Description
Make your descriptions high quality and make sure they have keywords in them
Category
Add the most relevant category, or Google will auto-apply one.
Understanding Customer Search Behavior
When crafting titles, consider:
Do customers prioritize brand names in their searches?
Are model or part numbers commonly used?
How often do searchers use product types or categories?
Analyze your Search Query Reports to identify top-converting keywords for each product. Incorporate these high-performing terms into your titles to maximize relevance and appeal
You need to be spending at least $50 a day on pMax – otherwise stick with standard shopping campaigns
You need correct conversion tracking – Use the Google Ads Purchase tag, not GA4 tracking. You can set up enhanced conversion on the Google Ads.
Feed pMax ONLY purchase data. Don’t give it conversions like Add to Cart – or it will go and get a load of clicks optimised for people who only Add to Cart, but don’t necessarily purchase.
Don’t go to granular – less is more, as you’ll get more data
You need 50+ conversions per month, for a pMax to work well. If you have 10 campaigns, with 5 conversions each, consider consolidating them to get better data.
When you have lots of data and your pMax campaign is running effficiently and hitting ROAS or CPA goals, then consider segmenting one campaigns, into several smaller campaigns.
For example, you could segemnt by:
Best sellers in one campaign, low performers in another
Seasonality
New products vs old
Products getting 0 conversions – put them in their own campaign to try and optimise
Here’s a way to structure your pMax campaigns in the beginning – if you have enough budget to spend $50 per day on each campaign, and to get at least 50 purcahses per campaign –
Best Sellers (Mid/low products excluded)
Mid/Low Performers (Best sellers excluded)
0 purchase products – exclude best sellers and mid/low performers.
Catch-All Standard Shopping Campaign
If you don’t have a $50 a day budget, then just have 1 pMax best sellers campaign, and have all of your mid/low selling products in the Catch-All shopping campaign.
If you have a massive budget, you can split out the best sellers, mid/low performers and 0 product categories into brand or categories. For example, you could have:
Football Goals – Best sellers, Mid/low performers/0 purchase products/standard shopping Football training equipment – Best sellers, mid/low performers/0 purchase products/standard shopping
Maintaining Your Campaigns
Move any top performing products in your mid/low performers into the best sellers, move any poorly performing products into the standard shopping campaign, where you can have more control over them.
Asset Group Structures
Feed only – Google will take all the information from just your data feed. This type of campaigns won’t show on display on video/Youtube. Some people do this and then run separate YouTube and Display campaigns. Or some people do this, because they don’t have any decent images!
All Assets Group – Add in images etc. Asset groups need to be split by brands and/or product categories.
Asset group are a bit like Ad Groups. Keep them specific and have multiple asset groups within a campaign.
Dont split test asset groups by audience signals!
How to set up Audience Signals
You would do this inside of your asset group – gind the signals section and Search Themes
Add top search terms to “Search Themes”
Add in customer Lists from your own data:
THe bottom ‘box’ allows you to add demographics and in market audiences. So sleect any that are directly relevant. For example, you could select a market audience for sofas – if you are selling sofas!
How to Set up Feed Only Asset Groups
Click the + in the blue circle
Click “Create new asset group”
Skip everything but make sure your products are set up:
make sure “All products” are selected in the Listing groups section (shown above)
Don’t give the asset group any headline or anything – no images etc.
Name the asset group – “feed only”
Add audience signals (if you want to)
click “save”
Sometimes this will give you an error. If this happens
Go to an existing asset group – click the 3 vertical dots on the right – duplicate asset group
Delete all the headlines – final URLs etc, delete images
Leave business name
Setting up a Full PMax Campaign
In campaigns
Hit the blue circle with the + icon within it
select – Create a campaign without a goal guidance
select campaign type –> Performance Max
select “purchases” for conversion goals
link to merchant centre
give URL for landing page
Name
Bidding
stick to conversion value – get data and volume first before setting a target
for most cases – untick the Customer acquisition section:
only in specific cases, do people normally turn on customer acquisition.
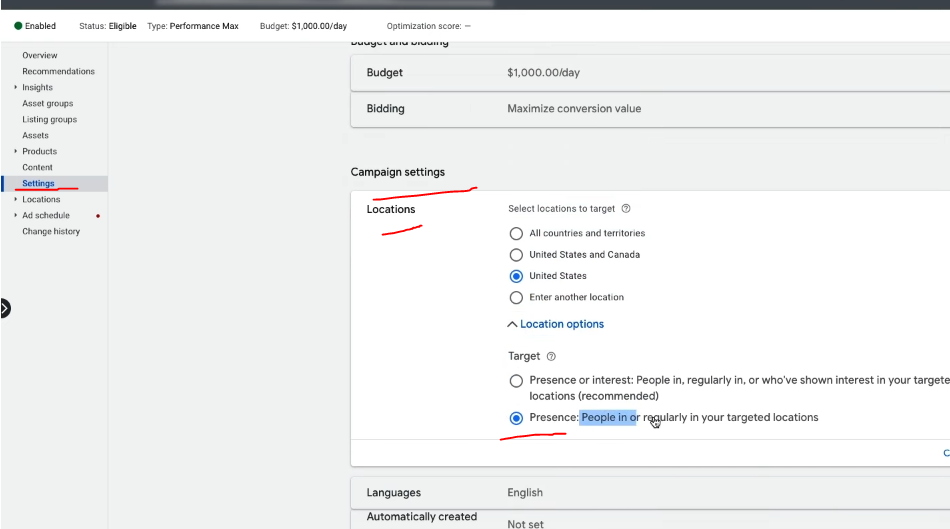
Locations – choose location you want – you need to go back and edit this again when the campaign is set up – Google won’t let you edit all teh advanced location settings at this point though!
Languages – English
Automatically Created assets – if you want to be conservative, turn this off. If you leave this on, Google will create new assets and send users to different pages on your website that it thinks will enhance conversions.
Brand exclusions
If you want to exclude your brand terms from the campaign. Add a brand exclusion. If you do exclude your brand terms, then make sure you have at least 1 shopping campaign to capture brand search terms.
Asset Generation
AI can generate assets like headlines and images for you – but it will be generic and pretty bad a lot of the time.
Listing Groups – this is your products.
Images – Add Images if you have some – or let Google crawl your website.
Logos – add logos
Business Name – add your business name!
Video – add a video – Google’s auto-generated ones are pretty bad at the moment.
Add sitelink extensions and Call-outs
Add USPs as Callouts
search themes – are similar to keywords, but think of them as more general. Please see video above for more info!
Look into asset reports, and pause badly performing assets.
Create more, assets that are likely to perform well based on the current data. For example, if your best performing image has a picture of someone using the product – get more images of people using the product.
Final URL expansion
If you want full control – turn this off. However, you can get better results. This lets Google send users to other landing pages on your site, and it can change the ad text.
Remember to exclude URLs you don’t want people sent to.
Negative Keywords pMax
At the time of writing, there is a work around to add negative keywords to pMax campaigns:
Add a shared library keyword list with negative keywords
contact a Google rep and ask them to add it to your pmax campaign
For lead generation websites, if you are a local tradesman for example, you’ll want a Call to ACTION button on the homepage, and probably all of your other pages – a Contact Now button for example
Homepage Call to Action
Strong Call To Action
You will probably want a “Call to Action” or “CTA” button, such as “Buy Now”, “Learn More” or “Contact Us”
This CTA button is generally placed “above the fold” on most pages, so that people don’t have to scroll down or look for a way to get in touch or buy from you.
“Join Free for a Month” – is the CTA on Netflix’s homepage (at the time of writing)
For more expensive, high end or though-out purchases such as – buying a car or contacting a therapist, sometimes it’s better to have the CTA below the fold. The best thing to do is test it, with Google Optimize.
For more information about “Conversion Rate Opimization” (CRO), see this article:
For a full SEO (Search Engine Optimization) checklist for your website – to help get visibility on Google – see this article – https://backlinko.com/seo-checklist
Google My Business
Register your website and your office with Google My Business
Google will send out a postcard to your office (or home) address
The postcard has a code – so you can confirm you are at that address
Local Directories
Register your business with high quality, local directories such as
Bing Places
Yelp
Yell
Free Index
Open Di
Try and get on any local government directories too.
Social Media & Captioned Videos
If relevant, register your business on:
Linkedin
Facebook
Instagram
TikTok
Arguably the best way to get noticed on social media at the moment, is to create videos with captions – so they can be watched on mute.
Linkedin is said to have the greatest organic reach at the moment too – meaning you can get your video, image or text-post in front of more people, without paying for ads.
Social media sites like people posting videos too – because they drive a high rate of engagement and keep people on the site for longer.
Do NOT post to YouTube and then post a link on social media
Instead – upload your video direct to the platform.
For example, if you have a Facebook page, upload the video directly to Facebook, so that Facebook hosts the video and not YouTube.
Social media sites will tend to kill your reach if you post a link – they don’t want people to click and leave their website
YouTube is also showing on more and more Search Results Pages on Google.
Consider creating a YouTube channel with lots of informative, helpful and entertaining content.
You can then edit the videos and post to specific social media platforms.
Find out the pain point of your target audience and create video content that helps with those pain points.
Take long form videos and edit them into YouTube shorts, and shorter clips for social media.
If you work in b2b for example, you could do a webinar on digital marketing for small businesses, create some 1 minute highlights of the most informative points and create a YouTube short, and create lists of 30 second clips for tiktok, Facebook, twitter, Instagram and LinkedIn.
Make sure you add captions to your videos for social media!
80% of social media videos ate watched muted.
Jab, Jab, Jab – Right Hook
General principle of content and social media marketing by Gary V.
Identify your target market
Identify their issues and pain points
Post helpful content related to their pain points and problems
Do NOT constantly promote your business – slip in the odd “Right Hook”, every 3 or 4 posts
People do not want to be sold to constantly, they want helpful, insightful and funny content.
For example.
If you target market is small business owners, take a look on Quora and Reddit and see what people are talking about. If a common theme is Facebook advertising for example, make some helpful videos and blog posts about Facebook marketing.
SEO, PPC and More
The above is just a foundation.
If you have the time and resources, you will ideally produce lots of insightful blog content, earn lots of inbound links and work your way to the top of Google.
You will also want to consider “PPC” – Pay Per Click ads on Google, Facebook and Linkedin.
One beginner mistake to avoid with ads – is sending people to your homepage.
Have a specific “landing page” for each advertising campaign.
oh – make sure you have a good looking logo too. You can use Canva or hire someone on PeoplePerHour.com
Google ads is changing all the time, but generally speaking you’ll want to use exact match keywords and create very specific ads for each keyword or group of keywords.
A good place to start with SEO is to check your website using an On-Page SEO Checklist.
Videos can also be used as aa way to gain presen o Google.
Videos are great for social media, and YouTube is also starting to show more and more often in the Google results. I would personally have a good go at gaining an online presence using videos and social media – particularly Linkedin at the moment.
Build a Brand
Here’s a good article that some hero wrote about building your brand as a small business
Identify other propositions “why use me/us and not the competitor?”
Write down your brand story
Use high quality photography & videography (avoid stock pictures)
Consider making customer support a key element of your brand – this can help with online reviews too. Pre-purchase, purchase and post-purchase consumer stages are all opportunities to impress and help.