One confusing thing with some tools in Inkscape, is that it keeps the previous settings from the last time you used the tool. So sometimes your squares will be white and not show up.
Generally use CTRL and not shift in Inkscape Vs Illustrator
XML Editor – press SHIFT + CTRL + X to edit the code
PASTE IN PLACE = CTRL + ALT + V
SELECT SHAPES by left clicking on them
To SELECT An OBJECT UNDERNEATH with Alt + Click (this doesn’t work on Mac – you have to select on object then tab through to the one you want)
To select multiple objects at once, use shift and click or drag a selection box over the objets
Deselect by pressing escape
Text
Https://inkscape.org
Ellipse Tool
To get a perfect circle in using the Elipse tool in Inkscape, you need to click on one of the square nodes, whilst holding down CTRL and then drag.
Rectangle Tool – Inkscape
Using the circular node, you can create rounded corners.
You can also just use the “Ry” measurement box on the bar near the top.
Inkscape Gradient
Fill & Stroke Menu
To show the Fill and Stroke Menu in Inkscape go to the “Object” Menu and then click on the third option “Fill and Stroke…”
Pathfinder Menu – Inkscape
For “Union” – you need to select 2 or more objects, then click on the “Path” menu.
To make a hole in an object with another object.
Place one object on top of the other
Select both objects
Then go to Path > Difference
Another example:
Select both Objects – Path menu > Difference – creates a hole in the bottom circle (if different shapes are used to make the cat image – Path>unionise first!)
Using an Image to Trim Another Image
Path > Difference
Gradient Tool
Add nodes to add more colours to the gradient by double clicking on the line.
Drag the lines at the ends to make them longer, to make the colours span further – for example across the whole shape
‘Linkedin Gradient Effect’
To create the Linkedin Gradient effect,
create an elipse that is about the same width as the rounded-square which forms the main outline of the logo.
Duplicate the green/blue square (or whatever colour your logo is)
Select the elipse and the new square
Path menu > intersection (this creates the shine/gradient area)
The Chrome Inspect Element function is instrimental in making these changes to your WordPress theme.
Let’s say for example, that you want to change the main header on the homepage of your WordPress theme – then right click and choose “Inspect Element”.
Then click on the arrow icon on the top left of the window that opens, and your arrow should automatically select whatever you hover over.
Use a Text Document To Track Changes
Copy and paste code that you want to make changes to.
Make your changes in your notepad document and add a comment so that you can easily identify what you have changed.
Paste Changes into the Appearance>Customize>Additional CSS window
Once you have selected your code from the text/notepad document, you can go to the WordPress admin section /wp-admin and the Appearance menu and then “Customize”, then near the bottom, you should be able to paste in your new CSS.
To Preview CSS Changes
In inspect element, click the “+” icon on the top right.
You can then add styles to different elements.
Be aware that you may need to edit the parent element, to see any changes (rather than the specific element)
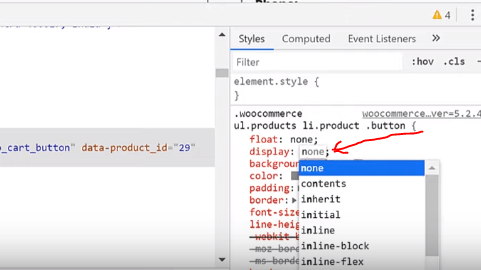
To Remove Elements on a Webpage
In CSS, if you change the “Display:” value to “none”, from inline-block etc.
display: none;
You’ll need to copy & paste the whole block of code from inspect element’s CSS window, into the Custom CSS menu’s window in WordPress’s (Appearance>Customize>Custom CSS)
The video below has more details on how to do this:
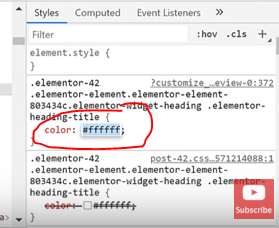
To Change the Colour of Elements
Use the same method as above – i.e. select the element with the inspect element tool.
Select the item that you want to choose using the arrow in the Inspect Element window (arrow is on top left)
Then change the colour using the panel on the right:
Finally, paste the new code for that element, into the Custom CSS window in WordPress (go to Appearance>Customize – wait for the Customize menu to load and then click either “Customize CSS” or “Additional CSS” which is normally located near the bottom left
Change the Colour of Font-Awesome Icons
This is easily done, the same way as shown above.
Select the icon, then change the colour in the CSS panel of inspect element on the right.
Select all the CSS in that window and then paste it into the Custom CSS/Additional CSS window on the left:
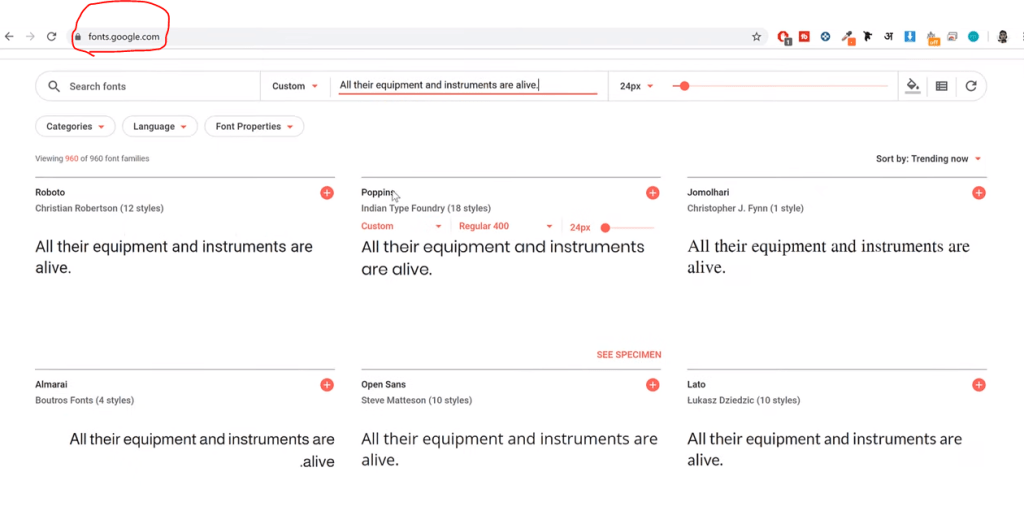
Changing the Fonts on Your WordPress Theme
Go to fonts.Google.com to see all the available fonts (well, most of them)
Open Inspect-Element – click the arrow on the top left of the window
Then, again just select the text that you want to change and this time change the font-family value to the one you want
Remember to add all the code/CSS from the window precise window that you edit on the right, to the Customize/Additional CSS panel on the left.
Using this method you can also change:
Padding & Margins Containers Background Image, Position etc. Sidebar
!Important
By adding !important to your CSS, you can ovveride all other rules relating to that element. Use this sparingly though as it will get confusing.