How Google Bot Crawls JavaScript [2025]

Ever wondered how Google turns your lovingly handcrafted website into a ranking somewhere below a Reddit thread from 2013? It’s not magic, it’s just a long queue of tiny robot librarians fetching HTML, executing JavaScript, and occasionally having nervous breakdowns when they hit your React app.

This is the life cycle of a webpage inside Google’s digestive system: crawl, render, index, panic. Let’s go step by step before your sitemap starts crying.

1. Crawling: getting the raw HTML

1.1 URL discovery & crawl queue

Googlebot first has to discover your URLs. That can happen via:

  • Links from other pages
  • XML sitemaps
  • Manual submit / “Inspect URL → Request indexing” in Search Console
  • Other Google systems (e.g. feeds, previous crawls)

Discovered URLs go into a crawl queue with priority based on things like page importance and your site’s crawl budget.

1.2 robots.txt and basic checks

Before requesting the URL, Googlebot:

  1. Fetches robots.txt
  2. Checks if the URL (and key resources like JS/CSS) are allowed
  3. Applies host load limits and crawl budget rules

If the page or important JS/CSS files are blocked in robots.txt, Google:

  • Won’t crawl them
  • Won’t be able to fully render your JS content later

Practical implication: Never block /js/, /static/, /assets/, etc. in robots.txt.

1.3 Fetching the HTML (“first wave”)

Googlebot makes a normal HTTP request (like a browser without UI):

  • Gets the initial HTML (without having run JS yet)
  • Parses head tags (title, meta description, canonical, meta robots, hreflang, etc.)
  • Extracts links from the HTML and adds them to the crawl queue
  • Notes references to resources (JS, CSS, images)

At this stage, only what’s in the raw HTML is visible. If your content is 100% client-side rendered (React, Vue, etc.), Google might see almost nothing yet.

Google can sometimes do basic indexing directly from the HTML (e.g. if content is already there), but JS-heavy pages need the next phase.


2. Rendering: running your JavaScript

Google describes the JS pipeline as: Crawling → Rendering → Indexing. Rendering happens in a separate system using an evergreen version of Chromium (a headless Chrome kept relatively up-to-date) called the Web Rendering Service.

2.1 The render queue (“second wave”)

After the initial crawl:

  1. Google adds the page to a render queue.
  2. When resources allow, that queue feeds URLs into the rendering system.
  3. Until rendering happens, Google only “knows” what was in the raw HTML.

This is why people talk about “two waves of indexing” for JavaScript:

  • Wave 1: Index from HTML (if possible)
  • Wave 2: Index updated content after JS has run

Modern research suggests the process is smoother and faster than years ago, but there is still a render queue and potential delay for JS content.

2.2 How Google’s renderer behaves

When a page reaches the renderer:

  1. Google loads it in an evergreen Chromium environment (no UI).
  2. It fetches JS, CSS, and other resources (subject to robots.txt, CORS, etc.).
  3. It executes JavaScript for a limited amount of time (shorter than a user session).
  4. JS can:
    • Modify the DOM
    • Inject content
    • Fetch JSON/XHR/data and add it to the page
    • Add structured data (application/ld+json) dynamically

Important constraints (from Google’s docs & tests):

  • No user interactions: Google doesn’t click, type, or scroll like a user.
  • Time limits: Long chains of async calls may never complete before the renderer stops.
  • Resource limits: Heavily blocking scripts or endless network calls can break rendering.
  • “Noindex = no render” effect: If a page is noindex, Google generally won’t bother rendering it.

2.3 Post-render snapshot

Once JS finishes (or time runs out), Google:

  1. Takes the final DOM snapshot (what a user would see after JS).
  2. Extracts:
    • Visible text content
    • Links added by JS (e.g. SPA navigation)
    • Structured data present in the DOM
    • Meta tags if they are changed or added by JS

This rendered snapshot is what feeds into the real indexing stage.


3. Indexing: storing & scoring the rendered content

With the rendered HTML/DOM in hand, Google moves to indexing.

3.1 Understanding the content

From the rendered DOM, Google:

  • Tokenizes and stores text (words, phrases, headings).
  • Maps entities, topics, and relationships.
  • Reads links (anchor text + target URL) added by your JS navigation.
  • Parses structured data (schema.org, etc.) that JS may have injected.

This is the version of the page that can now rank for queries matching that content.

3.2 Canonicals, duplicates & signals

Indexing also handles:

  • Canonical selection (HTML tags, redirects, link signals).
  • Duplicate / near-duplicate detection, especially if JS rewrites similar pages.
  • Applying meta robots and HTTP headers from the final state after JS (for most cases).

If Google decides another URL is the canonical, your rendered JS content might be stored but not shown as the main result.

3.3 Final result: searchable document

After indexing, the document is:

  • Stored in Google’s index with:
    • Content (from rendered DOM)
    • Links
    • Structured data
    • Various quality & relevance signals
  • Ready to be retrieved and ranked when a user searches for related queries.

4. Where JavaScript sites usually break this flow

Because JS adds extra moving parts, a bunch of things can go wrong between crawl → render → index:

  1. Blocked JS/CSS in robots.txt
    Google can’t render layout or content if the files are disallowed.
  2. Content only after interaction
    If key text appears only after a click/scroll or in a modal that never opens, Google won’t see it.
  3. Too slow or broken rendering
    Heavy JS, long waterfalls, or failing XHR calls mean the DOM never contains the content when Google takes the snapshot.
  4. Infinite scroll / SPA routing without proper URLs
    If content is loaded endlessly on one URL without crawlable links or pagination (e.g. no ?page=2, no anchor links), Googlebot may only see the initial “page”.
  5. Client-side only structured data that doesn’t materialise in time
    If JS injects JSON-LD but too slowly (or fails), rich results won’t trigger.

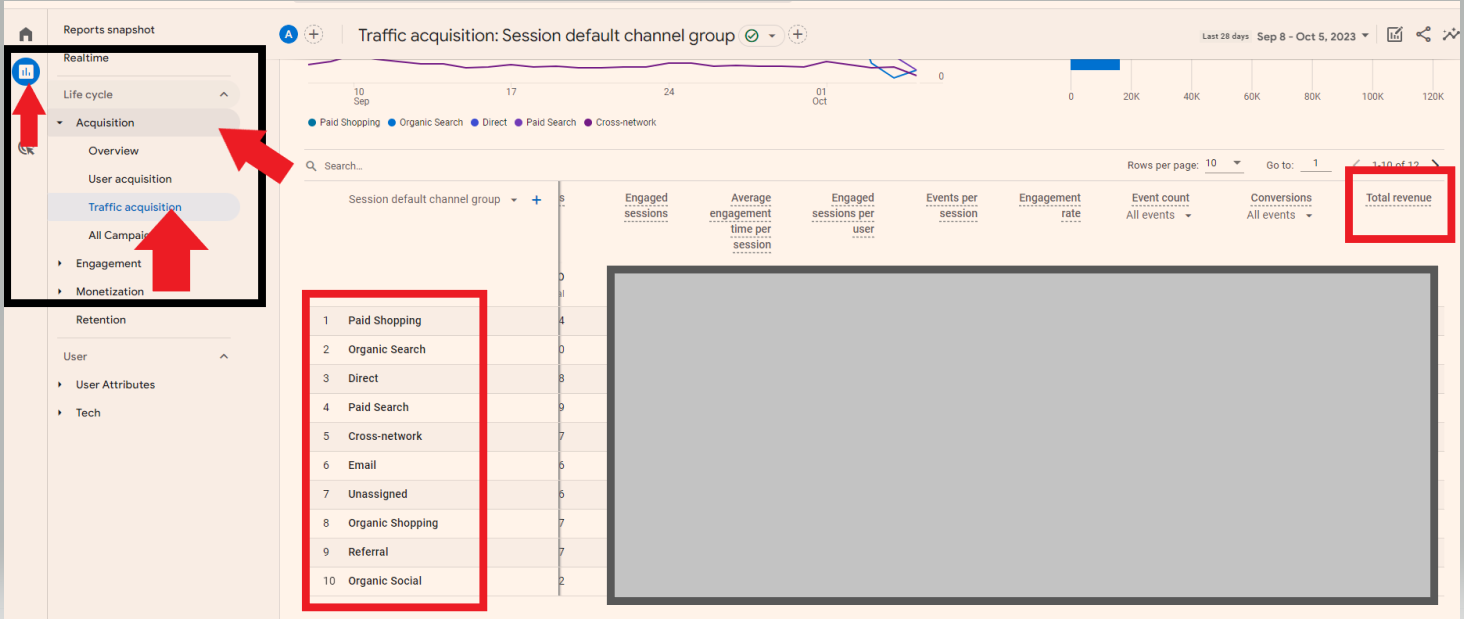
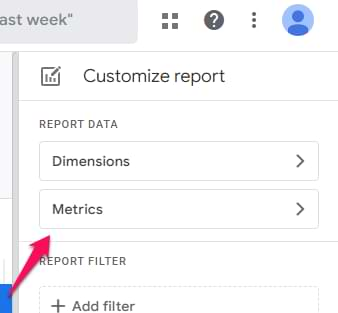
5. How to see what Google sees (JS-specific)

To understand how your JS is being processed:

  • Use URL Inspection“View crawled page” & “Screenshot” in Search Console to see the rendered DOM.
  • Compare “HTML” vs “Rendered HTML” to spot what content only appears post-JS.
  • Use “Test live URL” if you suspect render-queue delay.
  • Check Coverage / Pages report for “Crawled – currently not indexed” patterns that often show render/index issues.

So there you have it — from lazy bots fetching half your HTML to a headless Chrome pretending to be a real user for 0.3 seconds. Somewhere in that chaos, your content might actually get indexed.

If your JavaScript site isn’t showing up, don’t blame Google just yet — try unblocking your own files and giving the crawler half a chance. Think of it as SEO mindfulness: eliminate obstacles, breathe deeply, and let the bots eat your content in peace.


Explained in simpler terms – How Googlebot Crawls Javascript –

Stage 1 – Discovery & Crawling: “Finding your page and grabbing the first copy”

1. Google finds your URL

Google finds pages from things you already know:

  • Links on other sites
  • Your internal links
  • Your XML sitemap
  • Stuff you submit in Search Console

It puts those URLs in a big to-do list (crawl queue).


2. robots.txt check

Before visiting a URL, Google checks your robots.txt file:

  • If the page or important files (JS/CSS) are blocked, Google is basically told: “Don’t look here.”
  • If they’re allowed, it moves on.

Simple rule for you:
Never block your JS/CSS folders in robots.txt.


3. Google downloads the HTML (Wave 1)

Google now requests the page, just like a browser:

  • It gets the basic HTML (before any JavaScript runs).
  • From that HTML it grabs:
    • Title, meta description, canonical, meta robots, etc.
    • Any plain text that’s already there
    • Links to other pages
    • Links to JS/CSS/images

At this point, Google has not run your JavaScript yet.

If your important content is already in the HTML (e.g. server-side rendered), Google can often index it right away from this “first wave”.


Stage 2 – Rendering: “Actually running your JavaScript”

Now Google needs to know what your page looks like after JS runs – like a real user would see it.

Because this is heavy work, Google doesn’t do it instantly for every URL.

4. Render queue (waiting line)

After the first crawl, JavaScript pages go into a render queue:

  • Think of it like: “We’ve saved the HTML. When we have time, we’ll come back and run the JS.”

So for a while, Google might only know the bare HTML version of your page.


5. Headless Chrome renders the page

When your page reaches the front of the queue, Google loads it in something like Chrome without a screen (headless browser).

This browser:

  • Downloads JS/CSS (if not blocked)
  • Executes the JS for a short amount of time
  • Lets JS:
    • Change the DOM (the page structure)
    • Insert more text
    • Add more links
    • Inject structured data (JSON-LD)

Then it takes a snapshot of the final page – the “after JS” version.

This is basically:

“What a user would see if they opened your page and waited a bit.”


6. Things that can go wrong here

This is where JS sites often break:

  • Blocked JS/CSS → Google can’t see the layout or content properly.
  • Very slow JS → content appears after Google stops waiting.
  • Content only after a click/scroll → Google doesn’t usually click buttons or scroll like a human.
  • Broken scripts / errors → content never appears at all.

Result: Google’s snapshot may miss your main content.


Stage 3 – Indexing: “Filing your page in the library”

Now Google has:

  • Version 1: HTML-only (first wave)
  • Version 2: Rendered DOM (after JS runs)

7. Understanding the rendered page

From the rendered snapshot Google:

  • Reads all the visible text
  • Sees headings and structure
  • Follows any extra links added by JS
  • Reads structured data (schema)
  • Applies canonical tags / meta robots, etc.

This updated information is used to update your page in the index (second wave).


8. Search results

When someone searches:

  1. Google looks through its index of pages (which contains that rendered version).
  2. It decides which pages are most relevant.
  3. It shows your URL in the results.
  4. When the user clicks it, they go to your live site, not to Google’s stored copy.

Quick “JS SEO” checklist for you

If you remember nothing else, remember these:

  1. Can I see my main content in the raw HTML?
    • If yes → you’re mostly safe (e.g. SSR or hybrid).
    • If no → you’re relying heavily on rendering; be extra careful.
  2. Are JS & CSS allowed in robots.txt?
    • They should be.
  3. Does important content require a click/scroll?
    • Try to have key text and links visible without interaction, or use proper URLs for loaded content.
  4. Is the page reasonably fast?
    • If it takes ages for content to appear, Google may bail before seeing it.
  5. Use Search Console’s URL Inspection → “View crawled page”
    • Compare:
      • HTML Google saw
      • Rendered HTML
    • If you don’t see your text in the rendered version → that’s a problem.

Google Analytics 4 Tutorial (GA4 Benefits & Useful Reports) [Updated June 2023]

TLDR;

Useful report 1 – Traffic and Revenue by Channel

Reports – Acquisition – Traffic Acquisition – see channels and revenue – Scroll right to see revenue column in table:

Useful Report 2 – Browser & Device

Reports – User – Tech – Tech details – Add filter for Device:

GA 4 device and browser report

Useful Report 3 – Organic Landing Page Report in GA 4:

Reports – Acquisition – Engagement – Pages and screens –
Add a filter by clicking top right “+” button
Search for “session” and choose session default channel group – exactly matches – Organic search:

Useful Report 4 – Conversion Rate

Check out this post from Analytics Mania

Reports – Life Cycle – Engagement – Pages and SCreens:

GA4 uses events for bloody everything.

You’ll need to set up one type of events – conversions, whilst others are set up for you.

Benefits of GA 4 Include:

  • You can track across app and website
  • Visualise buyer journeys easier
  • Easier to customise reports
  • BigQuery Exports
  • You can ask questions and get quick answers (in the search box at the top)

Things to note:

“bounce rate” in GA4 – is the opposite of engagement rate. So if engagement rate in GA4 is 60%, then bounce rate is 40%

Find Engagement rate in REPORTS > Acquisition > Traffic acquisition

You can add a filter (top left of screen – by the page title) – to filter to specific pages

GA4 Home screen

The home screen gives you a summary or snap shot of your websites performance.

On the top right are real time stats

On the second row, you have recently viewed reports

Below is “insights”, which help you interpret the data

Reports

Reports tab gives a number of prebuilt reports:

Lifecycle Reports

-Acquisition

Where visitors are coming from

-Engagement

What people are doing on the site

-Monetization

What people are buying (on eCommerce sites)

-Demographics and tech

Shows you stuff like visitor age, and what device they are using

EXPLORE SECTION

in this area you can create lots of visuals and insightful reports

ADVERTISING SECTION

purely for Google ads reports

CONFIGURATION SECTION

in the configure section, you can mark events as conversions, create audiences , set up custom dimensions and metrics, and access the debug view to test you’ve implemented stuff correctly.

Useful reports

Traffic sources – where are your visitors coming from, and where are the best visitors coming from

Reports- Acquisition > traffic acquisition

“Engaged traffic” an engaged session = been on your site more than 10 seconds, or visited 2 or more pages or converted

the traffic acquisition report let’s you see how engaged different source s of traffic are. For example, you can compare organic engagement rate vs paid ads.

in the Event Count, and conversions columns, you can click and choose from a dropdown menu which conversions you want to populate the data in the table.

EXPLORE

Explore GA4

A good report to start out with in the explore section, is traffic sources.

Click “Free Form” to start.

On the default table, close the geo column by closing “town/city” on the left side of the screen

Go to DIMENSIONS on the left, click the +

Search for “default channel group” and tick the check box and click “IMPORT”

drag default channel grouping, into the rows area.

Now, for eCommerce, you’ll want to know the value each channel is bringing

On the left side, under VALUES, you’ll want to add transactions (scroll down to see VALUES, it’s below COLUMNS).

EXPLORE > FREE FROM

you can add country and other dimensions to the columns, and see which traffic source from which country (or town or something), drives the most value in terms of purchases or form submissions.

To learn more and isolate a channel, right click and select “include only selected”

for any referral traffic report, you can click the + above DIMENSIONS and search for and select “source”. You can then see which websites are referring the highest quality traffic

click the + icons to search for variables:

PATH EXPLORATION

see how people are journeying through you site

note “screens” is referring to mobile apps

e.g. the pages and screens report, “screens” refers to mobile apps

Useful premade reports:

REPORTING > ENGAGEMENT > PAGES AND SCREENS

“Scrolls” is an event that occurs when a user scrolls past 90% of the page

pretty much everything is an event, so event reports aren’t great. For example, exiting a website is an event.

to make thus report a bit better, we want “engagement rate” added to the table.

  • click the pencil icon in

REPORTS – Snapshot

You can add comparisons, by clicking “Add comparison +” at the top, or by clicking the “edit comparisons” icon which is near the top right:

REAL TIME

Real time reports are from the last 30 minutes (it was 5 mins in GA universal)

You can also add comparisons on realtime reports

ACQUISITION OVERVIEW

These report, show traffic sources that bring visitors to your site

“You can use the User acquisition report to get insights into how new users find your website or app for the first time. The report differs from the Traffic acquisition report, which focuses on where new sessions came from, regardless of whether the user is new or returning.”

source – Google

In the traffic acquisition report, if a user comes from organic search, and then later from paid search, both those sessions will show in the traffic acquisition report, but only organic would should in the User Acquisition report.

ENGAGEMENT

Events – you will see automatic events, like “scroll”, and custom events that you have implemented.

Conversions – “more important events” are conversions – like a purchase. These need to be configured manually.

Pages and Screens – see what people are doing on which pages. “Screens” is a term for mobile apps.

MONETIZATION

Needs sales tracking implemented.

You can see most popular proucts that have sold, how much revenue has been generated etc.

User Retention – Show how many users come back to the site. Don’t trust the data 100% due to cookies being blocked or expiring.

One more thing

You can filter reports by using the search box:

Also – Check out this GA4 course from Analytics Mania

Google Ads Reporting Script

This script is no longer live, but I had it in my account, I’m pasting it here for safekeeping and future reference as it is pretty handy:

to use the script:

Change the Google sheet/doc URL and the email address

  • Sign into Google Ads
  • Click on “Tools & Settings” on the top menu near the right hand side
  • Click “scripts”
  • Click the addition (+) sign to add a new script
  • Paste in the below script – save – preview and then run

// Copyright 2015, Google Inc. All Rights Reserved.
//
// Licensed under the Apache License, Version 2.0 (the "License");
// you may not use this file except in compliance with the License.
// You may obtain a copy of the License at
//
//     http://www.apache.org/licenses/LICENSE-2.0
//
// Unless required by applicable law or agreed to in writing, software
// distributed under the License is distributed on an "AS IS" BASIS,
// WITHOUT WARRANTIES OR CONDITIONS OF ANY KIND, either express or implied.
// See the License for the specific language governing permissions and
// limitations under the License.

/**
 * @name Account Summary Report
 *
 * @overview The Account Summary Report script generates an at-a-glance report
 *     showing the performance of an entire Google Ads account. See
 *     https://developers.google.com/google-ads/scripts/docs/solutions/account-summary
 *     for more details.
 *
 * @author Google Ads Scripts Team [adwords-scripts@googlegroups.com]
 *
 * @version 1.1
 *
 * @changelog
 * - version 1.1
 *   - Add user-updateable fields, and ensure report row ordering.
 * - version 1.0.4
 *   - Improved code readability and comments.
 * - version 1.0.3
 *   - Added validation for external spreadsheet setup.
 * - version 1.0.2
 *   - Fixes date formatting bug in certain timezones.
 * - version 1.0.1
 *   - Improvements to time zone handling.
 * - version 1.0
 *   - Released initial version.
 */

var RECIPIENT_EMAIL = 'drewgriffiths@live.com';

var SPREADSHEET_URL = 'https://docs.google.com/spreadsheets/d/1mNjc7iJWOIq580DMLf6rYKT8xRAcl2MynnGSY29UiXY/edit#gid=3';

/**
 * Configuration to be used for running reports.
 */
var REPORTING_OPTIONS = {
  // Comment out the following line to default to the latest reporting version.
  apiVersion: 'v201809'
};

/**
 * To add additional fields to the report, follow the instructions at the link
 * in the header above, and add fields to this variable, taken from the Account
 * Performance Report reference:
 * https://developers.google.com/adwords/api/docs/appendix/reports/account-performance-report
 */
var REPORT_FIELDS = [
  {columnName: 'Cost', displayName: 'Cost'},
  {columnName: 'AverageCpc', displayName: 'Avg. CPC'},
  {columnName: 'Ctr', displayName: 'CTR'},
  {columnName: 'Impressions', displayName: 'Impressions'},
  {columnName: 'Clicks', displayName: 'Clicks'}
];

function main() {
  Logger.log('Using spreadsheet - %s.', SPREADSHEET_URL);
  var spreadsheet = validateAndGetSpreadsheet();
  spreadsheet.setSpreadsheetTimeZone(AdsApp.currentAccount().getTimeZone());
  spreadsheet.getRangeByName('account_id_report').setValue(
      AdsApp.currentAccount().getCustomerId());

  var yesterday = getYesterday();
  var date = getFirstDayToCheck(spreadsheet, yesterday);

  var rows = [];
  var existingDates = getExistingDates();

  while (date.getTime() <= yesterday.getTime()) {
    if (!existingDates[date]) {
      var row = getReportRowForDate(date);
      rows.push([new Date(date)].concat(REPORT_FIELDS.map(function(field) {
        return row[field.columnName];
      })));
      spreadsheet.getRangeByName('last_check').setValue(date);
    }
    date.setDate(date.getDate() + 1);
  }

  if (rows.length > 0) {
    writeToSpreadsheet(rows);

    var email = spreadsheet.getRangeByName('email').getValue();
    if (email) {
      sendEmail(email);
    }
  }
}

/**
 * Retrieves a lookup of dates for which rows already exist in the spreadsheet.
 *
 * @return {!Object} A lookup of existing dates.
 */
function getExistingDates() {
  var spreadsheet = validateAndGetSpreadsheet();
  var sheet = spreadsheet.getSheetByName('Report');

  var data = sheet.getDataRange().getValues();
  var existingDates = {};
  data.slice(5).forEach(function(row) {
    existingDates[row[1]] = true;
  });
  return existingDates;
}

/**
 * Sorts the data in the spreadsheet into ascending date order.
 */
function sortReportRows() {
  var spreadsheet = validateAndGetSpreadsheet();
  var sheet = spreadsheet.getSheetByName('Report');

  var data = sheet.getDataRange().getValues();
  var reportRows = data.slice(5);
  if (reportRows.length) {
    reportRows.sort(function(rowA, rowB) {
      if (!rowA || !rowA.length) {
        return -1;
      } else if (!rowB || !rowB.length) {
        return 1;
      } else if (rowA[1] < rowB[1]) {
        return -1;
      } else if (rowA[1] > rowB[1]) {
        return 1;
      }
      return 0;
    });
    sheet.getRange(6, 1, reportRows.length, reportRows[0].length)
        .setValues(reportRows);
  }
}

/**
 * Append the data rows to the spreadsheet.
 *
 * @param {Array<Array<string>>} rows The data rows.
 */
function writeToSpreadsheet(rows) {
  var access = new SpreadsheetAccess(SPREADSHEET_URL, 'Report');
  var emptyRow = access.findEmptyRow(6, 2);
  if (emptyRow < 0) {
    access.addRows(rows.length);
    emptyRow = access.findEmptyRow(6, 2);
  }
  access.writeRows(rows, emptyRow, 2);
  sortReportRows();
}

function sendEmail(email) {
  var day = getYesterday();
  var yesterdayRow = getReportRowForDate(day);
  day.setDate(day.getDate() - 1);
  var twoDaysAgoRow = getReportRowForDate(day);
  day.setDate(day.getDate() - 5);
  var weekAgoRow = getReportRowForDate(day);

  var html = [];
  html.push(
    '<html>',
      '<body>',
        '<table width=800 cellpadding=0 border=0 cellspacing=0>',
          '<tr>',
            '<td colspan=2 align=right>',
              "<div style='font: italic normal 10pt Times New Roman, serif; " +
                  "margin: 0; color: #666; padding-right: 5px;'>" +
                  'Powered by Google Ads Scripts</div>',
            '</td>',
          '</tr>',
          "<tr bgcolor='#3c78d8'>",
            '<td width=500>',
              "<div style='font: normal 18pt verdana, sans-serif; " +
              "padding: 3px 10px; color: white'>Account Summary report</div>",
            '</td>',
            '<td align=right>',
              "<div style='font: normal 18pt verdana, sans-serif; " +
              "padding: 3px 10px; color: white'>",
               AdsApp.currentAccount().getCustomerId(), '</h1>',
            '</td>',
            '</tr>',
          '</table>',
          '<table width=800 cellpadding=0 border=0 cellspacing=0>',
            "<tr bgcolor='#ddd'>",
              '<td></td>',
              "<td style='font: 12pt verdana, sans-serif; " +
                  'padding: 5px 0px 5px 5px; background-color: #ddd; ' +
                  "text-align: left'>Yesterday</td>",
              "<td style='font: 12pt verdana, sans-serif; " +
                  'padding: 5px 0px 5px 5px; background-color: #ddd; ' +
                  "text-align: left'>Two Days Ago</td>",
              "<td style='font: 12pt verdana, sans-serif; " +
                  'padding: 5px 0px 5x 5px; background-color: #ddd; ' +
                  "text-align: left'>A week ago</td>",
            '</tr>');
  REPORT_FIELDS.forEach(function(field) {
    html.push(emailRow(
        field.displayName, field.columnName, yesterdayRow, twoDaysAgoRow,
        weekAgoRow));
  });
  html.push('</table>', '</body>', '</html>');
  MailApp.sendEmail(email, 'Google Ads Account ' +
      AdsApp.currentAccount().getCustomerId() + ' Summary Report', '',
      {htmlBody: html.join('\n')});
}

function emailRow(title, column, yesterdayRow, twoDaysAgoRow, weekAgoRow) {
  var html = [];
  html.push('<tr>',
      "<td style='padding: 5px 10px'>" + title + '</td>',
      "<td style='padding: 0px 10px'>" + yesterdayRow[column] + '</td>',
      "<td style='padding: 0px 10px'>" + twoDaysAgoRow[column] +
          formatChangeString(yesterdayRow[column], twoDaysAgoRow[column]) +
          '</td>',
      "<td style='padding: 0px 10px'>" + weekAgoRow[column] +
          formatChangeString(yesterdayRow[column], weekAgoRow[column]) +
          '</td>',
      '</tr>');
  return html.join('\n');
}


function getReportRowForDate(date) {
  var timeZone = AdsApp.currentAccount().getTimeZone();
  var dateString = Utilities.formatDate(date, timeZone, 'yyyyMMdd');
  return getReportRowForDuring(dateString + ',' + dateString);
}

function getReportRowForDuring(during) {
  var report = AdsApp.report(
      'SELECT ' +
          REPORT_FIELDS
              .map(function(field) {
                return field.columnName;
              })
              .join(',') +
          ' FROM ACCOUNT_PERFORMANCE_REPORT ' +
          'DURING ' + during,
      REPORTING_OPTIONS);
  return report.rows().next();
}

function formatChangeString(newValue,  oldValue) {
  var x = newValue.indexOf('%');
  if (x != -1) {
    newValue = newValue.substring(0, x);
    var y = oldValue.indexOf('%');
    oldValue = oldValue.substring(0, y);
  }

  var change = parseFloat(newValue - oldValue).toFixed(2);
  var changeString = change;
  if (x != -1) {
    changeString = change + '%';
  }

  if (change >= 0) {
    return "<span style='color: #38761d; font-size: 8pt'> (+" +
        changeString + ')</span>';
  } else {
    return "<span style='color: #cc0000; font-size: 8pt'> (" +
        changeString + ')</span>';
  }
}

function SpreadsheetAccess(spreadsheetUrl, sheetName) {
  this.spreadsheet = SpreadsheetApp.openByUrl(spreadsheetUrl);
  this.sheet = this.spreadsheet.getSheetByName(sheetName);

  // what column should we be looking at to check whether the row is empty?
  this.findEmptyRow = function(minRow, column) {
    var values = this.sheet.getRange(minRow, column,
        this.sheet.getMaxRows(), 1).getValues();
    for (var i = 0; i < values.length; i++) {
      if (!values[i][0]) {
        return i + minRow;
      }
    }
    return -1;
  };
  this.addRows = function(howMany) {
    this.sheet.insertRowsAfter(this.sheet.getMaxRows(), howMany);
  };
  this.writeRows = function(rows, startRow, startColumn) {
    this.sheet.getRange(startRow, startColumn, rows.length, rows[0].length).
        setValues(rows);
  };
}

/**
 * Gets a date object that is 00:00 yesterday.
 *
 * @return {Date} A date object that is equivalent to 00:00 yesterday in the
 *     account's time zone.
 */
function getYesterday() {
  var yesterday = new Date(new Date().getTime() - 24 * 3600 * 1000);
  return new Date(getDateStringInTimeZone('MMM dd, yyyy 00:00:00 Z',
      yesterday));
}

/**
 * Returned the last checked date + 1 day, or yesterday if there isn't
 * a specified last checked date.
 *
 * @param {Spreadsheet} spreadsheet The export spreadsheet.
 * @param {Date} yesterday The yesterday date.
 *
 * @return {Date} The date corresponding to the first day to check.
 */
function getFirstDayToCheck(spreadsheet, yesterday) {
  var last_check = spreadsheet.getRangeByName('last_check').getValue();
  var date;
  if (last_check.length == 0) {
    date = new Date(yesterday);
  } else {
    date = new Date(last_check);
    date.setDate(date.getDate() + 1);
  }
  return date;
}

/**
 * Produces a formatted string representing a given date in a given time zone.
 *
 * @param {string} format A format specifier for the string to be produced.
 * @param {date} date A date object. Defaults to the current date.
 * @param {string} timeZone A time zone. Defaults to the account's time zone.
 * @return {string} A formatted string of the given date in the given time zone.
 */
function getDateStringInTimeZone(format, date, timeZone) {
  date = date || new Date();
  timeZone = timeZone || AdsApp.currentAccount().getTimeZone();
  return Utilities.formatDate(date, timeZone, format);
}

/**
 * Validates the provided spreadsheet URL to make sure that it's set up
 * properly. Throws a descriptive error message if validation fails.
 *
 * @return {Spreadsheet} The spreadsheet object itself, fetched from the URL.
 */
function validateAndGetSpreadsheet() {
  if ('YOUR_SPREADSHEET_URL' == SPREADSHEET_URL) {
    throw new Error('Please specify a valid Spreadsheet URL. You can find' +
        ' a link to a template in the associated guide for this script.');
  }
  var spreadsheet = SpreadsheetApp.openByUrl(SPREADSHEET_URL);
  var email = spreadsheet.getRangeByName('email').getValue();
  if ('foo@example.com' == email) {
    throw new Error('Please either set a custom email address in the' +
        ' spreadsheet, or set the email field in the spreadsheet to blank' +
        ' to send no email.');
  }
  return spreadsheet;
}

Bob’s your uncle

The code was originally on the Google Developer’s site here – https://developers.google.com/adwords/scripts/docs/solutions/ad-performance

Please Google, don’t bankrupt me for using the script on here! I’ll take it down if it upsets thee.

Advanced SEO Technical Audit Template- 2023 [Downloadable Excel Checklist]

The idea of technical SEO is to minimise the work of bots when they come to your website to index it on Google and Bing. Look at the build, the crawl and the rendering of the site.

To get started:

  • Crawl with Screaming Frog with “Text” Rendering – check all the structured data options so you can check schema (under Configuration – Spider – Extraction)
  • Crawl site with Screaming Frog with “JavaScript” rendering also in a separate or second crawl
  • Don’t crawl the sitemap.xml

This allows you to compare the JS and HTML crawls to see if JS rendering is required to generate links, copy etc.

  • Download the sitemap.xml – import into Excel – you can then check sitemap URLs vs crawl URLs.
  • Check “Issues” report under Bulk Export menu for both crawls

Also download or copy and paste sitemap URLs into Screaming Frog in list mode – check they all result in 200 status

Full template in Excel here – https://businessdaduk.com/wp-content/uploads/2023/10/seo-tech-audit-template-12th-october-2023.xlsx

Schema Checking Google Sheet here

Hreflang sheet here (pretty unimpressive sheet to be honest)

Tools Required:

  • SEO Crawler such as Screaming Frog or DeepCrawl
  • Log File Analyzer – Screaming Frog has this too
  • Developer Tools – such as the ones found in Google Chrome – View>Developer>Developer Tools
  • Web Developer Toolbar – giving you the ability to turn off Javascript
  • Search Console
  • Bing Webmaster Tools – shows you geotargetting behaviour, gives you a second opinion on security etc.
  • Google Analytics – With onsite search tracking *

    *Great for tailoring copy and pages. Just turn it on and add query parameter

Summary:

Perform a crawl with Screaming Frog – In Configuration – Crawl – Rendering – Crawl once with Text only and once with JavaScript

Check indexation with site: searches including:

site:example.com -inurl:www

site:*.example.com -inurl:www

site:example.com -inurl:https

Search screaming frog crawl – for “http:” on the “internal” tab – to find any unsecure URLs

*Use a chrome plug in to disable JS and CSS*

Check pages with JS and CSS disabledAre all the page elements visible? Do Links work?

Configuration Checks

Check all the prefixes – http, https and www redirect (301) to protocol your using – e.g. https://www.

Does trailing slash added to URL redirect back to original URL structure?

Is there a 404 page?

Robots & Sitemap

Is Robots.txt present?

Is sitemap.xml present? (and in the sitemap)

Is Sitemap Submitted in S.C.?

X-robots present?

Are all the sitemaps naming conventions in lower case?

Are the URLs correct in the sitemap – correct domain and correct URL structure?

Do sitemap URLs all 200? (including images)
List Mode in Screaming Frog – “Upload” – Download sitemap – “ok”

For site migrations check – Old sitemap and Crawl Vs New – For example, Magento 1 website sitemap vs Magento 2 – anything missing or added – what are status codes?


Status Codes – any 404s or redirects in SCreaming Frog crawl?

Rendering Check – Screaming Frog – also check pages with JS and CSS disable. Check links are present and work

Are HTML Links and H1s in the rendered HTML – check URL Inspection in Search Console or Mobile Friendly text?

Do pages work with JS disabled – links and images visible etc?

What hreflang links are present on the site?

Schema – Check all schema reports in Screaming Frog for errors

Sitemap Checks
Are crawl URLs missing from the sitemap? (check sitemap Vs crawl URLs that 200 and are “indexable”

Site: scrape
How many pages are indexed?

Do all the scraped URLs result in a 200 status code?

H1s
Are any duplicate H1s?
Are any pages missing H1s?
Any multiple H1s?

Images
Are any images missing alt text?
Are any images too big in terms of KB?

Canonicals
Are there any non-indexable canonical URLs?

Check canonical URLs aren’t in the server header using http://www.rexswain.com/httpview.html or https://docs.google.com/spreadsheets/d/1A2GgkuOeLrthMpif_GHkBukiqjMb2qyqqm4u1pslpk0/edit#gid=617917090
More info here – https://www.oncrawl.com/technical-seo/http-headers-and-seo/

Are any canonicals canonicalised?
e.g. pages with different canonicals that arent simples/config products

URL structure Errors

Meta Descriptions
Are any meta descriptions too short?
Are anymeta descriptions too long?
Are any meta descriptions duplicated?

Meta Titles
Are any meta titles too short?
Are anymeta titles too long?
Are any meta titles duplicated?

Robots tags blocking any important pages?

Menu
Is the menu functioning properly?

Pagination
Functioning fine for UX?
Canonical to root page?


Check all the issues in the issues report in Screaming Frog

PageSpeed Checks
Lighthouse – check homepage plus 2 other pages

GTMetrix

pingdom

Manually check homepage, listing page, product page for speed

Dev Tools Checks (advanced)
Inspect main elements – are they visible in the inspect window? e.g. right click and inspect the Headings – check has meta title and desc
Check on mobile devices
Check all the elements result in a 200 – view the Network tab

Console tab – refresh page – what issues are flagged?
Unused JS in the elements tab – coverage

other Checks

Has redirect file been put in place?
Have hreflang tags for live sites been added?
Any meta-refresh redirects!?


Tech SEO 1 – The Website Build & Setup

The website setup – a neglected element of many SEO tech audits.

  • Storage
    Do you have enough storage for your website now and in the near future? you can work this out by taking your average page size (times 1.5 to be safe), multiplied by the number of pages and posts, multiplied by 1+growth rate/100

for example, a site with an average page size of 1mb with 500 pages and an annual growth rate of 150%

1mb X 1.5 X 500 X 1.5 = 1125mb of storage required for the year.

You don’t want to be held to ransom by a webhost, because you have gone over your storage limit.

  • How is your site Logging Data?
    Before we think about web analytics, think about how your site is storing data.
    As a minimum, your site should be logging the date, the request, the referrer, the response and the User Agent – this is inline with the W3 Extended Format.
log file analyzer

When, what it was, where it came from, how the server responded and whether it was a browser or a bot that came to your site.

  • Blog Post Publishing
    Can authors and copywriters add meta titles, descriptions and schema easily? Some websites require a ‘code release’ to allow authors to add a meta description.
  • Site Maintenance & Updates – Accessibility & Permissions
    Along with the meta stuff – how much access does each user have to the code and backend of a website? How are permissions built in?
    This could and probably should be tailored to each team and their skillset.

    For example, can an author of a blog post easily compress an image?
    Can the same author update a menu (often not a good idea)
    Who can access the server to tune server performance?

Tech SEO 2 – The Crawl

  • Google Index

Carry out a site: search and check the number of pages compared to a crawl with Screaming Frog.

With a site: search (for example, search in Google for site:businessdaduk.com) – don’t trust the number of pages that Google tells you it has found, scrape the SERPs using Python on Link Clump:

Too many or too few URLs being indexed – both suggest there is a problem.

  • Correct Files in Place – e.g. Robots.txt
    Check these files carefully. Google says spaces are not an issue in Robots.txt files, but many coders and SEOers suggest this isn’t the case.

XML sitemaps also need to be correct and in place and submitted to search console. Be careful with the <lastmod> directive, lots of websites have lastmod but don’t update it when they update a page or post.

  • Response Codes
    Checking response codes with a browser plugin or Screaming Frog works 99% of the time, but to go next level, try using curl and command line. Curl avoids JS and gives you the response header.

Type in Curl – I and then the URL

e.g.

curl – I https://businessdaduk.com/

You need to download cURL which can be a ball ache if you need IT’s permission etc.

Anyway, if you do download it and run curl, your response should look like this:

Next enter an incorrect URL and make sure it results in a 404.

  • Canonical URLs
    Each ‘resource’ should have a single canonical address.

common causes of canonical issues include – sharing URLs/shortened URLs, tracking URLs and product option parameters.

The best way to check for any canonical issues is to check crawling behaviour and do this by checking log files.

You can check log files and analyse them, with Screaming Frog – the first 1,000 log files can be analysed with the free version (at time of writing).

Most of the time, your host will have your logfiles in the cPanel section, named something like “Raw Access”. The files are normally zipped with gzip, so you might need a piece of software to unzip them or just allow you to open them – although often you can still just drag and drop the files into Screaming Frog.

The Screaming Frog log file analyser, is a different download to the SEO site crawler – https://www.screamingfrog.co.uk/log-file-analyser/

If the log files are in the tens of millions, you might need to go next level nerd and use grep in Linux command line

Read more about all things log file analysis-y on Ian Lurie’s Blog here.

This video tutorial about Linux might also be handy. I’ve stuck it on my brother’s old laptop. Probably should have asked first.

With product IDs, and other URL fragments, use a # instead of a ? to add tracking.

Using rel-canonical is a hint, not a directive. It’s a work around rather than a solution.

Remember also, that the server header, can override a canonical tag.

You can check your server headers using this tool – http://www.rexswain.com/httpview.html (at your own risk like)


Tech SEO 3 – Rendering & Speed

  • Lighthouse
    Use lighthouse, but use in with command line or use it in a browser with no browser add-ons.If you are not into Linux, use pingdom, GTMetrix and Lighthouse, ideally in a browser with no add-ons.

    Look out for too much code, but also invalid code. This might include things such as image alt tags, which aren’t marked up properly – some plugins will display the code just as ‘alt’ rather than alt=”blah”
  • Javascript
    Despite what Google says, all the SEO professionals that I follow the work of, state that client-side JS is still a site speed problem and potential ranking factor. Only use JS if you need it and use server-side JS.

    Use a browser add-on that lets you turn off JS and then check that your site is still full functional.

  • Schema

Finally, possibly in the wrong place down here – but use Screaming Frog or Deepcrawl to check your schema markup is correct.

You can add schema using the Yoast or Rank Math SEO plugins

The Actual Tech SEO Checklist (Without Waffle)

Basic Setup

  • Google Analytics, Search Console and Tag Manager all set up

Site Indexation

  • Sitemap & Robots.txt set up
  • Check appropriate use of robots tags and x-robots
  • Check site: search URLs vs crawl
  • Check internal links pointing to important pages
  • Check important pages are only 1 or 2 clicks from homepage

Site Speed

Tools – Lighthouse, GTMetrix, Pingdom

Check – Image size, domain & http requests, code bloat, Javascript use, optimal CSS delivery, code minification, browser cache, reduce redirects, reduce errors like 404s.

For render blocking JS and stuff, there are WordPress plugins like Autoptimize and the W3 Total Cache.

Make sure there are no unnecessary redirects, broken links or other shenanigans going on with status codes. Use Search Console and Screaming Frog to check.

Site UX

Mobile Friendly Test, Site Speed, time to interactive, consistent UX across devices and browsers

Consider adding breadcrumbs with schema markup.

Clean URLs

Image from Blogspot.com

Make sure URLs – Include a keyword, are short – use a dash/hyphen –

Secure Server HTTPS

Use a secure server, and make sure the unsecure version redirects to it

Allow Google to Crawl Resources

Google wants to crawl your external CSS and JS files. Use “Fetch as Google” in Search Console to check what Googlebot sees.

Hreflang Attribute

Check that you are using and implementing hreflang properly.

Tracking – Make Sure Tag Manager & Analytics are Working

Check tracking is working properly. You can check tracking coed is on each webpage with Screaming Frog.

Internal Linking

Make sure your ‘money pages’ or most profitable pages, get the most internal links

Content Audit

Redirect or unpublish thin content that gets zero traffic and has no links. **note on this, I had decent content that had no visits, I updated the H1 with a celebrity’s name and now it’s one of my best performing pages – so it’s not always a good idea to delete zero traffic pages**

Consider combining thin content into an in depth guide or article.

Use search console to see what keywords your content ranks for, what new content you could create (based on those keywords) and where you should point internal links.

Use Google Analytics data regarding internal site searches for keyword and content ideas 💡

Update old content

Fix meta titles and meta description issues – including low CTR

Find & Fix KW cannibalization

Optimize images – compress, alt text, file name

Check proper use of H1 and H2

See what questions etc. are pulled through into the rich snipetts and answer these within content

Do you have EAT? Expertise, Authority and Trust?

https://www.semrush.com/blog/seo-checklist/

You can download a rather messy Word Doc Template of my usual SEO technical checklist here:

https://businessdaduk.com/wp-content/uploads/2021/11/drewseotemplate.docx

You can also download the 2 Excel Checklists below:

https://businessdaduk.com/wp-content/uploads/2022/07/teechnicalseo_wordpresschecklist.xlsx

https://businessdaduk.com/wp-content/uploads/2022/07/finalseochecks.xlsx

Another Advanced SEO Template in Excel

It uses Screaming Frog, SEMRush and Search Console

These tools (and services) are pretty handy too:
https://tamethebots.com/tools

How to Scrape Google SERPs (No Coding)

Add the Chrome Extension – Linkclump – https://chrome.google.com/webstore/detail/linkclump/lfpjkncokllnfokkgpkobnkbkmelfefj?hl=en

Go to the options in Linkclump – click “Edit” in the “Actions” section

Change to Copy links to Clipboard instead of open in new Tabs

Do your search

Zoom out to see more results

Change Google settings to see 100 results per page

Hold down Z and click and drag over results

Paste into a google sheet