CSS styles can be passed down to “children”, that is elements that are contained within an element.
For example, below, <body> has the children of “heading” or “H1” and “paragraph” or “p”.
<body>
 <h1>heading</h1>
 <p>paragraph</p>
<body>
If we add a style to the body, and there are not specific styles added to the H1 or the <p> elements, they will “inherit” the style from <body>
<style>
 body {
 color: red;
 }
</style>
If the above code is added our webpage (or in a linked-to CSS sheet), and there is no specific styles given for the heading or paragraph, they will both be red.
CSS Grid allows you to layout items in 2 dimensions. It is similar to Flexbox but in 2D, instead of 1D (apparently).
You have a grid container, like in Flexbox. It is like a square perimeter around all the items or elements.
Grid has lines or tracks between the elements.
Getting Started with CSS Grid
You’ll want a code editor thingy, like Sublime Text, Visual Studio or if you’re old school, Notepad.
The easiest way to do this is to use codepen, but if you have Visual Studio, that’s ideal as you can test your code in real time.
Unless your using inline styles, you’ll want to create an HTML doc and a separate CSS sheet.
Getting started
If you want to follow along, you’ll want to add the <HTML> tags to declare you’re created a webpage with HTML, and add a <head>, a page title in <title> </title> tags and a <body> to add your content.
You should then save the HTML doc as something like “index.html”, just make sure it has .HTML at the end of the name.
In a separate doc/sheet, create your style sheet and save it as “styles.css”
You can then link to/connect your HTML doc to your CSS sheet in the <head> of the HTML doc with the code in bold:
The video should start at the grid template areas section:
Grid Alignment
Works similar to flexbox when it comes to aligning items.
justify-content: center;
justify-content: center; will place all the items in the middle of the page
Centred Grid
To place the content to the left:
justify-content: start;
justify-content: space-evenly;
Space-evenly, will spread the grid items evenly across the page:
*Everyone tends to use divs, but according to W3 (the internet police) you should be using divs as a last resort. More info here
Instead of <div class =classname>, you could for example, use <article class=”classname”> or <section class = “classname”>
***Remember to add specific styles to the .grid-container in the CSS sheet, and text-specific styles, such as text-align, in the grid.item styles section***
E.g. put this in the .grid-item styles, not the .grid-container:
Let’s say you have made a grid, with 6 items, but you want the first one to be different to the rest. Probably the easiest way to achieve this, is to add a “.grid-item-1” styles section, below the CSS you’ve created for the rest of the grid items.
If you use the W3 try it yourself tool, remember to click “Run” on the top left, as the code doesn’t update real time.
css grid equal height rows
If you add the value/property thing in CSS, to the .grid-container section of the CSS (assuming you’ve named the class of your container .grid-container) to “grid-auto-rows: 1fr;” – then all the rows should be equal height. Or you could just set the heights to 100px each
I’ve made some notes on how to use the Inspect Element Tool – AKA Chrome Developer Tools.
Sorry about the change in layout for the images, I drafted this post on various computers and devices and used different software to annotate the screenshots.
The main thing that I use inspect element for at the moment, is to work out what’s cuasing
To launch Inspect Element right click and from the drop-down menu that appears, click “Inspect” at the bottom.
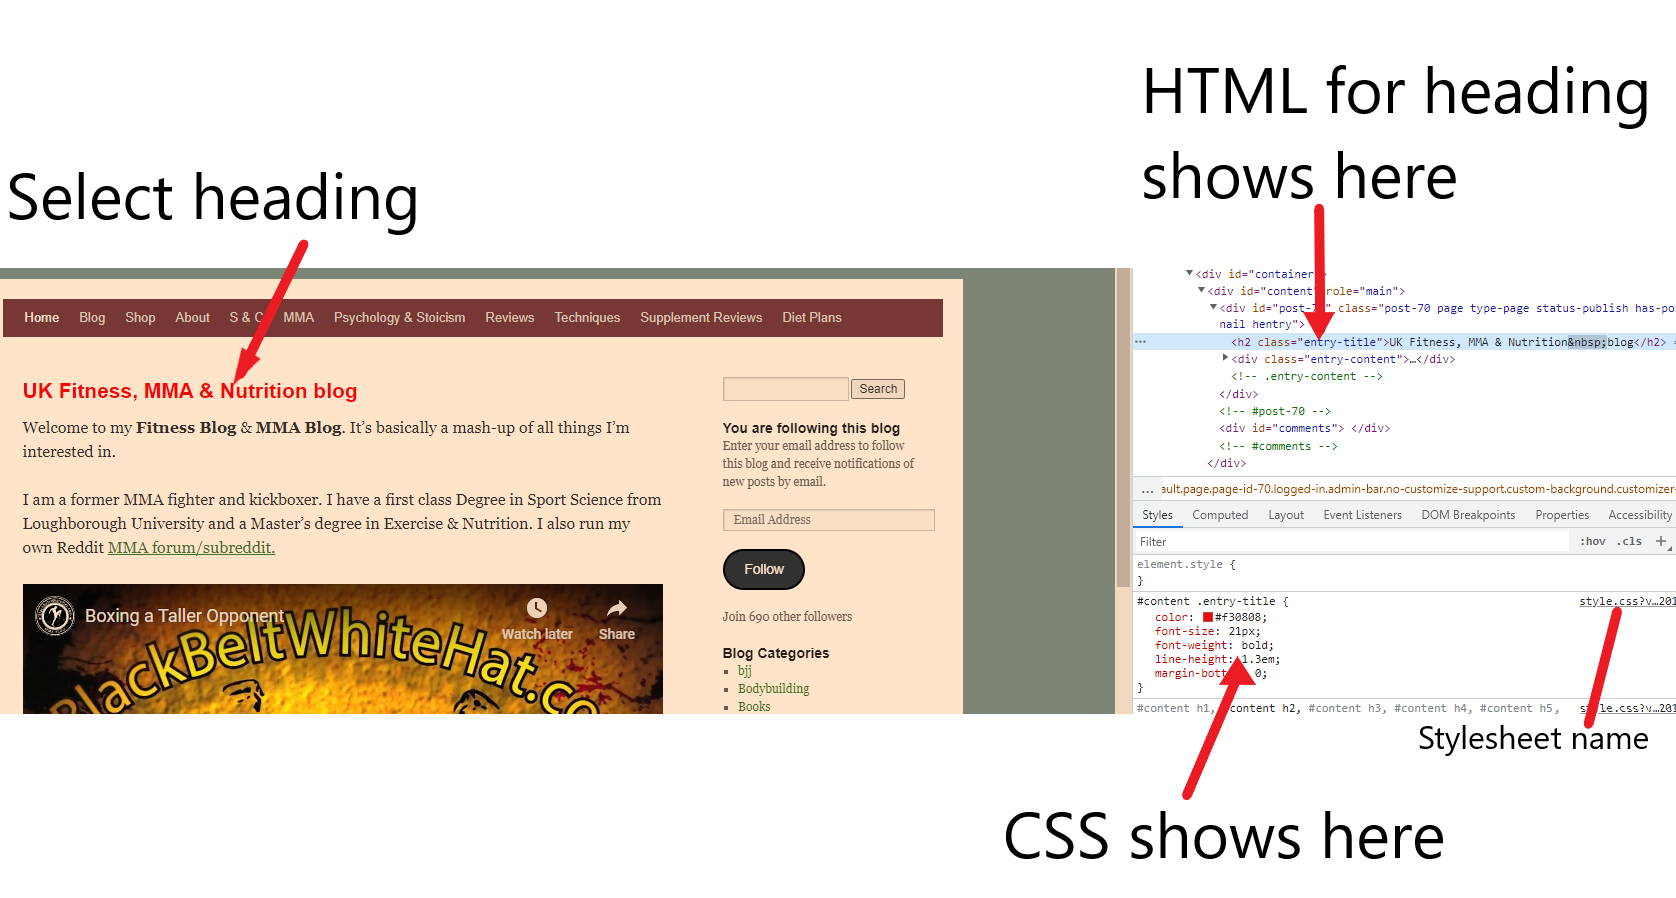
When you hover over any element, such as a H1 in the inspect-window, the element will also be highlighted in the view of the webpage.
The small horizontal bar shows the location of the element you’re hovering over or selected
Elements > Styles Tab
The styles tab, shows you the styles, or CSS for any element you’re hovering over on the webpage.
You can turn styles off and on, using the check box
on the opposite side of the style, it shows the location, or path of the CSS file
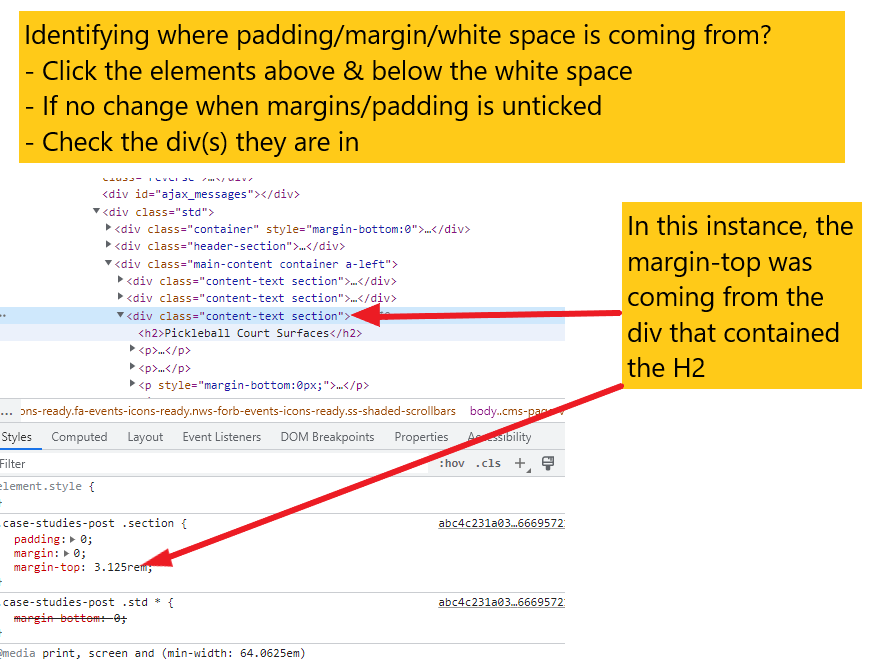
I use this tab a lot to find out where spacing i.e. margins and padding is coming from – if it’s not from the individual element, that I can click on the container (usually a “div) and check the marings and padding values on that.
You can also turn CSS styles on and off – a checkbox will appear next to each style when you hover over it
Right click – copy element – and you can paste headers, images etc into another location on the page
You can click & drag elements too
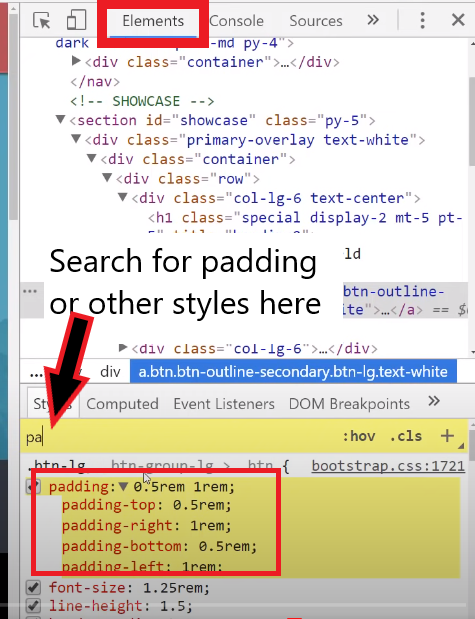
You can also search for specific styles using the box shown below:
-Computed Styles Tab
Computed styles, are the result of all the CSS in the Styles tab.
You can also clock the + icon to the right of .click, to add a new style to the elements tab. Remember to copy the css if you want to keep itz or you’ll lose it when you refresh the page.
You can use the horizontal box near the middle to search for styles and elements
– Forced Element State
With the Forced Element State menu open, you can tick different boxes and check how an element appears – for example a link, when it’s been clicked, or hovered over with the mouse.
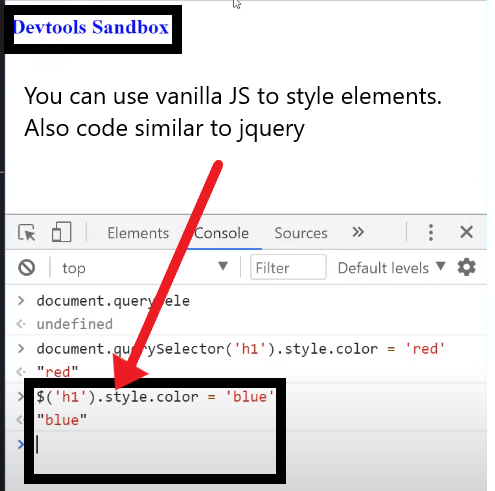
– Console Tab
I’ve never got my head around this tab, but here goes.
In the console tab, you can see all the Javascript and console log messages
Can use it to check code is working, for example any “if/else” code, you can check which “option” your code took
You can also see error messages
According to one of the tutorials I’ve read, this works best when running a code tool like Visual Studio. You can link up Visual Studio and test out your Javascript code real time.
Refresh the page whilst you have the Console Tab open, you can check the console tab for any error messages
You’ll likely get a load of error messages if you have an Ad Blocker extension
You’ll get warnings and “violation” messages in yellow if you are using out of date frameworks or libraries e.g. JS
The “no entry” icon will clear the console messages
The two Youtube tutorial below, should start at the sections talking about the Console tab:
You can run your own JS in the console tab. For example type “alert(1)” and click enter, you’ll get a pop up with the text “1” within it
If you type in code, the line below will usually give you the return value. E.g. if you type “1+3” the return value will be “4”
“undefined” means there is no return value
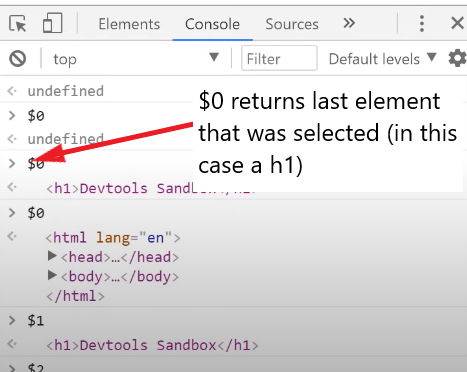
$0 will return the last item you selected, $1 returns the second to last item you selected, $2 the third to last, etc.
Editing HTML in Visual Studio or another Code Editor
You can also type code into the “webpage window” to the left, in this example:
**You will probably have to refresh the page to see the code output if you don’t have a visual studio plugin**
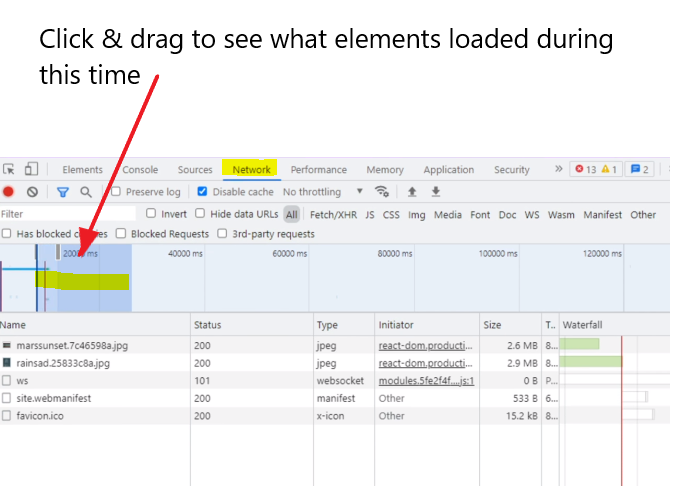
Network Tab
In this tab, you can see every element, and when it has been loaded
Using the “time bar” at the top, you can click and drag over different time periods and see what loaded.
For example, you can see what took the longest to load
You may have to refresh the page for this to work ‘properly’
Sources Tab
In the sources tab, you can navigate different files related to the webpage.
If you are on the homepage, clicking “index” will show you all the HTML code
It’s good for trying to fix code without editing to source files
Hello, I’m having another go at learning code. I’m an SEO Executive but have been coding quite a few of our SEO-related pages in my day job.
Plan is to do courses on Udemy, then create a blog post about them and do an example. I’ll probably have to do the example on Codepen as I can’t embed code in the free WP blog.
CSS selectors, are used in CSS style sheets to determine what styles to apply to what HTML elements.
In Line CSS (bit chavvy)
You can apply CSS inline – i.e. just add it onto an HTML element
e.g. <H1 style = "margin-bottom 0px;"
CSS in Script Tags
You can add it, somewhere on the HTML doc within <style> </style> tags
<html>
<head>
<style>
  h1 {color:red;}
  p {color:blue;}
</style>
</head>
CSS in an external Style Sheet
Usually the best solution, is to create a separate Style Sheet
To do this you need a line of code (or markup) linking the HTML doc to the CSS sheet.
For example, if you save and name your stylesheet as styles.css:
Best practice is to put all your styles in a separate stylesheet. Dunno why, just go with it for now.
If you put your CSS in script tags, or in a stylesheet, you’ll need to use Bo selectors.
Imagine you’re a parent.
HTML elements are your kids
The CSS style sheet are the instructions you’re giving to the baby-sitter on how to look after your kids.
Great analogy, I know.
You can be an overprotective, bit of a bellend of a parent and use inline CSS to give you micro-management and control over your kids, but you generally don’t want to do that.
Types of CSS Selectors
ID & Class selectors are the most commonly used. Class selectors for sure. But I’ve listed class selectors second, just to be annoying.
ID selectors
Id selectors use a hashtag, like Twitter but it’s not full of political wankers and Chinese bots – #
Use these selectors sparingly, class selectors usually work better/are preferred.
If you run the codepen below, hopefully you’ll see that I’ve selected only the first ID, and made it blue
ID selectors are specific and therefore override more general selectors
Class Selectors
The most commonly used type of selector
very versatile
Well supported in most browsers – probably all browsers except for like IE 6
You can add multiple classes to an HTML element, so you can style it multiple ways with a class selector
If you run the pen below, you should see the first class coloured pink
Tag Selectors
HTML tags like <h1> and <p> can be targeted directly with tag selectors
Tag selectors are sometimes used to unset styles that browsers set by default
Tag selectors are not so popular. Stick with class selectors if possible.
Just type the name of the tag e.g. H2 and then open curly brackets, add style and close brackets
Attribute Selectors
The value within your HTML tags is called an attribute
You can target them directly with CSS attribute selectors
Positional Selectors
– Decent type of selector when trying to style individual elements of a list or div – To style the second item on a list – prefix the CSS with “li”:
The code in bold – is for adding a horizontal scroll bar. If a table is too wide on mobile, the scroll bar let’s users slide it across and view all the table’s info and columns
The code in italics – these are “in-house” CSS classes, that probably won’t work or do anything in your code.
Add the number of columns to this bit of code near the top:
<th colspan=”4”
This is how the above code should look when published: